> ## Documentation Index
> Fetch the complete documentation index at: https://docs.thinkrr.ai/llms.txt
> Use this file to discover all available pages before exploring further.
# Abilities & Actions
> Inbound Agents in the thinkrr.ai Voice AI platform aren’t just virtual assistants — they’re fully functional AI receptionists equipped with built-in decision-making and response mechanisms. These agents can book meetings, transfer calls, notify reps, and access structured information using Knowledge Packs. This guide walks through how to configure and deploy each action.
## Overview
Inbound Agents in **thinkrr Voice AI** are more than voice bots — they’re AI receptionists that can handle real conversations and take meaningful action in real time. You can configure each agent with a set of **built-in abilities** such as:
* **Real-Time Appointment Booking**
* **Live Call Transfers**
* **Internal Rep Notifications**
* **CRM Smart Actions** (tags + workflow automation)
* **Knowledge Pack Referencing** (account-wide)
Each ability is optional and fully customizable, allowing you to tailor the agent’s behavior based on your business logic — whether it’s lead capture, sales routing, appointment scheduling, or support triage.
> 💡 **Why it matters:**\
> With configurable actions and shared memory via Knowledge Packs, you can create scalable AI workflows that respond intelligently to caller intent — just like a trained human assistant.
## Where to Configure Agent Actions
To access the action settings:
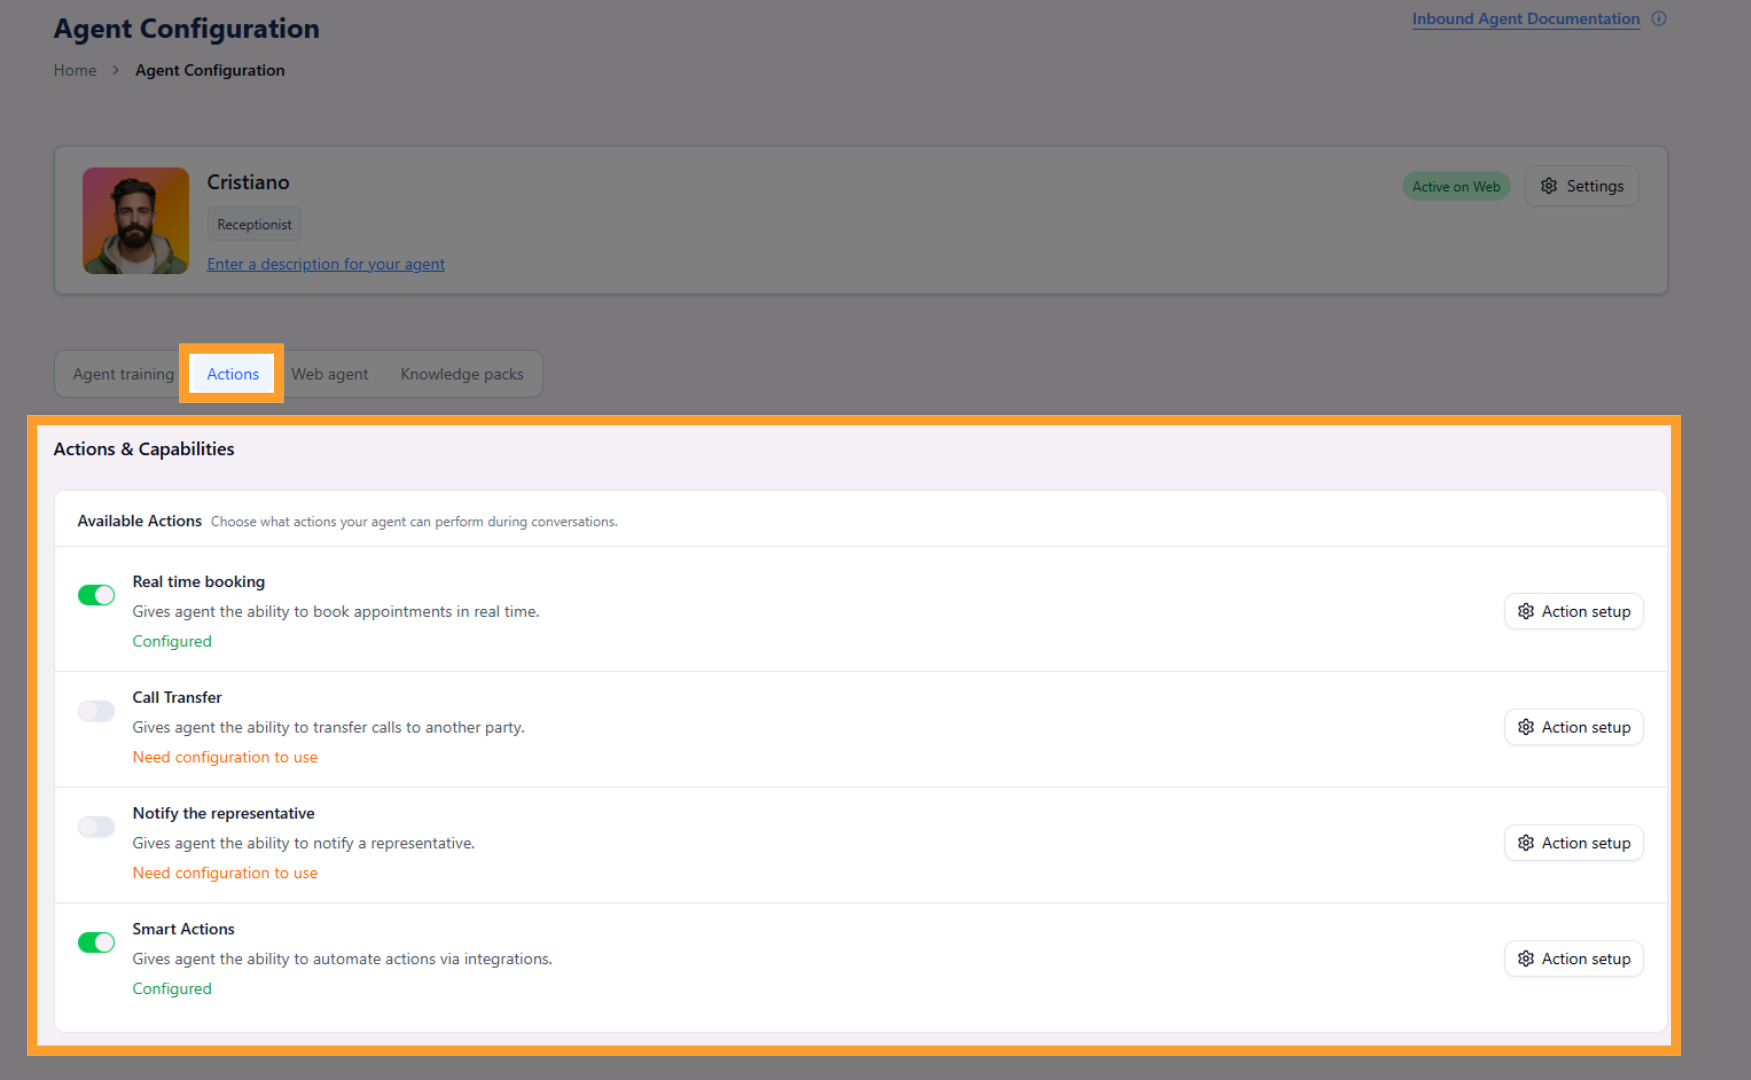
1. Open your **thinkrr dashboard** and select any Inbound Agent.
2. In the **Agent Configuration** screen, select the **Actions** tab .
3. Stop at the section titled **“What actions can the agent take?”**
Each action is shown as a **toggle switch**. Turning a toggle **on** will open a side panel where you can configure the logic and setup for that action. Configurations are **retained even if toggles are later turned off**, making it easy to update or re-enable features at any time.
 ***
## Real-Time Appointment Booking
This ability allows your AI agent to book calendar appointments on your behalf during live phone or web widget calls using connected **GHL Round Robin calendars**.
**How to Configure:**
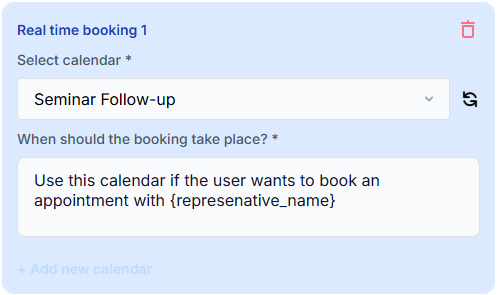
* Toggle **Real-Time Booking** on
* Choose a **calendar** from the list
* Set **conditions** for when the booking should happen (e.g. only if caller qualifies)
* Define fallback messages if no times are available
***
## Real-Time Appointment Booking
This ability allows your AI agent to book calendar appointments on your behalf during live phone or web widget calls using connected **GHL Round Robin calendars**.
**How to Configure:**
* Toggle **Real-Time Booking** on
* Choose a **calendar** from the list
* Set **conditions** for when the booking should happen (e.g. only if caller qualifies)
* Define fallback messages if no times are available
 **Notes:**
* Works only with **GHL Round Robin calendars**
* Supports up to **10 calendar connections per agent**
* Timezone alignment is required for accurate scheduling
* Testing requires a **real phone call or Web Agent** — test calls won’t trigger bookings
***
## Call Transfer
This ability allows the AI to transfer a caller to another phone number — this can be a human, another AI agent, or a routing number.
**How to Configure:**
* Toggle **Call Transfer** on
* Enter the **phone number** to transfer to
* Add a **handoff message** to explain the transfer
* Define **trigger logic** (e.g. after caller requests to speak to someone)
* Multiple call transfers can be set up with unique hours and conditions. If two conditions are true at once, the system prioritizes the first configuration in the list.
**Notes:**
* Works only with **GHL Round Robin calendars**
* Supports up to **10 calendar connections per agent**
* Timezone alignment is required for accurate scheduling
* Testing requires a **real phone call or Web Agent** — test calls won’t trigger bookings
***
## Call Transfer
This ability allows the AI to transfer a caller to another phone number — this can be a human, another AI agent, or a routing number.
**How to Configure:**
* Toggle **Call Transfer** on
* Enter the **phone number** to transfer to
* Add a **handoff message** to explain the transfer
* Define **trigger logic** (e.g. after caller requests to speak to someone)
* Multiple call transfers can be set up with unique hours and conditions. If two conditions are true at once, the system prioritizes the first configuration in the list.
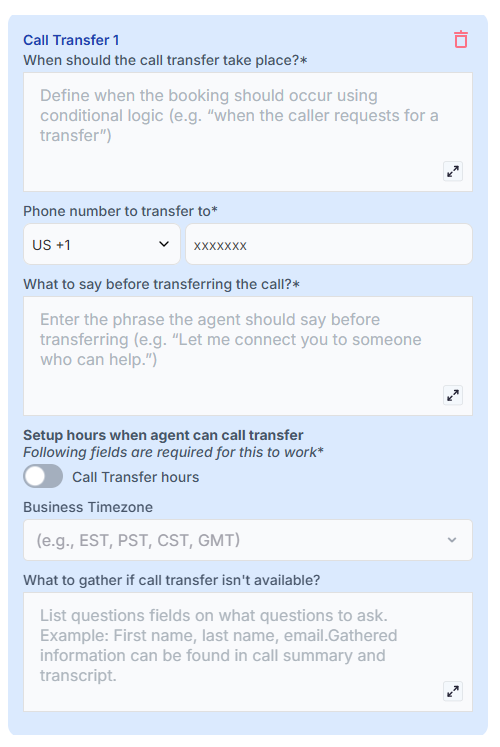 * You can configure **business/availability hours** for inbound call transfers to avoid disruptive off-hour transfers (e.g., 3 AM calls).
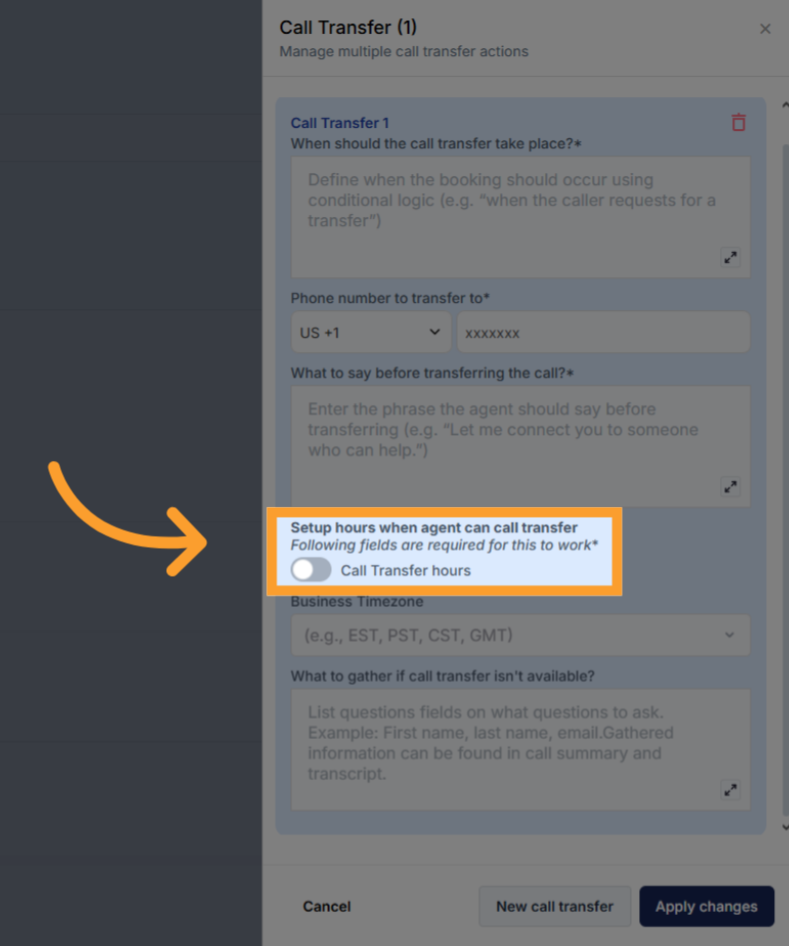 * Select your timezone and select the days of the week and customize the hours for each day. After customizing one day, use **Copy All** to apply the same hours across all days, if you wish.
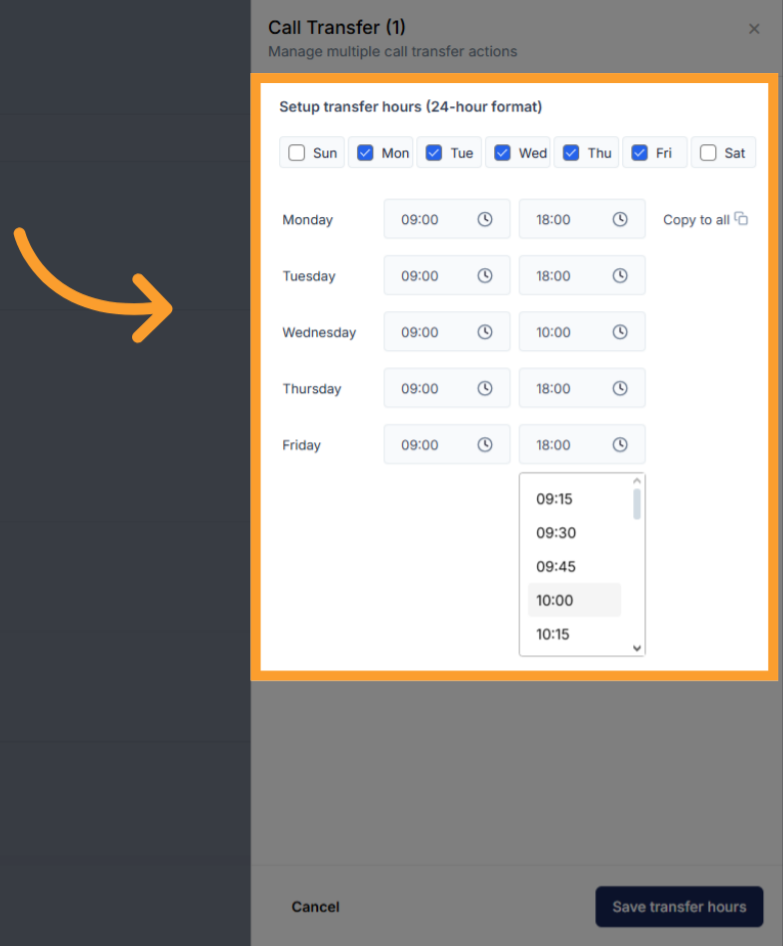 Outside configured hours, the agent will offer alternatives such as taking a message or sending an email.
**Notes:**
* **Only works during phone calls**, not Web Agent sessions
* Call recordings **end** at the moment of transfer for compliance reasons
* Transfers can be stacked — you can create **multi-agent handoffs**
* Transfer behavior respects the **configured hours** and **order of precedence**
***
## Notify the Representative
This feature sends an **internal summary email** after each call to up to **10 team members**. It’s a useful tool for updating staff or handing off leads after qualification.
**How to Configure:**
* Toggle **Notify the Rep** on
* Add one or more **internal email addresses**
* Done — no further configuration required
Outside configured hours, the agent will offer alternatives such as taking a message or sending an email.
**Notes:**
* **Only works during phone calls**, not Web Agent sessions
* Call recordings **end** at the moment of transfer for compliance reasons
* Transfers can be stacked — you can create **multi-agent handoffs**
* Transfer behavior respects the **configured hours** and **order of precedence**
***
## Notify the Representative
This feature sends an **internal summary email** after each call to up to **10 team members**. It’s a useful tool for updating staff or handing off leads after qualification.
**How to Configure:**
* Toggle **Notify the Rep** on
* Add one or more **internal email addresses**
* Done — no further configuration required
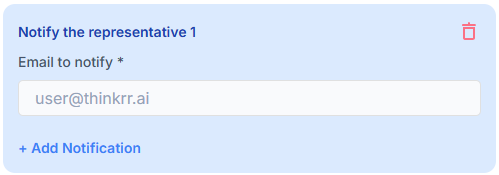 Each email includes:
* Caller name and number
* Time of call
* Agent name
* Call summary
* Call sentiment
* Transcript
* Call recording link
> ⚠️ This is for **internal use only**. Do not use it to send confirmation emails to customers. If you wish to notify the client of a meeting, use your dedicated CRM with a personalized email template and notification.
***
## Smart Actions (CRM Automation)
Smart Actions allow your agent to automatically trigger CRM follow-up steps inside GoHighLevel after a call ends. This applies to both inbound agents and outbound campaigns.
This is ideal for lead capture, pipeline updates, and launching workflows without manual effort.
**How to Configure:**
* Toggle **Smart Actions** on
* Ensure your GoHighLevel CRM connection is active
* Select which actions should run when the call is complete
Each email includes:
* Caller name and number
* Time of call
* Agent name
* Call summary
* Call sentiment
* Transcript
* Call recording link
> ⚠️ This is for **internal use only**. Do not use it to send confirmation emails to customers. If you wish to notify the client of a meeting, use your dedicated CRM with a personalized email template and notification.
***
## Smart Actions (CRM Automation)
Smart Actions allow your agent to automatically trigger CRM follow-up steps inside GoHighLevel after a call ends. This applies to both inbound agents and outbound campaigns.
This is ideal for lead capture, pipeline updates, and launching workflows without manual effort.
**How to Configure:**
* Toggle **Smart Actions** on
* Ensure your GoHighLevel CRM connection is active
* Select which actions should run when the call is complete
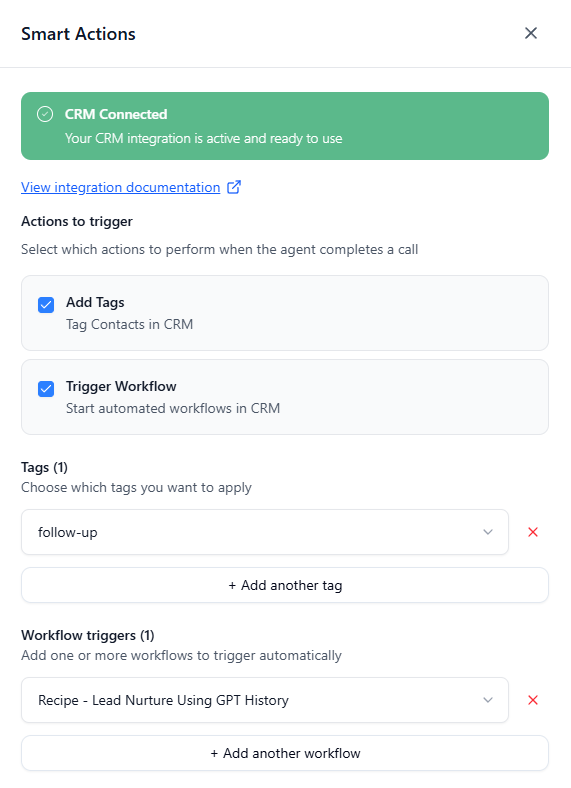 ### Actions You Can Trigger
Once enabled, Smart Actions support:
* **Add Tags**
* Automatically apply one or more GoHighLevel tags after a caller interacts with your agent
* Tags must already exist inside GoHighLevel
* **Trigger Workflow**
* Automatically start one or more published GoHighLevel workflows after the call ends
* Workflows must be published before they appear in the selection list
> ⚠️ **Important**
>
> If you trigger workflows using Smart Actions, do not use **Inbound Agent Call** or **AI Voice Studio Smart Trigger** as the workflow trigger inside GoHighLevel.
>
> Otherwise, the workflow may run twice.
Smart Actions are ideal for automatically tagging inbound leads and launching CRM workflows immediately after an agent interaction.
***
## Custom Field Extraction
Custom Field Extraction allows your agent to capture structured data from each call and store it against the contact's record inside thinkrr. You define the fields you want — lead score, service type, insurance ID, qualification status, or any other data point relevant to your business — and the agent extracts that information from the conversation automatically.
Extracted data is available for review, filtering, and reporting from the call record. If a CRM destination is mapped, the value is written directly to the matching GoHighLevel contact-level custom field.
This action is available for both inbound agents and outbound campaigns.
From the left sidebar, click **Profile Settings** at the bottom of the navigation.
### Actions You Can Trigger
Once enabled, Smart Actions support:
* **Add Tags**
* Automatically apply one or more GoHighLevel tags after a caller interacts with your agent
* Tags must already exist inside GoHighLevel
* **Trigger Workflow**
* Automatically start one or more published GoHighLevel workflows after the call ends
* Workflows must be published before they appear in the selection list
> ⚠️ **Important**
>
> If you trigger workflows using Smart Actions, do not use **Inbound Agent Call** or **AI Voice Studio Smart Trigger** as the workflow trigger inside GoHighLevel.
>
> Otherwise, the workflow may run twice.
Smart Actions are ideal for automatically tagging inbound leads and launching CRM workflows immediately after an agent interaction.
***
## Custom Field Extraction
Custom Field Extraction allows your agent to capture structured data from each call and store it against the contact's record inside thinkrr. You define the fields you want — lead score, service type, insurance ID, qualification status, or any other data point relevant to your business — and the agent extracts that information from the conversation automatically.
Extracted data is available for review, filtering, and reporting from the call record. If a CRM destination is mapped, the value is written directly to the matching GoHighLevel contact-level custom field.
This action is available for both inbound agents and outbound campaigns.
From the left sidebar, click **Profile Settings** at the bottom of the navigation.
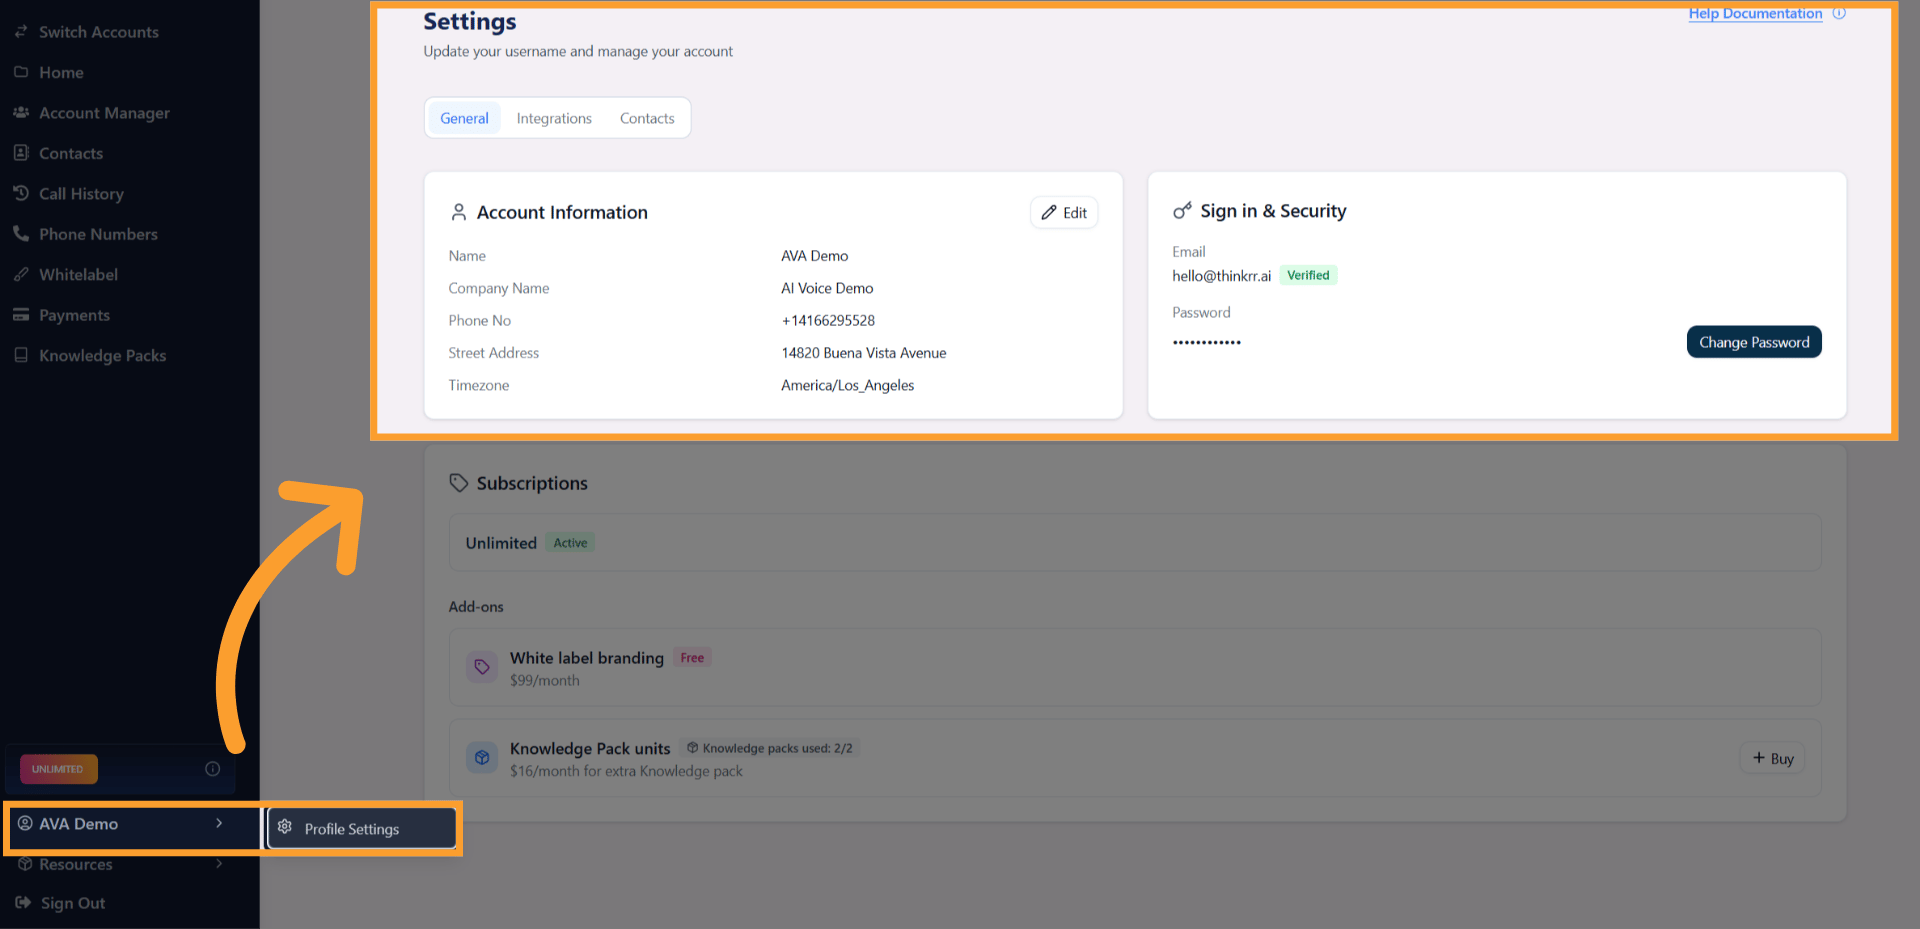 Click the **Contacts** tab. You will see the **Custom Fields** section, which lists all fields defined for this sub-account. You can create up to **50 fields** and organize them into groups using **Manage Groups**.
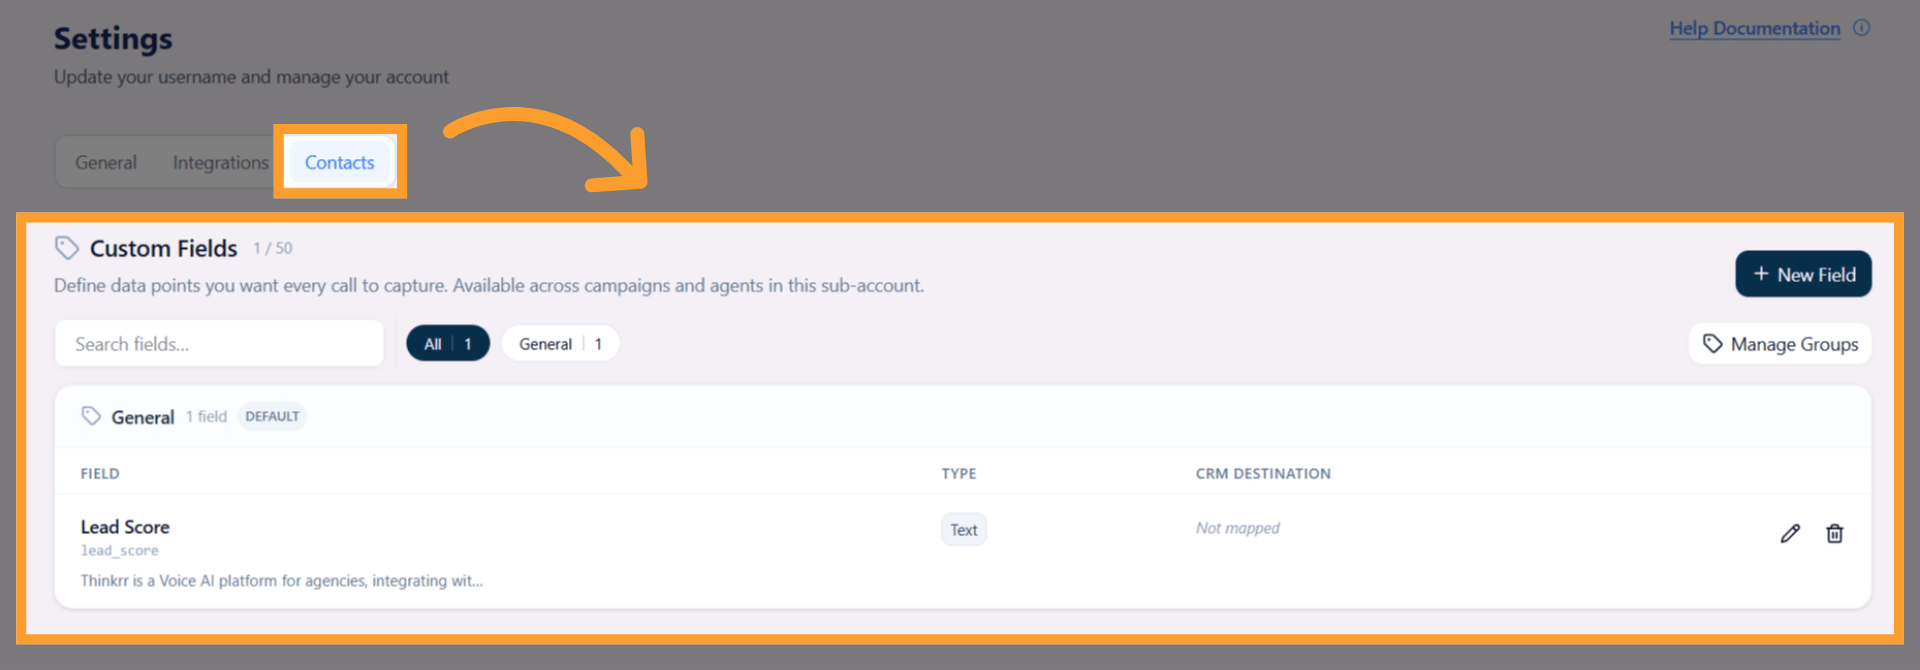 Click **+ New Field** to open the field creation modal. Fill in the following:
* **Name** — A label for the field (e.g. "Lead Score", "Insurance ID", "Service Type"). The system key is generated automatically.
* **Type** — The data format to capture: Text, Multiline Text, Number, Date, or Phone Number.
* **Group** — Assign the field to an organizational group (defaults to General).
* **Extraction Prompt** — Describe what the agent should extract from the call for this field. This is the default prompt and can be overridden per agent or campaign inside the action setup.
* **CRM Destination** *(optional)* — Map this field to a GoHighLevel contact-level custom field. When mapped, extracted values sync automatically to the contact record in GHL after the call.
Click **Create field** to save.
Click **+ New Field** to open the field creation modal. Fill in the following:
* **Name** — A label for the field (e.g. "Lead Score", "Insurance ID", "Service Type"). The system key is generated automatically.
* **Type** — The data format to capture: Text, Multiline Text, Number, Date, or Phone Number.
* **Group** — Assign the field to an organizational group (defaults to General).
* **Extraction Prompt** — Describe what the agent should extract from the call for this field. This is the default prompt and can be overridden per agent or campaign inside the action setup.
* **CRM Destination** *(optional)* — Map this field to a GoHighLevel contact-level custom field. When mapped, extracted values sync automatically to the contact record in GHL after the call.
Click **Create field** to save.
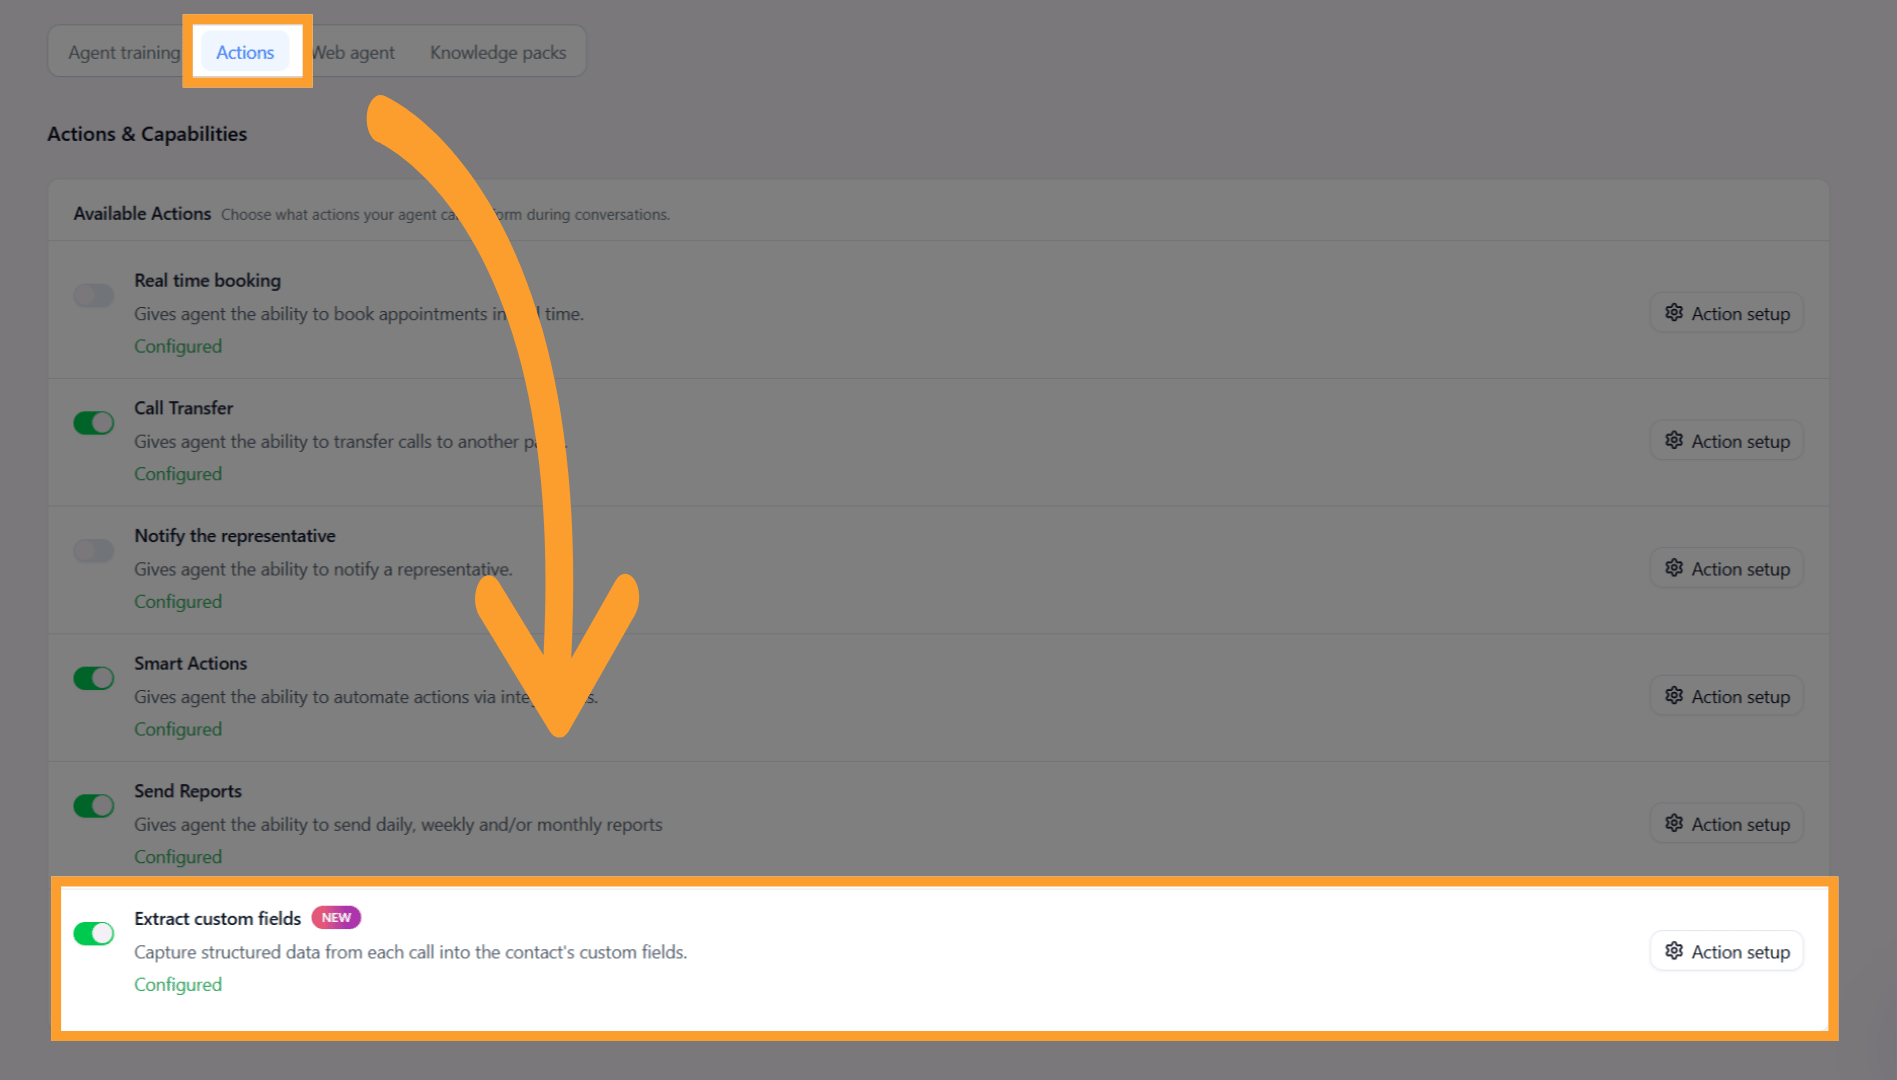
 Open your inbound agent or outbound campaign and navigate to the **Actions** tab. Locate **Extract custom fields** in the list of available actions.
Toggle **Extract custom fields** on, then click **Action setup**.
Open your inbound agent or outbound campaign and navigate to the **Actions** tab. Locate **Extract custom fields** in the list of available actions.
Toggle **Extract custom fields** on, then click **Action setup**.
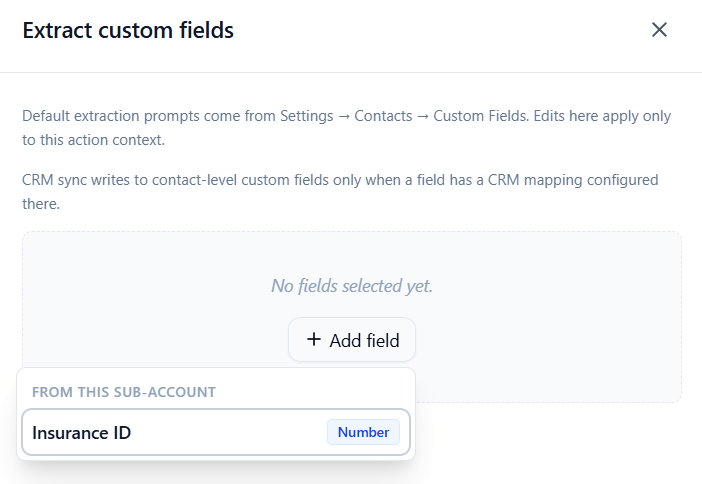
 Click **+ Add field** and select the fields you want this agent or campaign to extract. You can edit the extraction prompt for each field here — changes apply only to this agent or campaign and do not affect the global field definition.
Click **Save** to apply.
Click **+ Add field** and select the fields you want this agent or campaign to extract. You can edit the extraction prompt for each field here — changes apply only to this agent or campaign and do not affect the global field definition.
Click **Save** to apply.
 > ⚠️ **Note** CRM sync writes to contact-level custom fields only when a CRM destination mapping has been configured for that field in **Profile Settings → Contacts → Custom Fields**.
***
## Optional: Add a Knowledge Pack
A **Knowledge Pack** allows your agent to access and reference structured company information during conversations. It can be used across both inbound and outbound projects and is especially helpful for handling FAQs, objection handling, or product-specific queries.
Depending on your plan, you may be able to create one or more packs and attach them to specific agents as needed.
**Supported Plans:**
* Business Professional: 1 Pack
* Business Growth: 2 Packs
* Agency Lite: 1 Pack
* Agency Unlimited: 2 Packs
#### Steps to Add a Knowledge Pack:
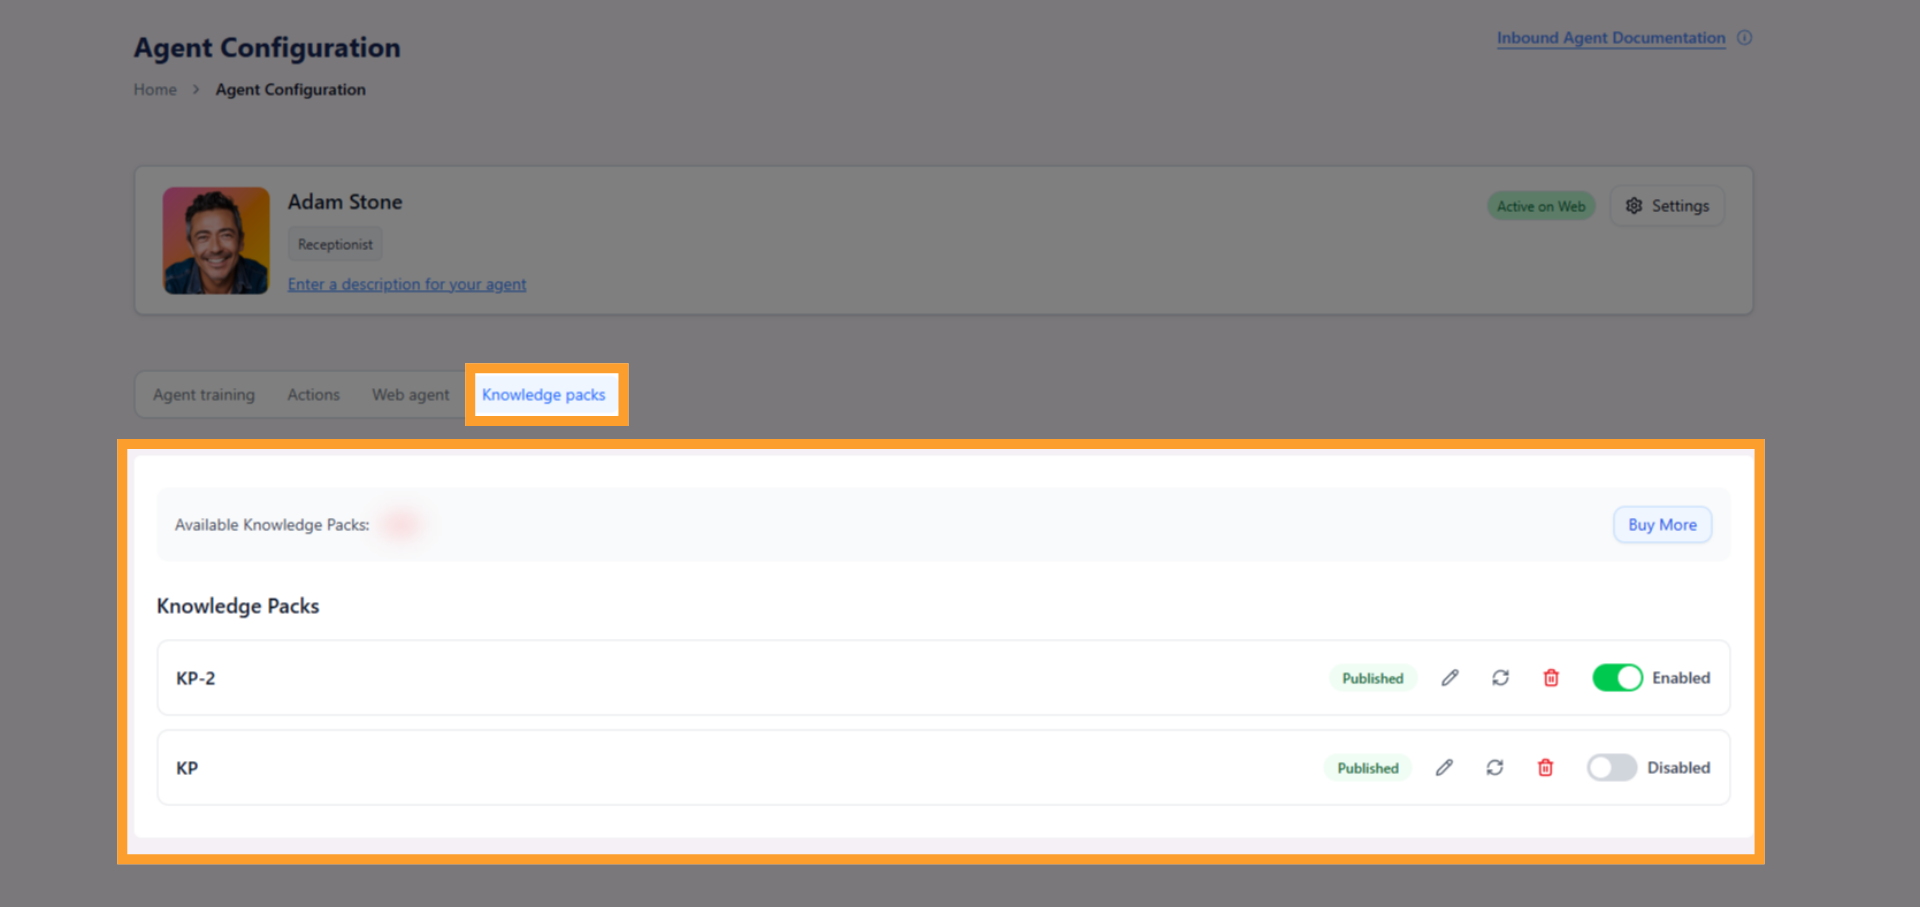
* In your **Inbound Agent** configuration screen, click **"Knowledge Packs"** in the tabs options.
> ⚠️ **Note** CRM sync writes to contact-level custom fields only when a CRM destination mapping has been configured for that field in **Profile Settings → Contacts → Custom Fields**.
***
## Optional: Add a Knowledge Pack
A **Knowledge Pack** allows your agent to access and reference structured company information during conversations. It can be used across both inbound and outbound projects and is especially helpful for handling FAQs, objection handling, or product-specific queries.
Depending on your plan, you may be able to create one or more packs and attach them to specific agents as needed.
**Supported Plans:**
* Business Professional: 1 Pack
* Business Growth: 2 Packs
* Agency Lite: 1 Pack
* Agency Unlimited: 2 Packs
#### Steps to Add a Knowledge Pack:
* In your **Inbound Agent** configuration screen, click **"Knowledge Packs"** in the tabs options.
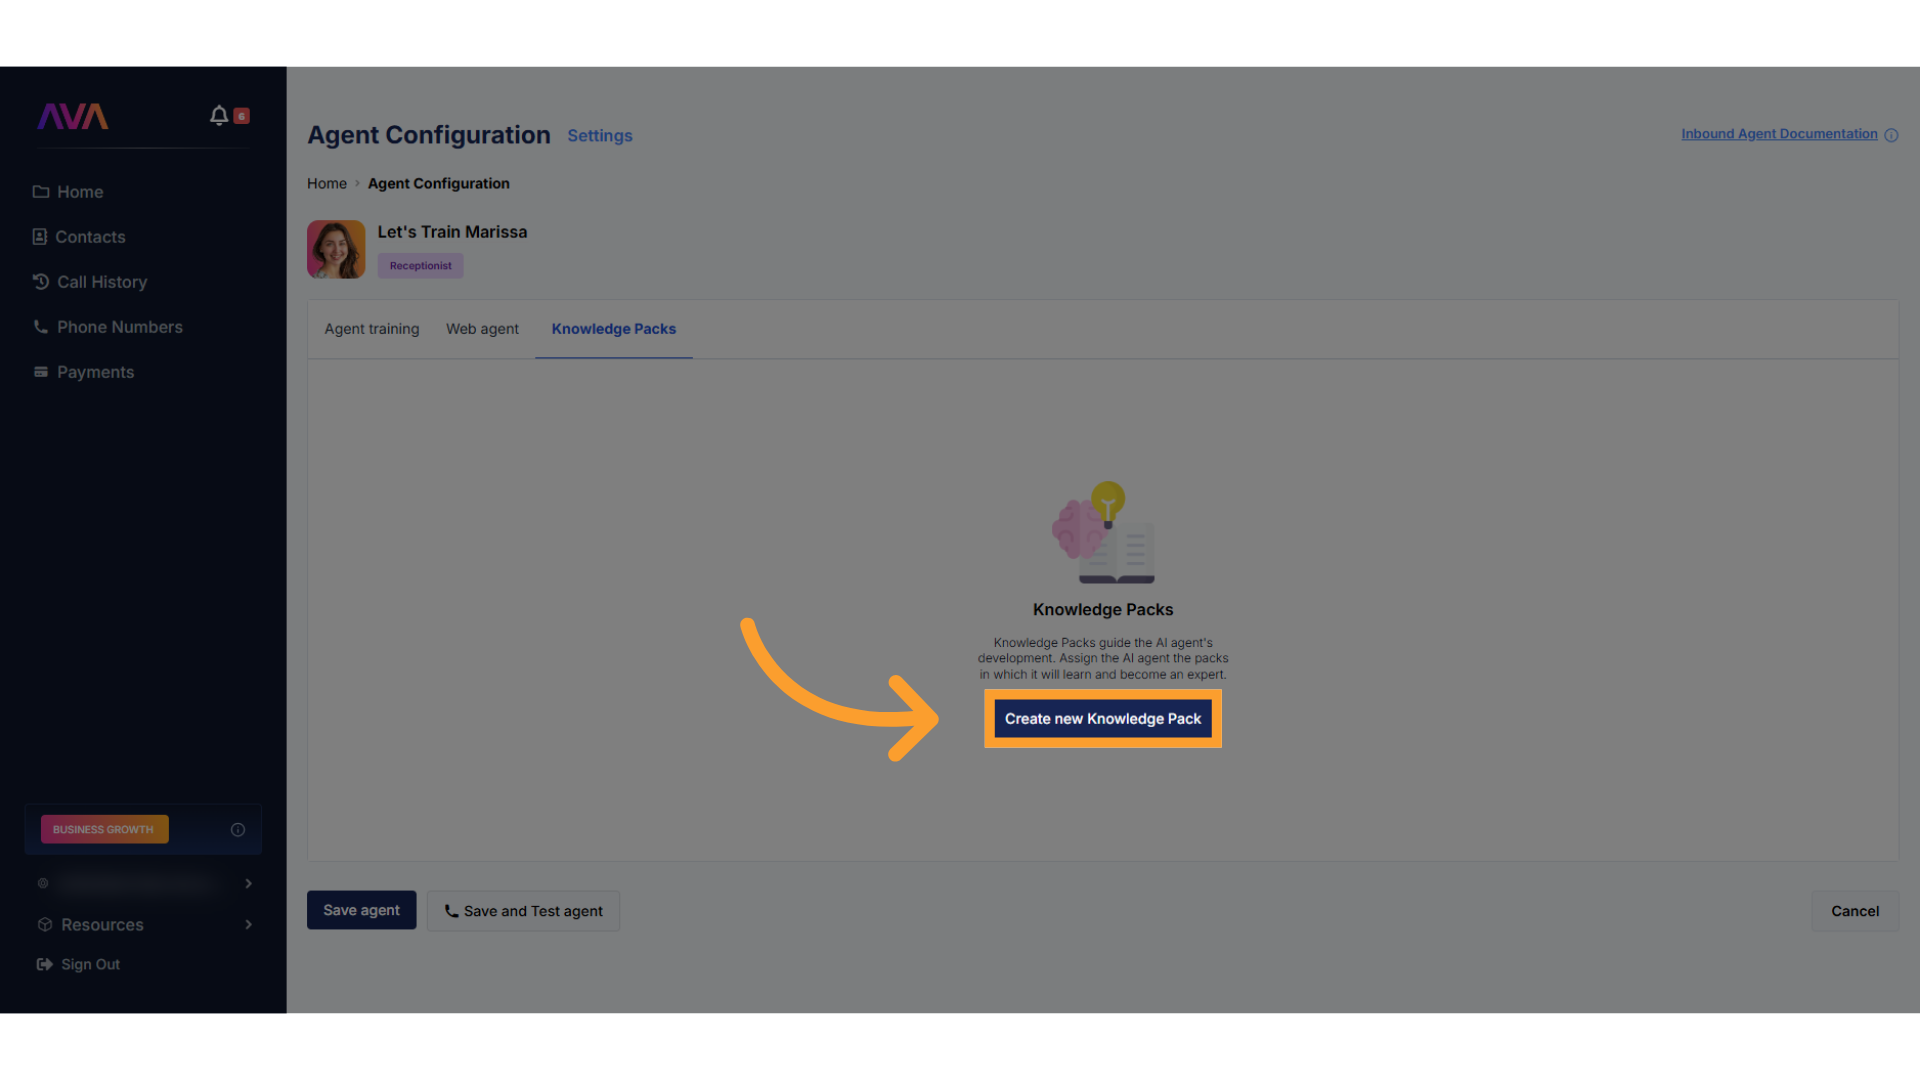
 * Click **"Create New Knowledge Pack"** to launch the builder.
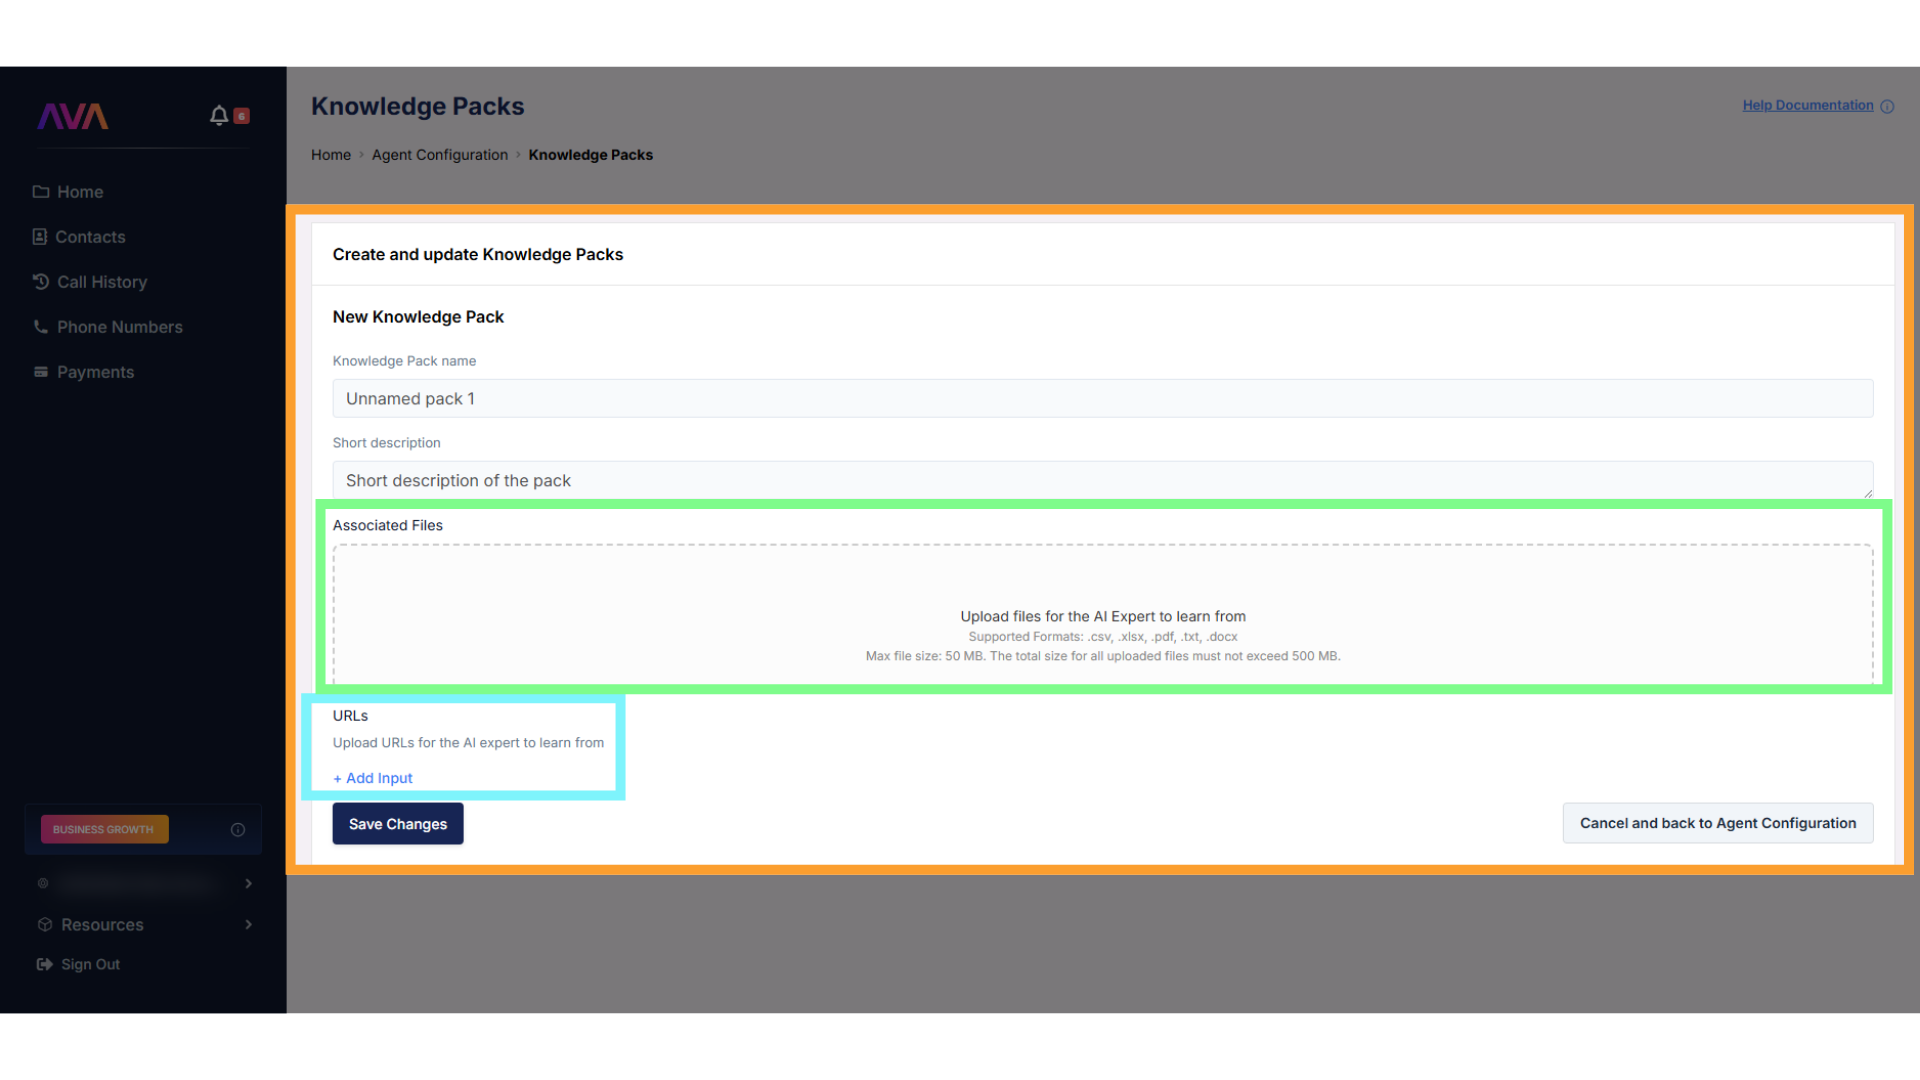
 You can populate your Knowledge Pack using one or both of the following:
* **Upload files** (.csv, .xlsx, .pdf, .txt, or .docx)
* Max file size: 50MB each
* Total upload limit: 500MB
* **Enter URLs** to let thinkrr scan selected web pages
You can populate your Knowledge Pack using one or both of the following:
* **Upload files** (.csv, .xlsx, .pdf, .txt, or .docx)
* Max file size: 50MB each
* Total upload limit: 500MB
* **Enter URLs** to let thinkrr scan selected web pages
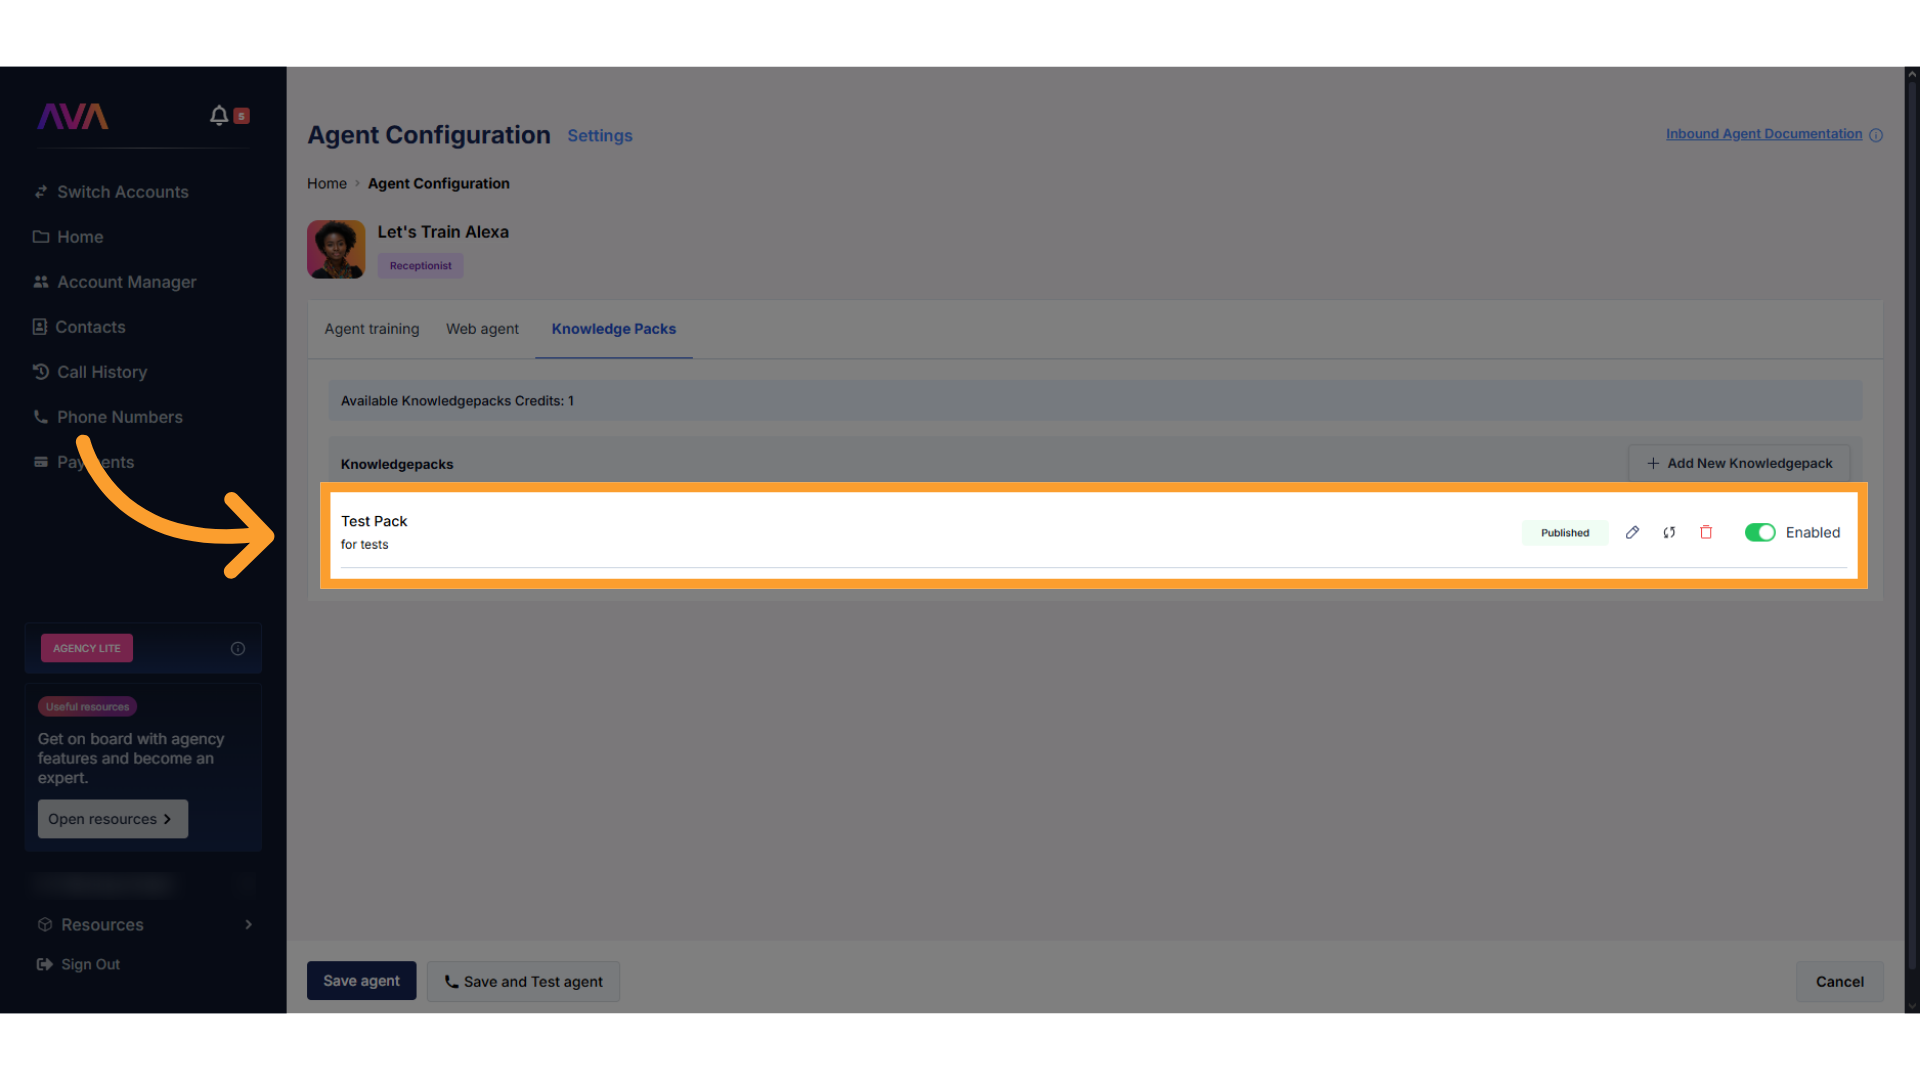
 Once your pack is created, you can:
* **Edit** the content
* **Refresh** to re-scan attached URLs
* **Delete** the pack permanently
* **Disable/Enable** the pack without losing content
Disabling a pack turns off agent access but preserves the data so you can re-enable it later.
Once your pack is created, you can:
* **Edit** the content
* **Refresh** to re-scan attached URLs
* **Delete** the pack permanently
* **Disable/Enable** the pack without losing content
Disabling a pack turns off agent access but preserves the data so you can re-enable it later.
 🚫 **Note:** Sub-accounts cannot access Knowledge Packs created by an agency’s main account.
***
## Key Benefits
* **Automation**: Save time by automating calendar bookings and internal alerts.
* **Responsiveness**: Route callers instantly based on urgency or intent.
* **Customization**: Configure logic and conditions for each action per agent.
* **Memory**: Give agents shared knowledge through reusable Knowledge Packs.
* **Scalability**: Use agents as front-line assistants for multiple departments.
***
## Notes & Testing Considerations
* Test calls made via the **thinkrr test call button** do **not** trigger actions
* You must make a **real phone call or web widget interaction** to test bookings, transfers, or notifications
* Calendars must be **Active** in GHL and belong to the **same account** that is connected to thinkrr
* Notify emails will show **@thinkrr.ai** branding unless a **white-labeled domain** is set
***
### FAQs & Troubleshooting
### General Questions
A Knowledge Pack is a shared memory module that lets your AI agents reference structured company information — like services, FAQs, or pricing — during calls. They enhance the agent’s accuracy and reduce the need for hard-coded scripting.
Yes. Each Inbound Agent can be individually configured. For example, your sales agent can be set to book meetings and notify reps, while your support agent only transfers calls.
No. These are **internal notifications only**. To send confirmation emails to callers, set up a GHL workflow instead.
Yes. Once created, a Knowledge Pack can be assigned to both inbound and outbound agents — allowing them to pull answers from the same information.
### Configuration
Inside the **Agent Configuration** screen, scroll to the section titled **“What actions can the agent take?”**. Each toggle opens a setup panel with configuration options.
Each action allows you to define **when** it should activate. Use keywords or call flow logic to trigger bookings, transfers, or notifications only in the right scenarios.
You can connect up to **10** GHL Round Robin calendars to each inbound agent. These must be part of the same GHL account connected to your thinkrr workspace.
In your **White Label > Email** settings, configure and verify a custom domain. Once verified, outbound emails will display your branding instead of thinkrr.ai.
### Usage and Results
No. Actions like bookings and transfers only work in real phone calls or live Web Agent sessions. In-app test calls simulate logic but don’t trigger external actions.
The AI disconnects and the call is passed to the destination number. Recordings end automatically to comply with privacy regulations.
You likely haven’t completed **domain verification** for your custom email address. Until that’s done, thinkrr defaults to thinkrr.ai branding on outbound emails.
***
For more guidance, try the [**Virtual Support Agent**](/Thinkrr-Support-Agent) — available 24/7 at [thinkrr.ai/support](https://thinkrr.ai/support).
Need hands-on help? Visit [help.thinkrr.ai](http://help.thinkrr.ai) or email us at [hello@thinkrr.ai](mailto:hello@thinkrr.ai).
🚫 **Note:** Sub-accounts cannot access Knowledge Packs created by an agency’s main account.
***
## Key Benefits
* **Automation**: Save time by automating calendar bookings and internal alerts.
* **Responsiveness**: Route callers instantly based on urgency or intent.
* **Customization**: Configure logic and conditions for each action per agent.
* **Memory**: Give agents shared knowledge through reusable Knowledge Packs.
* **Scalability**: Use agents as front-line assistants for multiple departments.
***
## Notes & Testing Considerations
* Test calls made via the **thinkrr test call button** do **not** trigger actions
* You must make a **real phone call or web widget interaction** to test bookings, transfers, or notifications
* Calendars must be **Active** in GHL and belong to the **same account** that is connected to thinkrr
* Notify emails will show **@thinkrr.ai** branding unless a **white-labeled domain** is set
***
### FAQs & Troubleshooting
### General Questions
A Knowledge Pack is a shared memory module that lets your AI agents reference structured company information — like services, FAQs, or pricing — during calls. They enhance the agent’s accuracy and reduce the need for hard-coded scripting.
Yes. Each Inbound Agent can be individually configured. For example, your sales agent can be set to book meetings and notify reps, while your support agent only transfers calls.
No. These are **internal notifications only**. To send confirmation emails to callers, set up a GHL workflow instead.
Yes. Once created, a Knowledge Pack can be assigned to both inbound and outbound agents — allowing them to pull answers from the same information.
### Configuration
Inside the **Agent Configuration** screen, scroll to the section titled **“What actions can the agent take?”**. Each toggle opens a setup panel with configuration options.
Each action allows you to define **when** it should activate. Use keywords or call flow logic to trigger bookings, transfers, or notifications only in the right scenarios.
You can connect up to **10** GHL Round Robin calendars to each inbound agent. These must be part of the same GHL account connected to your thinkrr workspace.
In your **White Label > Email** settings, configure and verify a custom domain. Once verified, outbound emails will display your branding instead of thinkrr.ai.
### Usage and Results
No. Actions like bookings and transfers only work in real phone calls or live Web Agent sessions. In-app test calls simulate logic but don’t trigger external actions.
The AI disconnects and the call is passed to the destination number. Recordings end automatically to comply with privacy regulations.
You likely haven’t completed **domain verification** for your custom email address. Until that’s done, thinkrr defaults to thinkrr.ai branding on outbound emails.
***
For more guidance, try the [**Virtual Support Agent**](/Thinkrr-Support-Agent) — available 24/7 at [thinkrr.ai/support](https://thinkrr.ai/support).
Need hands-on help? Visit [help.thinkrr.ai](http://help.thinkrr.ai) or email us at [hello@thinkrr.ai](mailto:hello@thinkrr.ai).