> ## Documentation Index
> Fetch the complete documentation index at: https://docs.thinkrr.ai/llms.txt
> Use this file to discover all available pages before exploring further.
# Receptionist
## Details
A **Receptionist** Inbound Agent is capable of:
* Greeting callers professionally with a custom welcome message.
* Understanding inquiries and responding based on business-specific knowledge.
* Executing defined actions, such as call transfers, meeting bookings, or email notifications.
* Capturing caller details for future follow-up.
The goal of the **Receptionist** Inbound Agent is to act as an efficient, always-available first point of contact, improving customer experience and streamlining business operations.
## Configuring the Receptionist Role
### 1. Selecting the Receptionist Role
* If it's your very first time in thinkrr, you will be prompted to create an Outbound Project, or an Inbound Agent.
Otherwise, navigate to the **Home** screen in thinkrr.
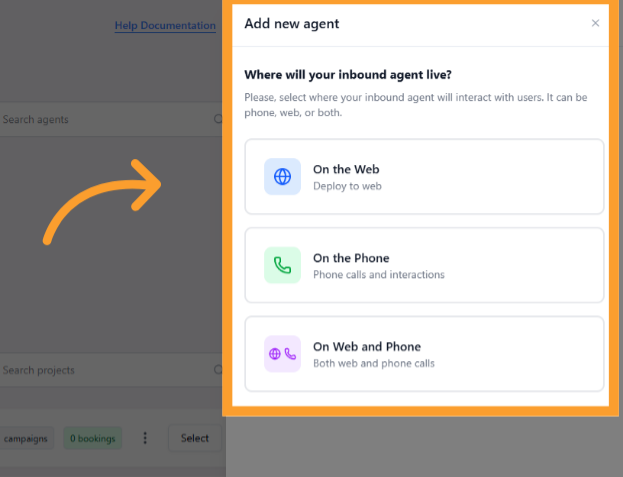
* Click **"Add New Agent"** in the **Active Agents** section.
* Choose whether the agent should be:
* Tied to a **phone number**
* Deployed to the **web**
* Both
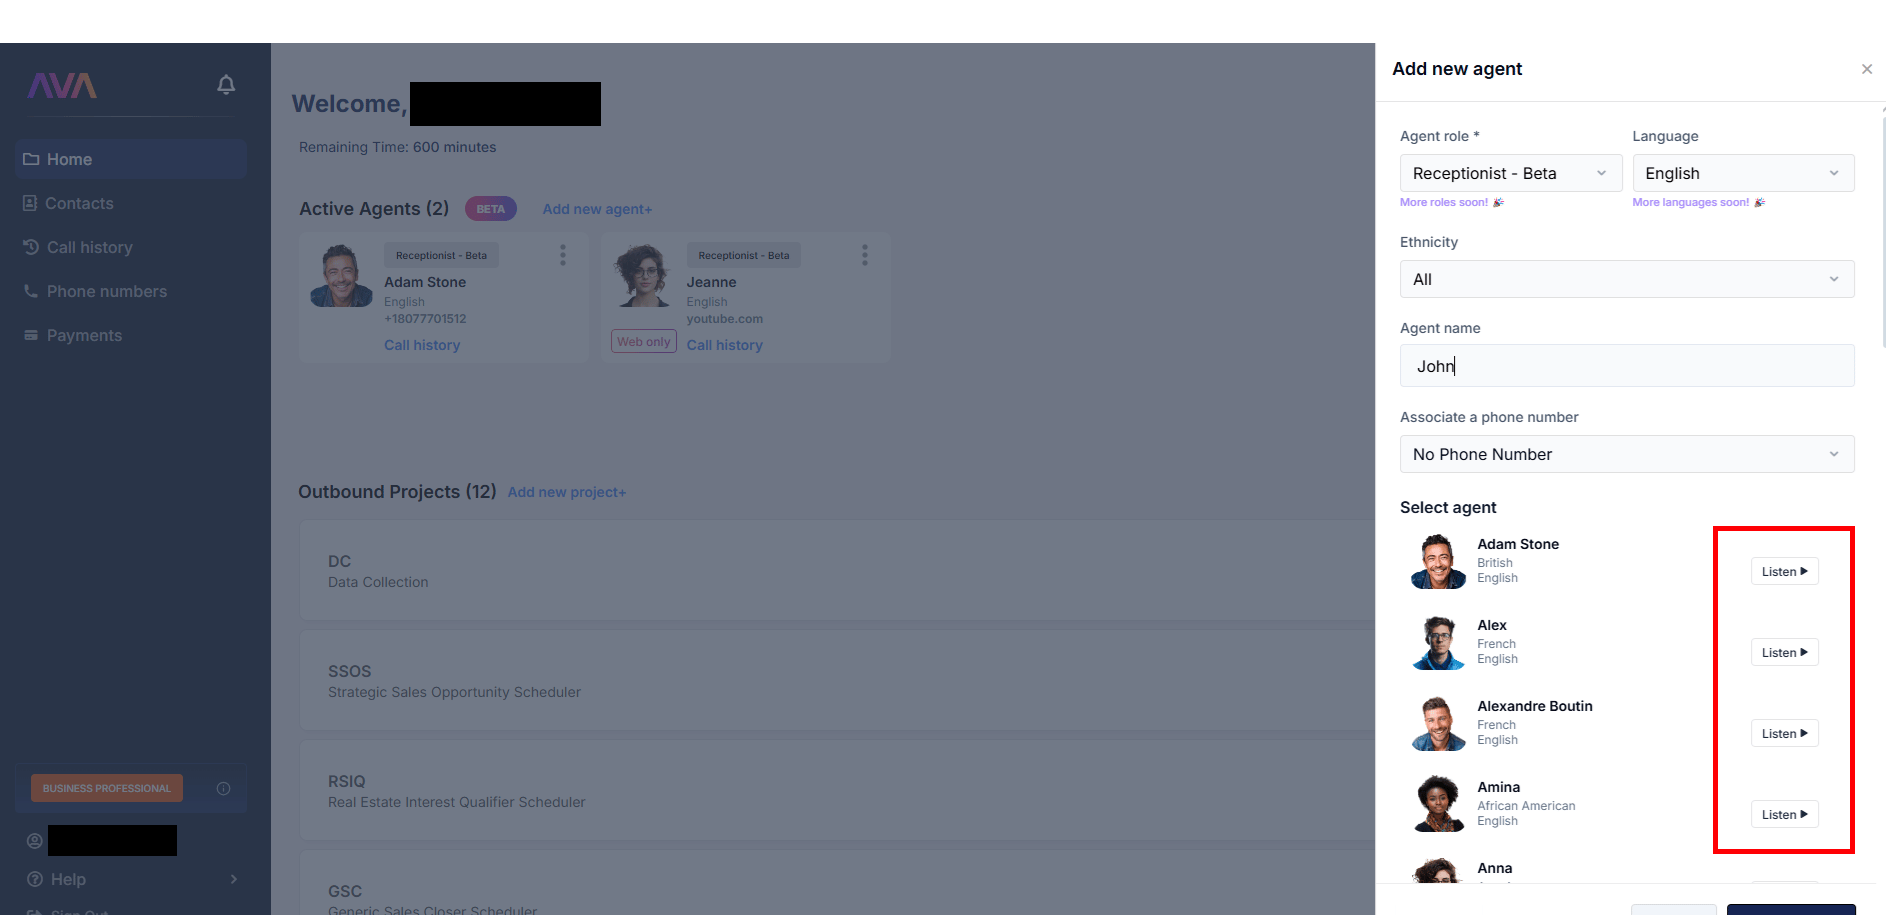
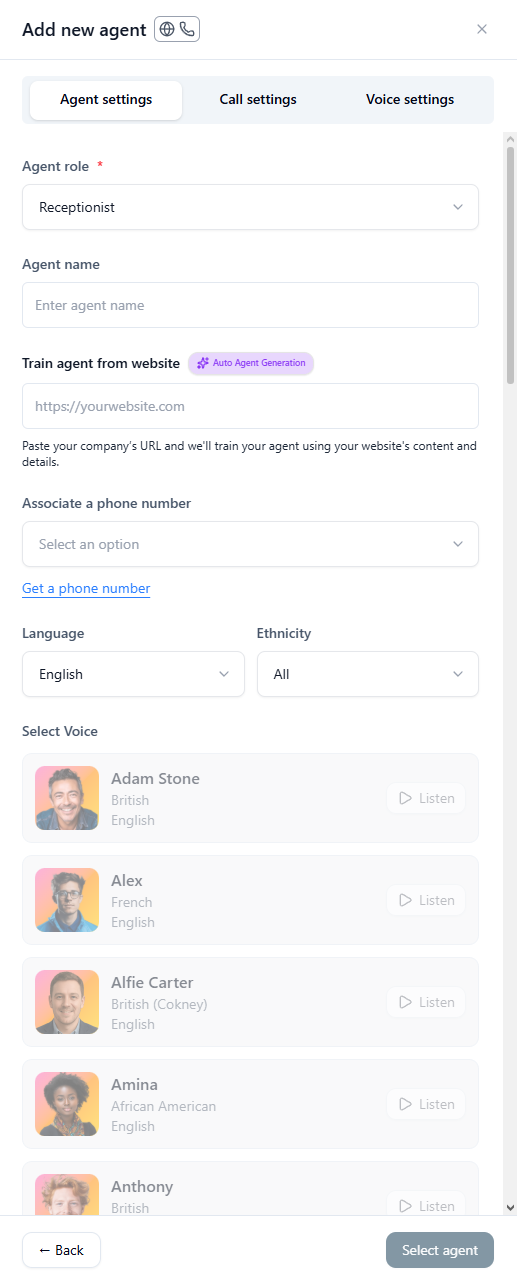
When creating a new inbound agent, configuration is organized into three tabs: **Agent Settings**, **Call Settings**, and **Voice Settings**.
* **Agent Settings**
* **Agent Role** – Select **Receptionist** to determine the agent's function and tone.
* **Agent Name** – Customize how the agent refers to itself during calls. If left blank, it will use its default name.
* **Train Agent from Website** – Paste a public company URL and thinkrr will use your website content to pre-configure the training fields in the next step.
* **Phone Number** – Assign an available number (**Inbound Agents cannot share phone numbers**).
* **Language** – Agents can only speak their specifically assigned language. The selected language determines which voices are available.
* **Ethnicity** – Optional voice style filter to help narrow down accent and delivery options.
* **Agent Voice** – Use the **Listen** button to preview and select a voice.
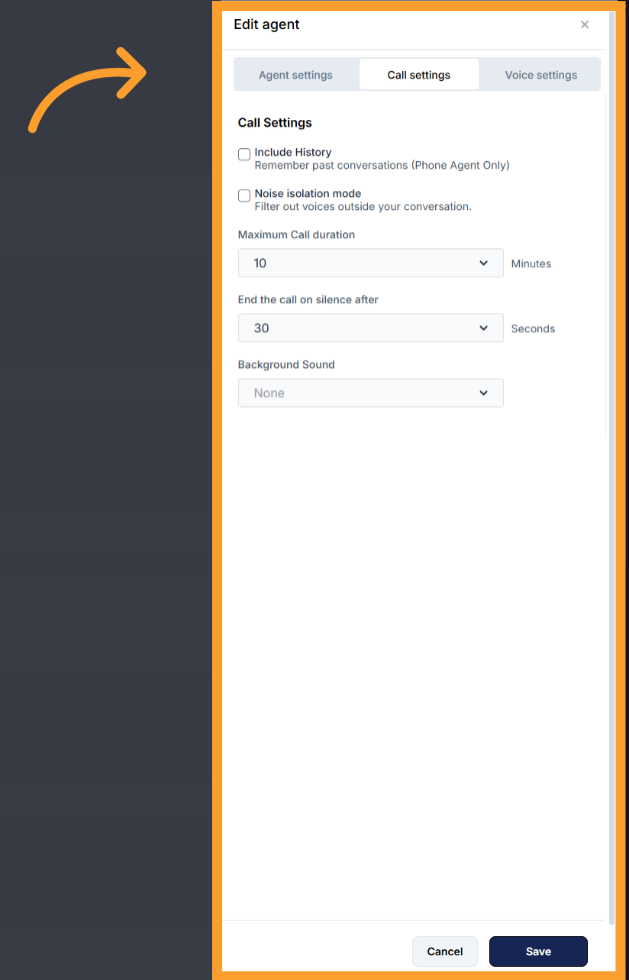
* **Call Settings**
* **Include History** – Option to let the agent remember past conversations (phone agent only).
* **Noise Isolation Mode** – Filters out background voices.
* **Maximum Call Duration** – Caps call time (set in minutes).
* **End Call After Silence** – Ends calls automatically after a set period of silence.
* **Background Sound** – Add ambient noise (e.g., Coffee Shop).
* **Background Volume Slider** – Appears if background sound is enabled.
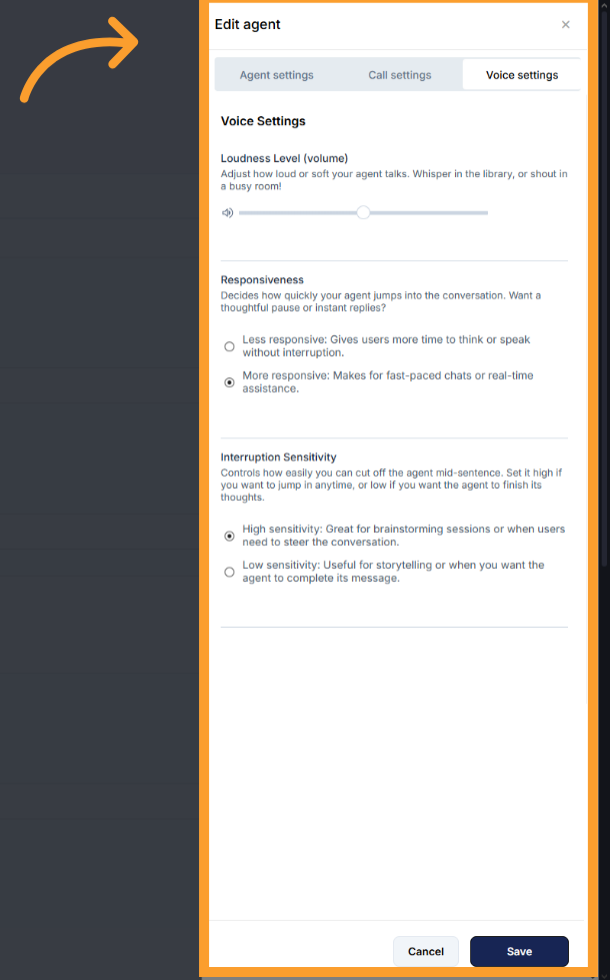
* **Voice Settings**
* **Loudness Level (volume)** – Adjust how loud or soft your agent talks.
* **Responsiveness** – Decide how quickly your agent replies.
* Less responsive: Gives users more time to think or speak without interruption.
* More responsive: Makes for fast-paced chats or real-time assistance.
* **Interruption Sensitivity** – Controls how easily you can cut off the agent mid-sentence.
* High sensitivity: Easy to interrupt at any time.
* Low sensitivity: Agent will usually finish speaking before listening again.
### 2. Defining the Receptionist’s Behavior
Once the **Receptionist** role is selected and your initial settings are configured, you will need to train the Inbound Agent to properly represent your business.
If you need to revisit or update these settings later, click the **Settings** button at the top of the agent’s page. This reopens the same three tabs—**Agent Settings**, **Call Settings**, and **Voice Settings**—allowing you to make adjustments at any time.
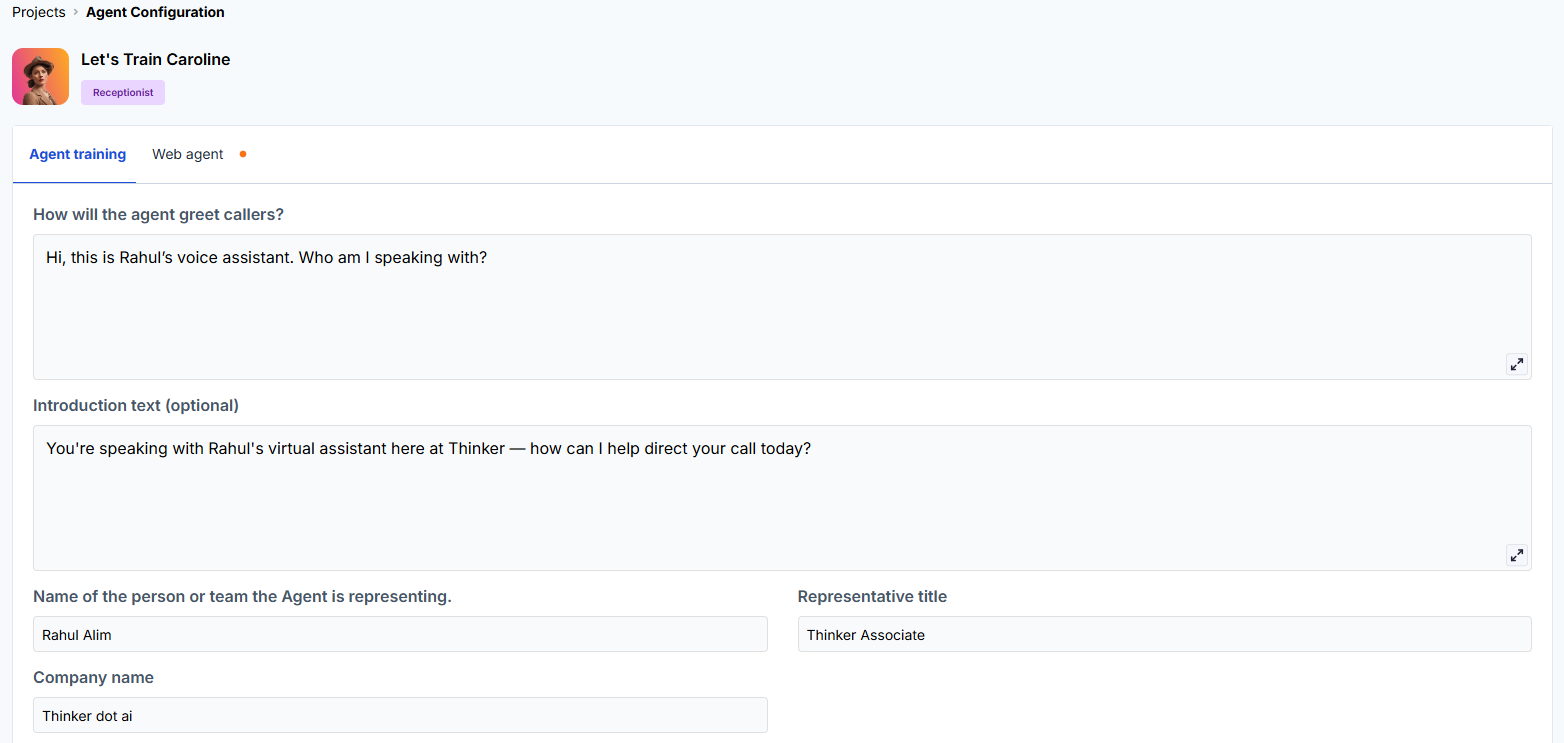
The following input fields determine how the agent will interact with callers:
* **How will the agent greet callers?** – How the **Receptionist** answers calls or starts interactions (e.g., “Hello! Thanks for calling \[Company Name]”).
* **Introduction text (optional)** – Optional text where the Agent introduces itself and its function.
* **Representative name** – Name of the business representative the AI is assisting.
* **Representative title** – Job title of the representative.
* **Company name** – The company the Agent is working on behalf of.
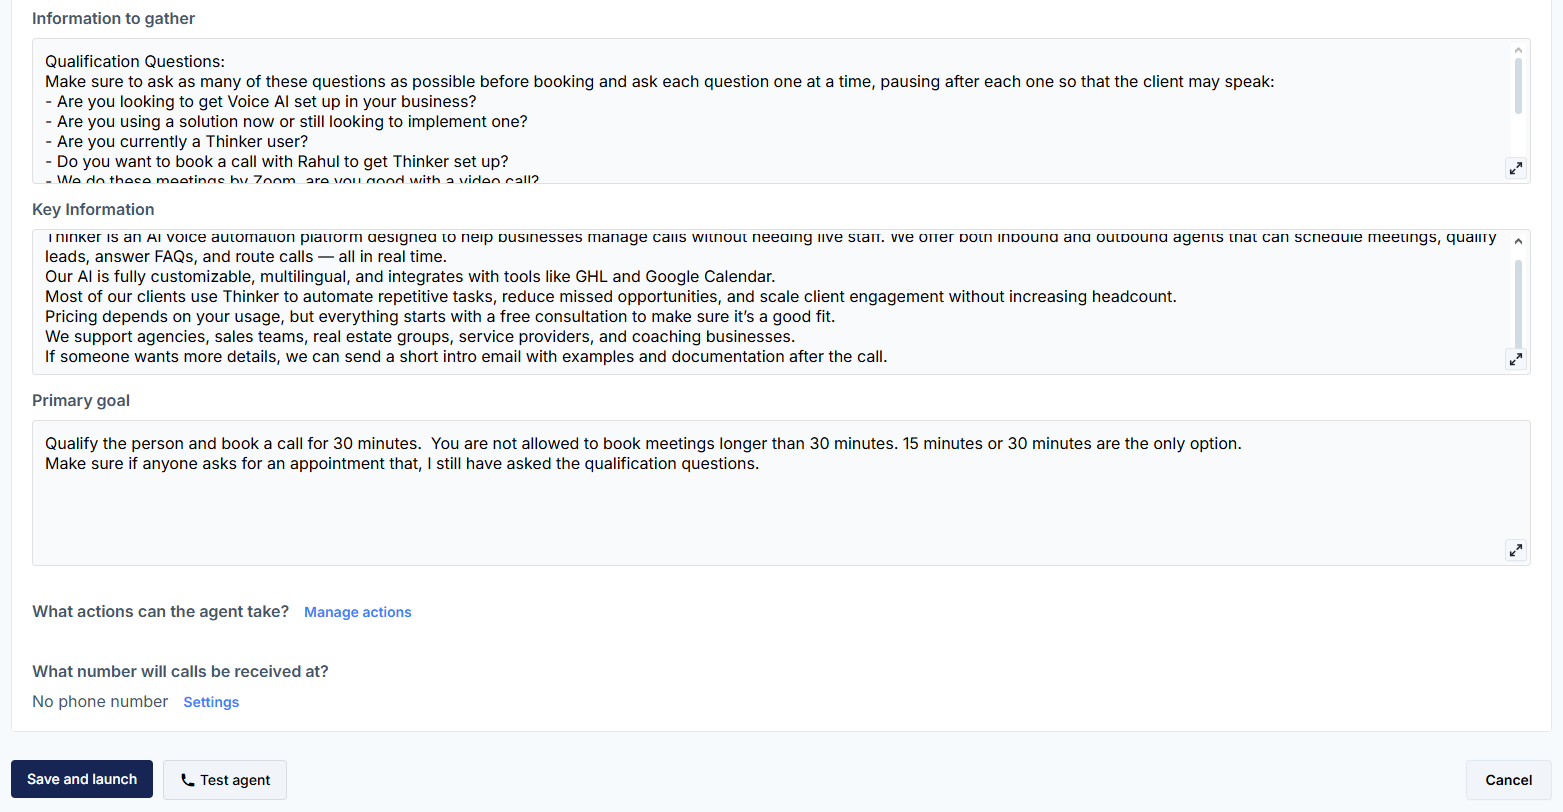
* **Information to gather** – What details the Agent should collect from the caller during the interaction.
* **Key information** – Business-specific data that the Agent should know.
* **Primary goal** – The main purpose of the Agent.
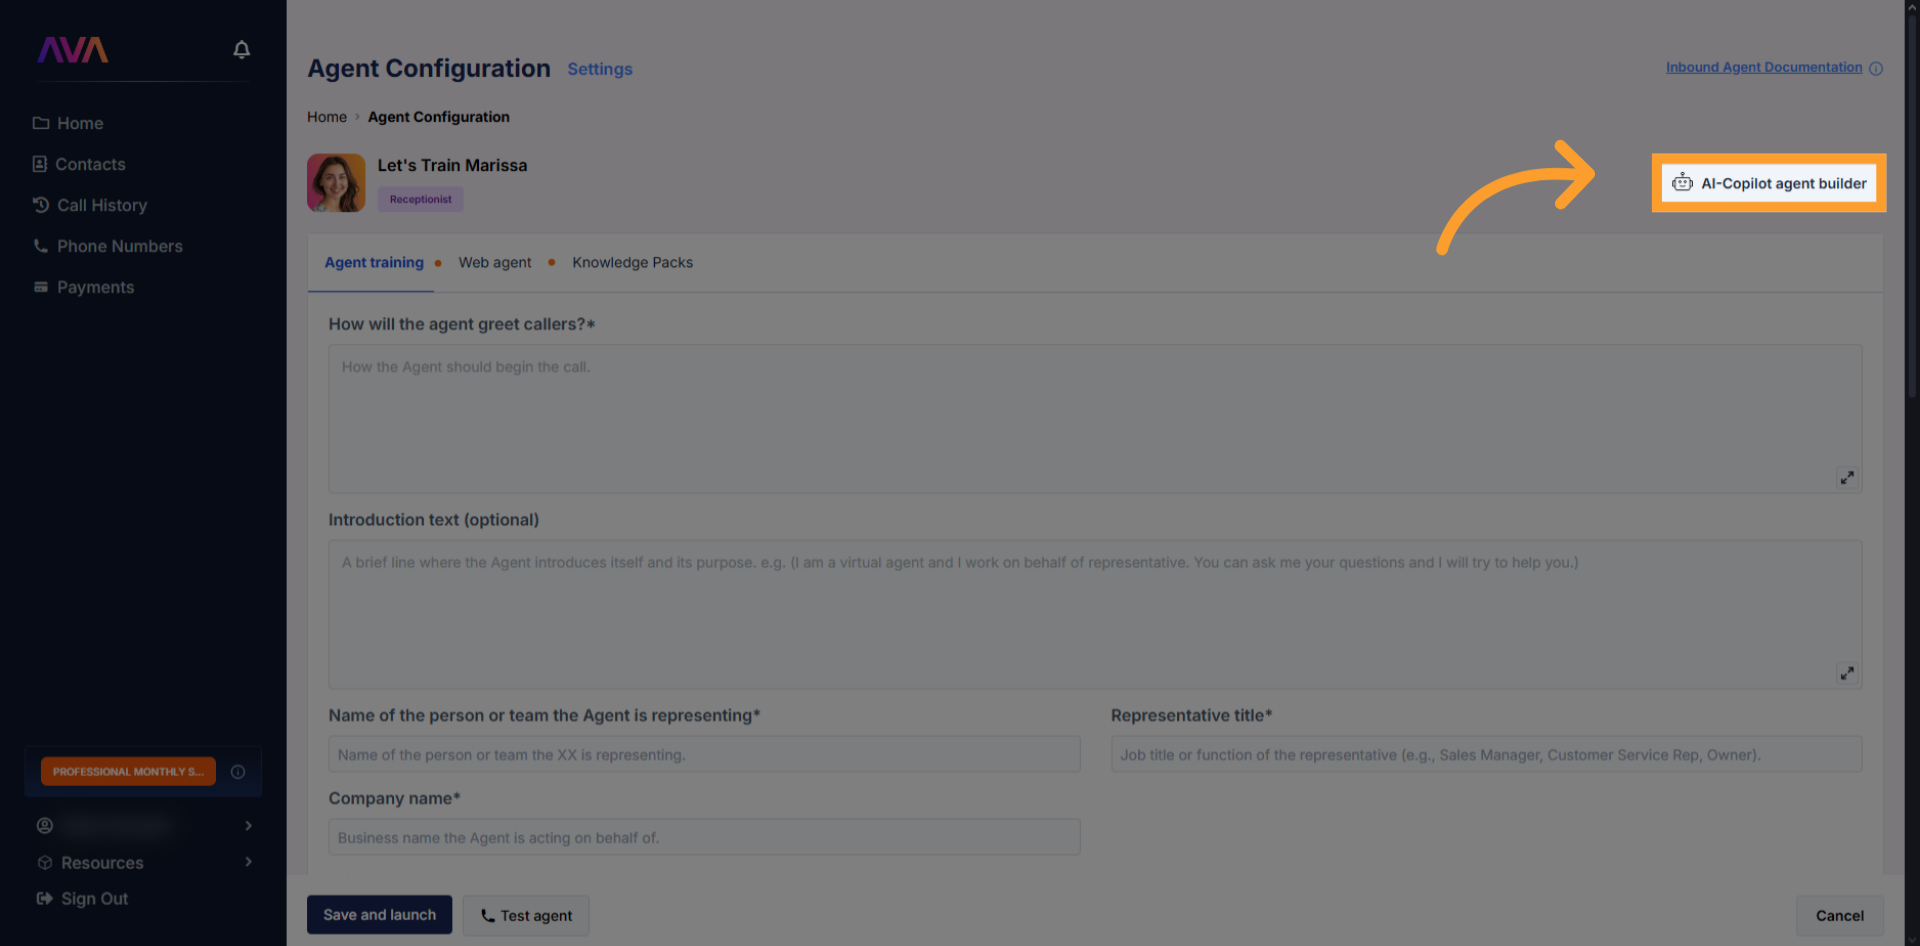
If you need assistance filling in these training fields, you can use the built-in **AI Copilot**. AI Copilot lets you describe your receptionist in plain language and will auto-populate a draft configuration for you.
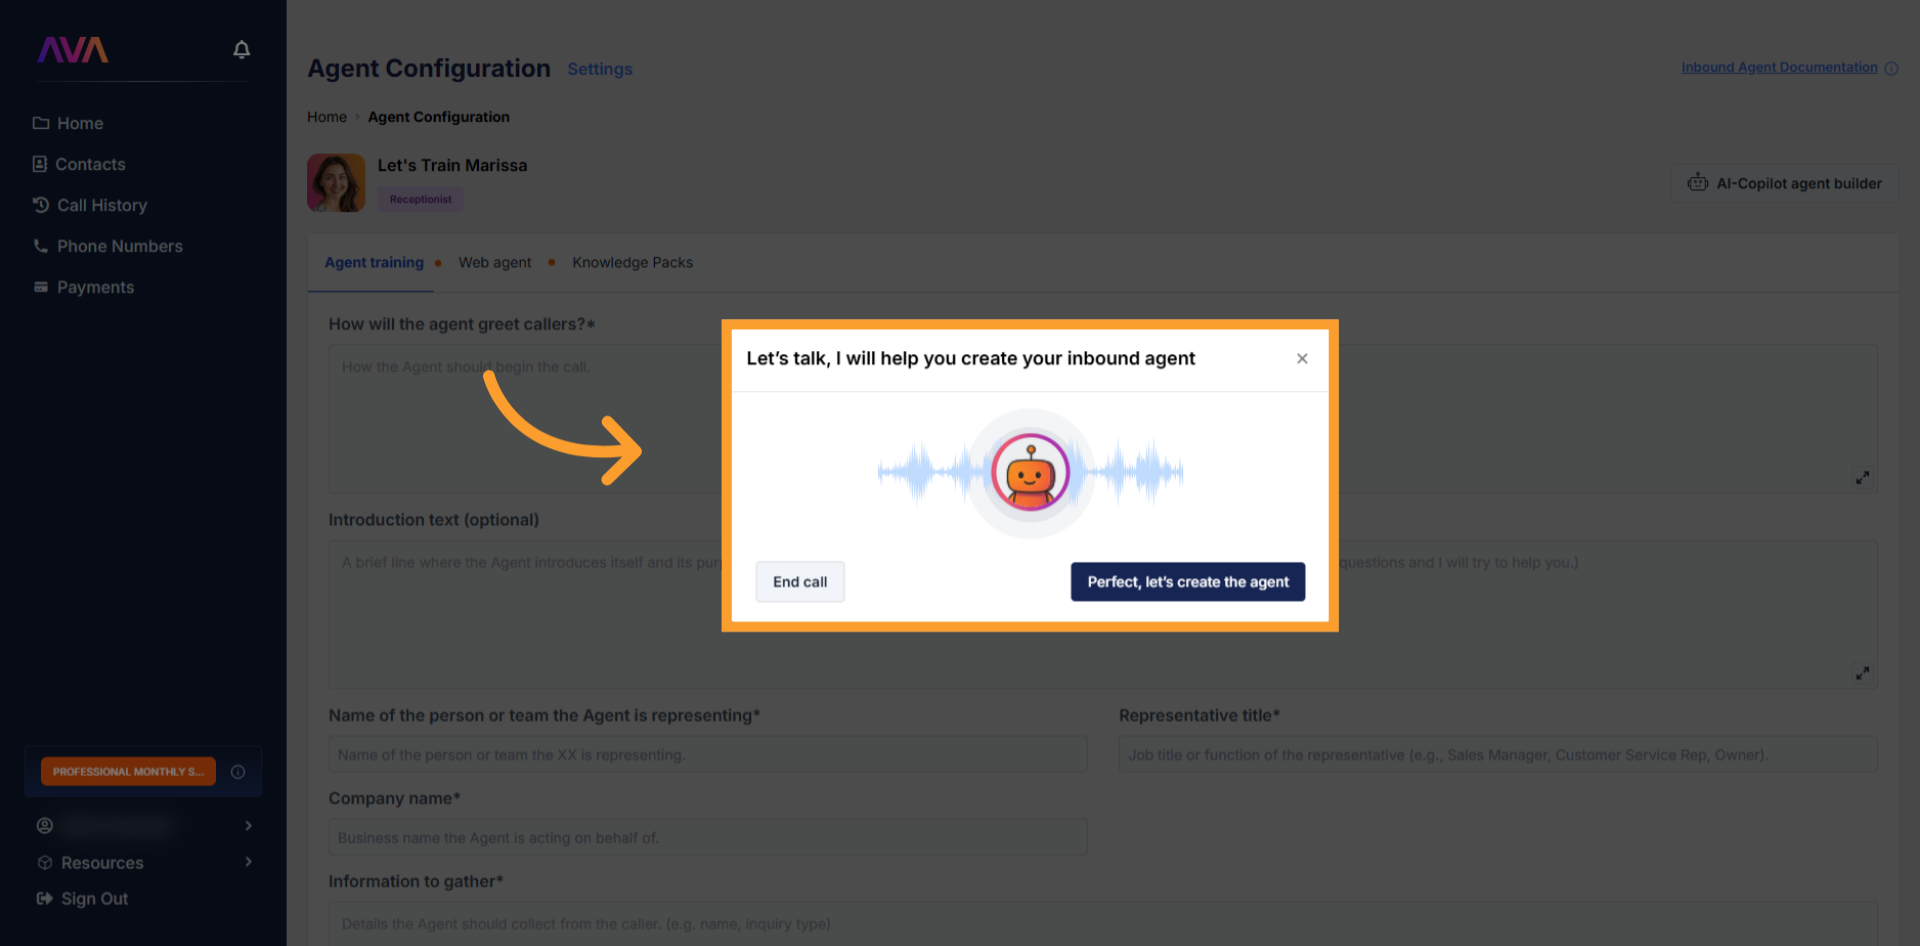
* **Click "AI-Copilot agent builder"** to open the builder interface and explain your goals or agree to suggested options.
* **Click "Perfect, let’s create the agent"** once you’re satisfied. The assistant will automatically populate the customizable fields shown above, giving you a solid starting point you can refine.
We recommend not overthinking the instructions. Train your agent the way you would train an intern; not by defining an exact script, but by providing guidelines and considerations you want it to follow.
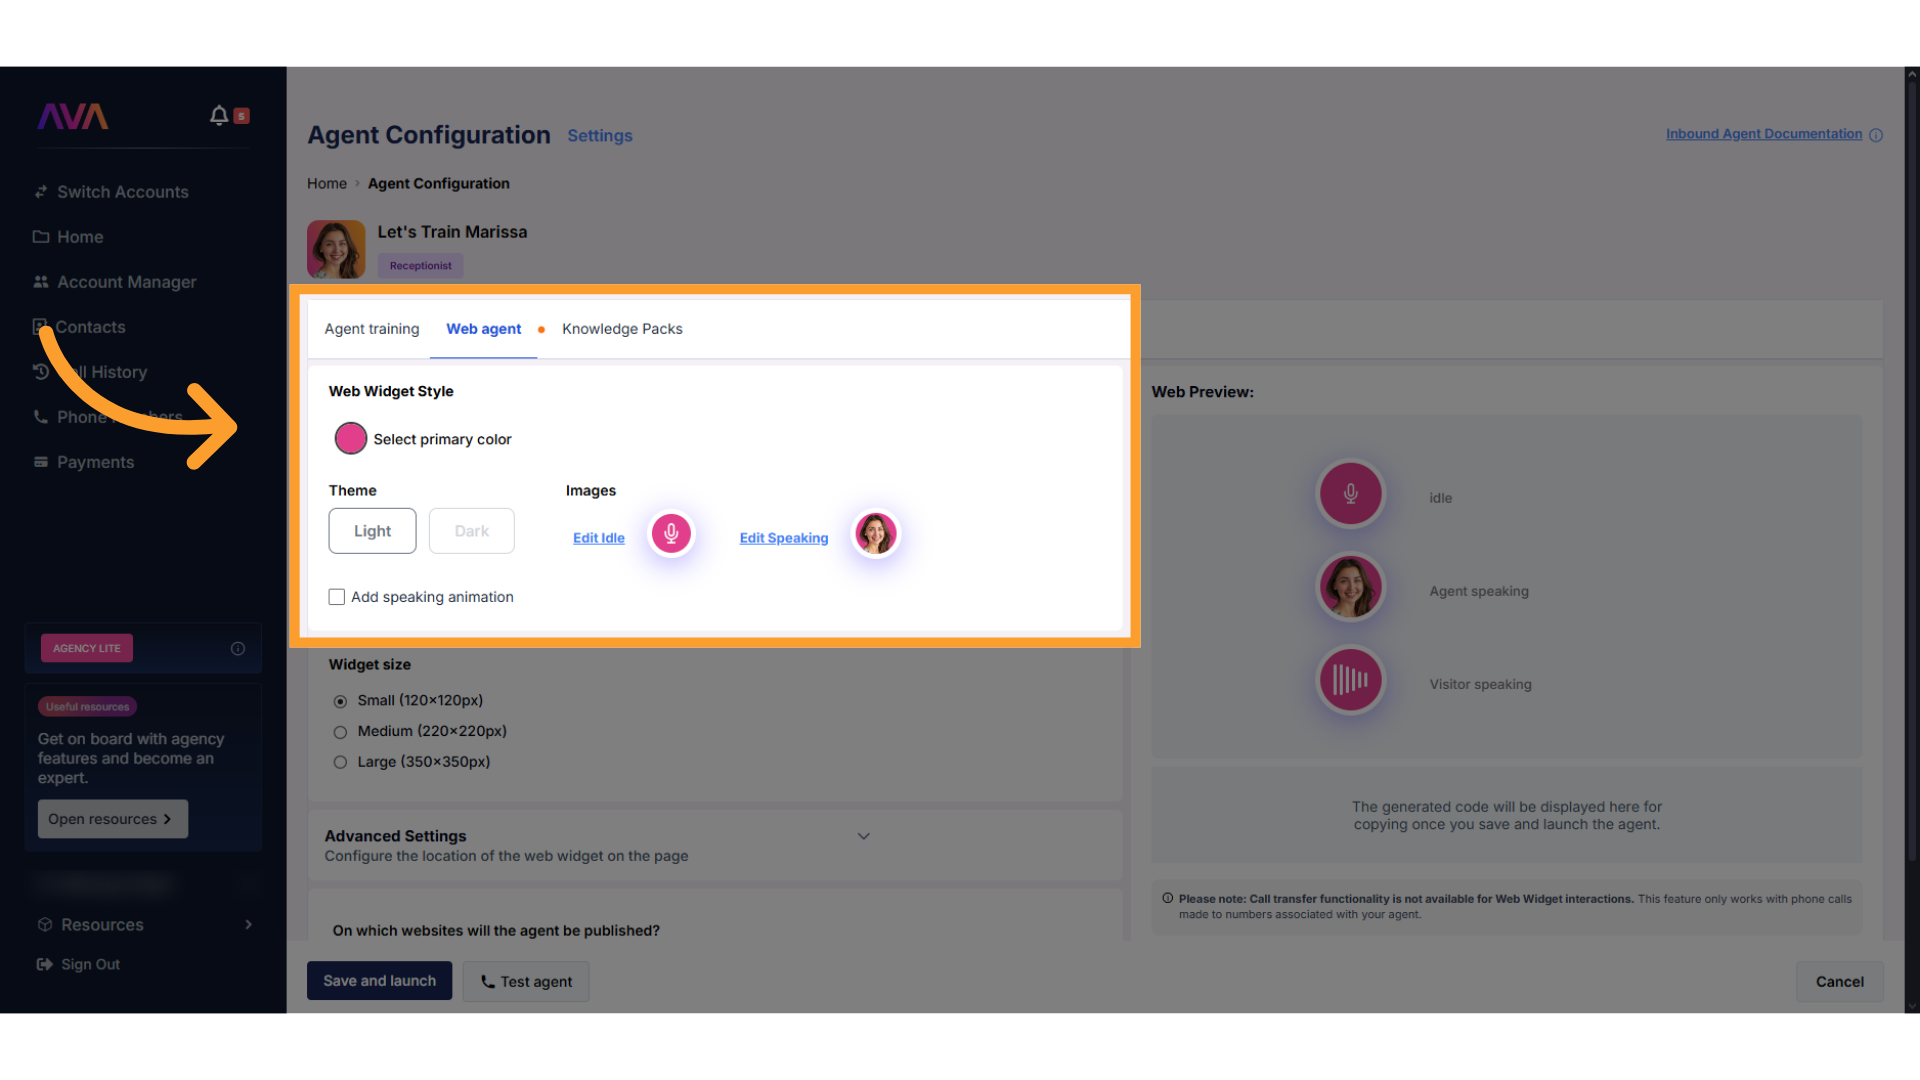
If your Receptionist Agent is also or only deployed to the **web**, you can customize its appearance and placement using the **Web Agent** tab.
* **Select Primary Color** – Set the base color of your widget to match your website branding.
* **Theme Selection** – Choose between:
* **Light Theme**
* **Dark Theme**
* **Idle Image** – Choose a preset icon that appears when the agent is idle.
* **Speaking Image** – Choose a preset icon to display while the agent is speaking.
* **Speaking Animation Toggle** – Enable or disable animation that plays when the agent talks.
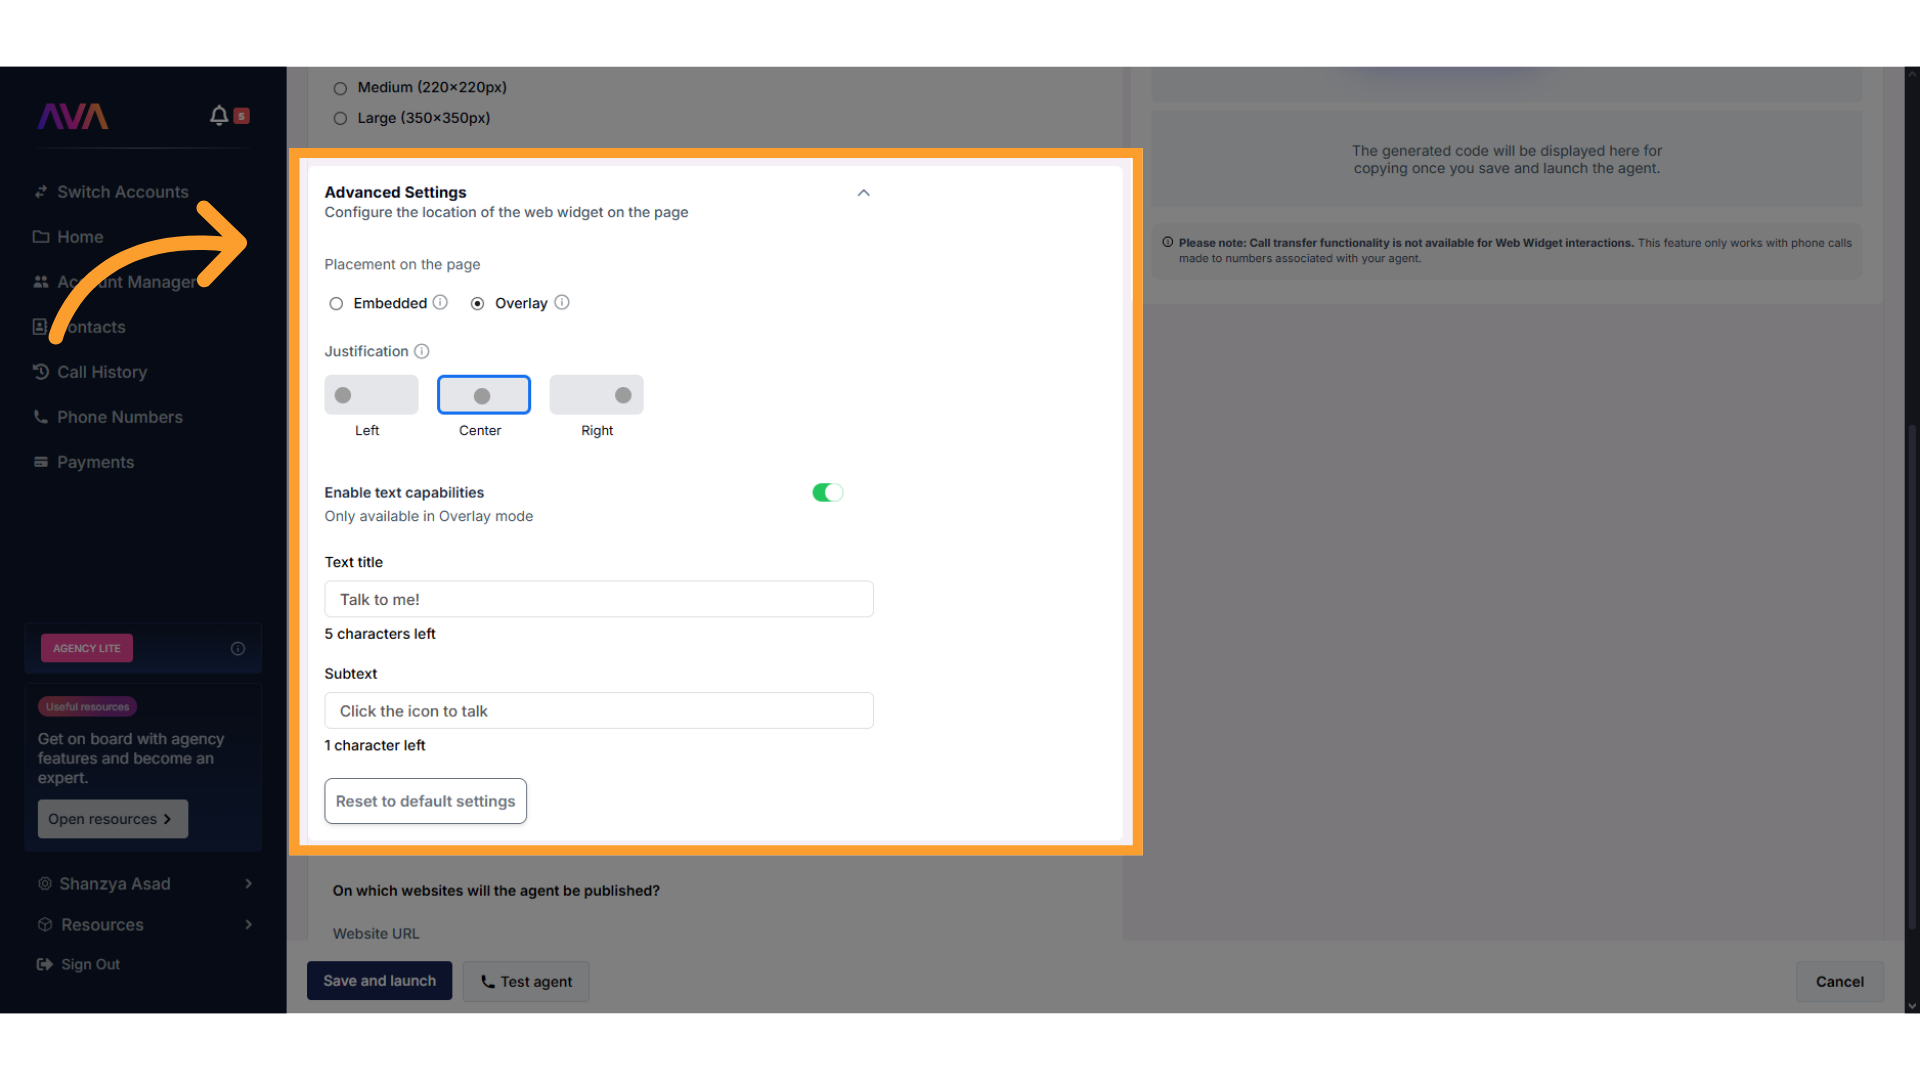
* Select **Embedded** or **Overlay** placement.
* Choose justification: **Left**, **Center**, or **Right**.
* Enable text features (Overlay only) with max 16/23 characters.
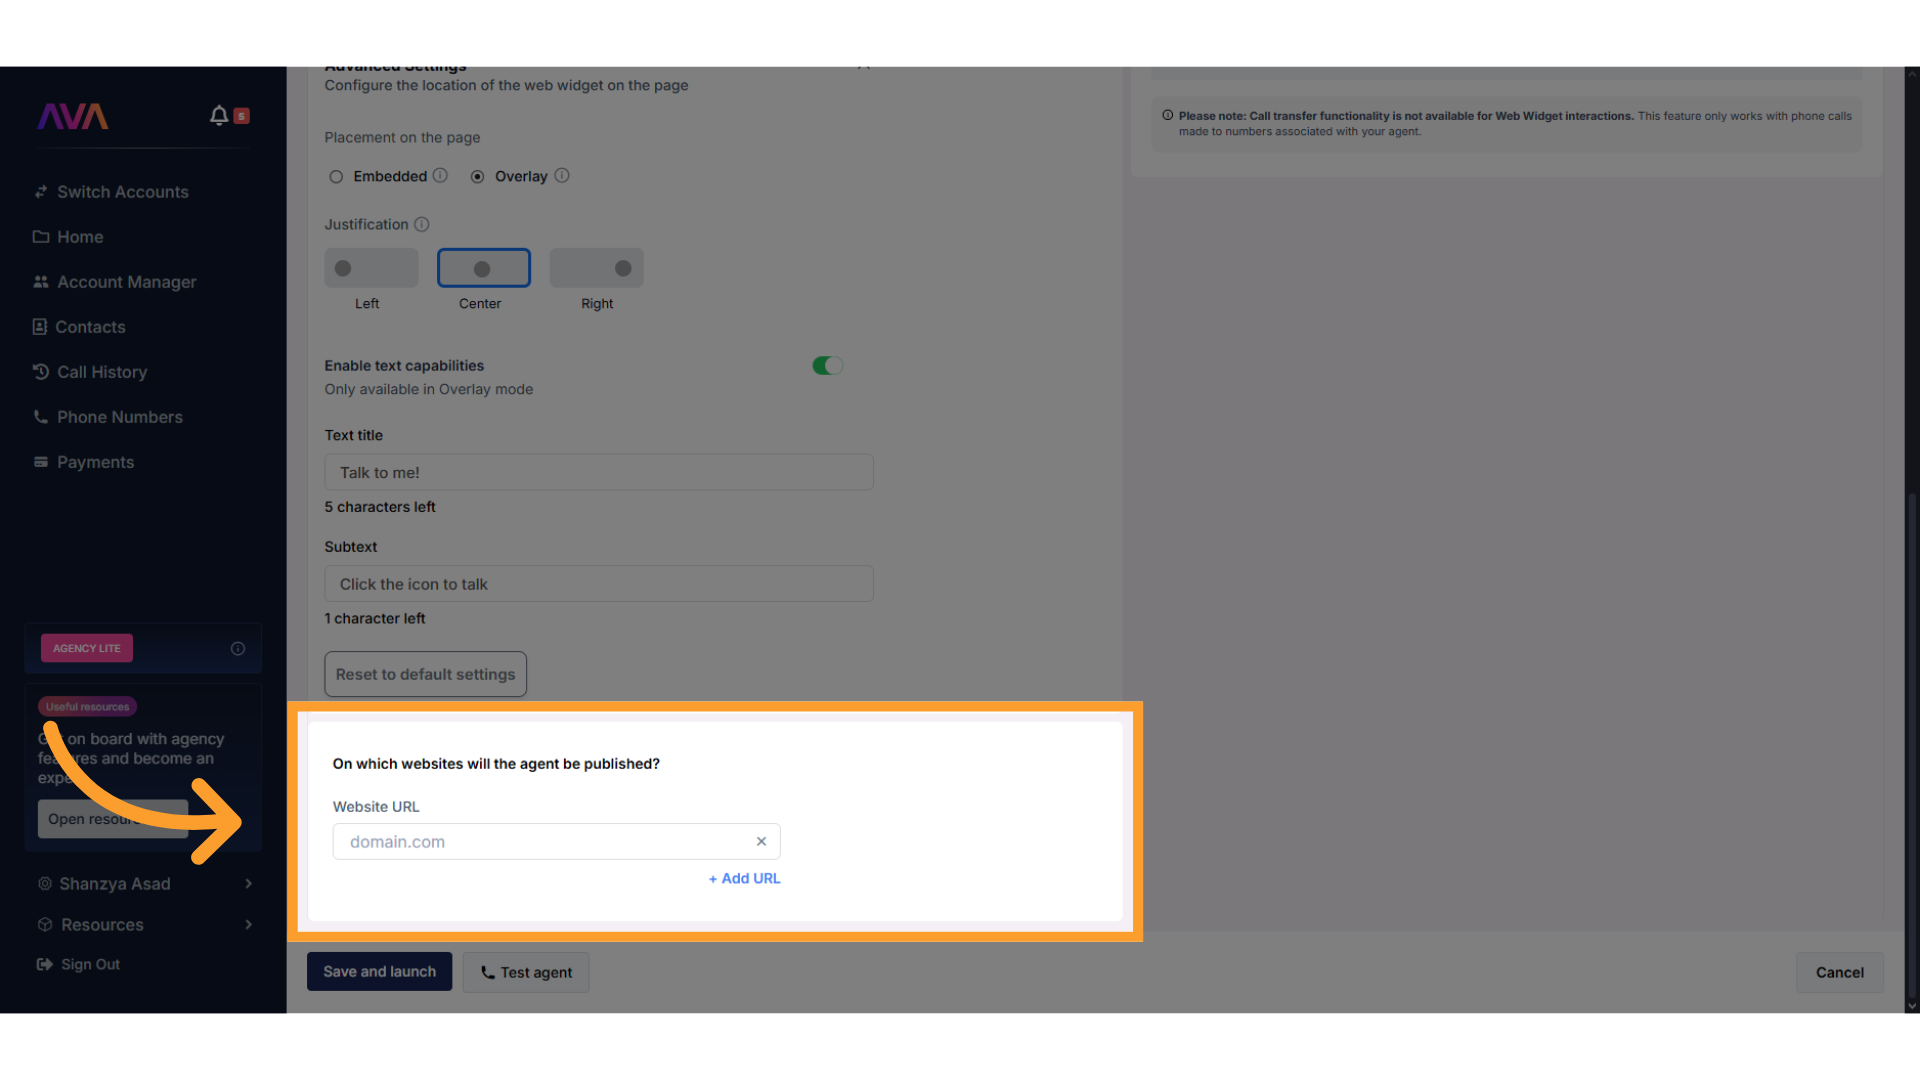
* Enter the domain(s) where your Web Agent will be allowed to appear.
* Include both `www.` and non-www versions if applicable.
Once saved, thinkrr will generate a code snippet you can embed in your site. Testing both **Embedded** and **Overlay** modes is recommended.
A **Knowledge Pack** allows your agent to access and reference structured company information during conversations. It can be used across both inbound and outbound projects.
Depending on your plan, you can create one or more Knowledge Packs and attach them to specific agents as needed.
**Supported plans:**
* Business Professional: 1 Pack
* Business Growth: 2 Packs
* Agency Lite: 1 Pack
* Agency Unlimited: 2 Packs
#### Steps to Add a Knowledge Pack:
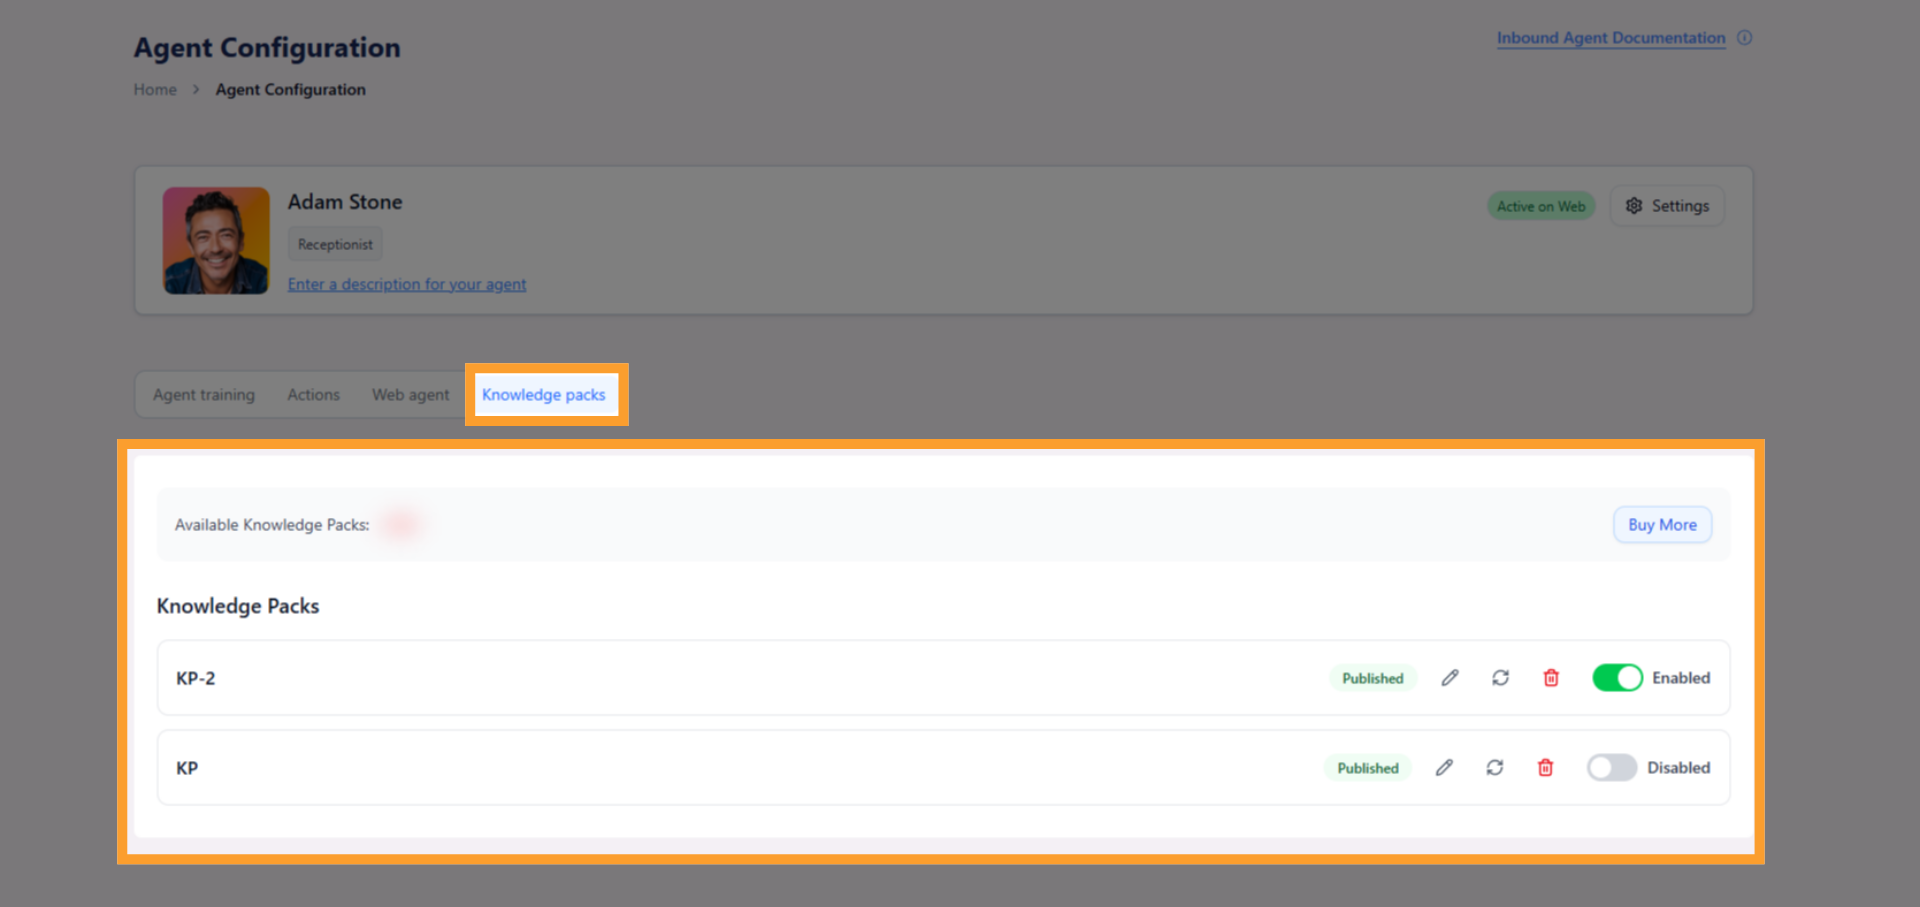
1. In your inbound agent configuration screen, scroll down and click **"Knowledge Packs."**
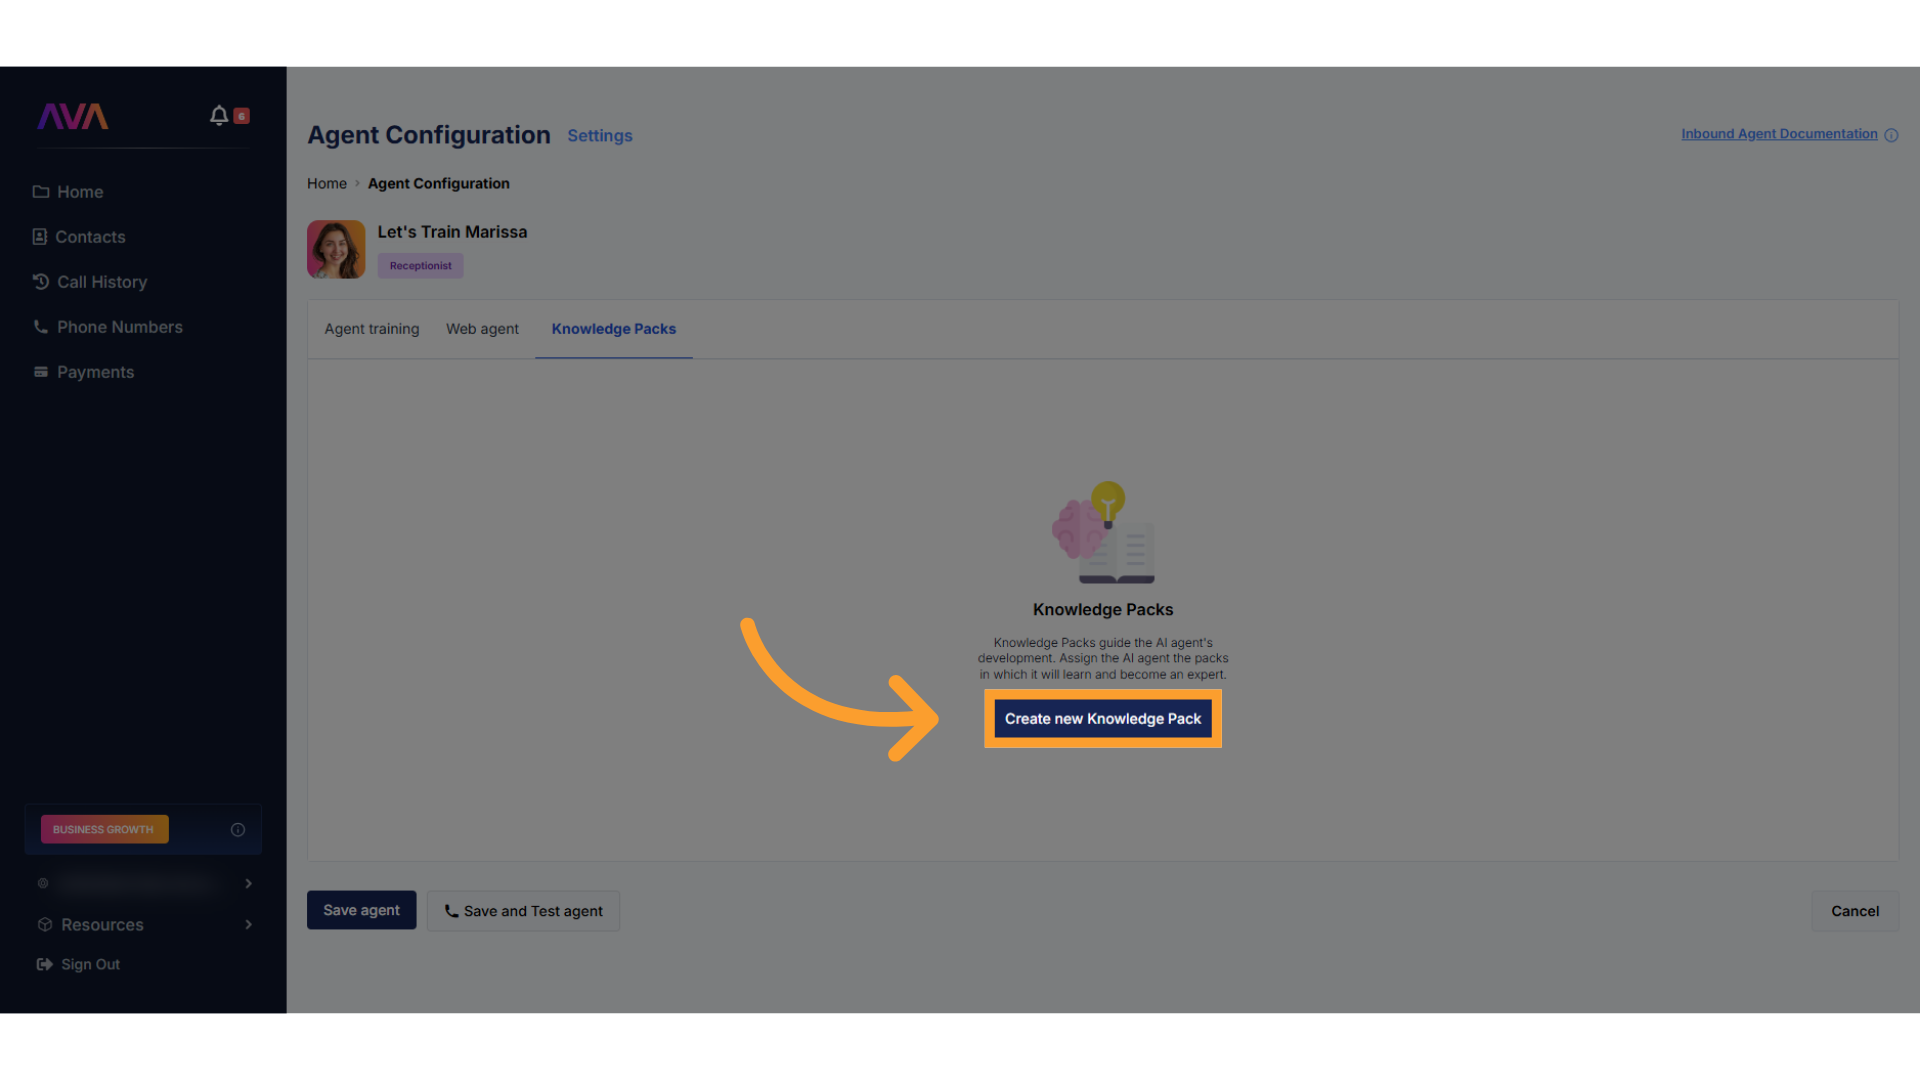
2. Click **"Create New Knowledge Pack"** to launch the builder.
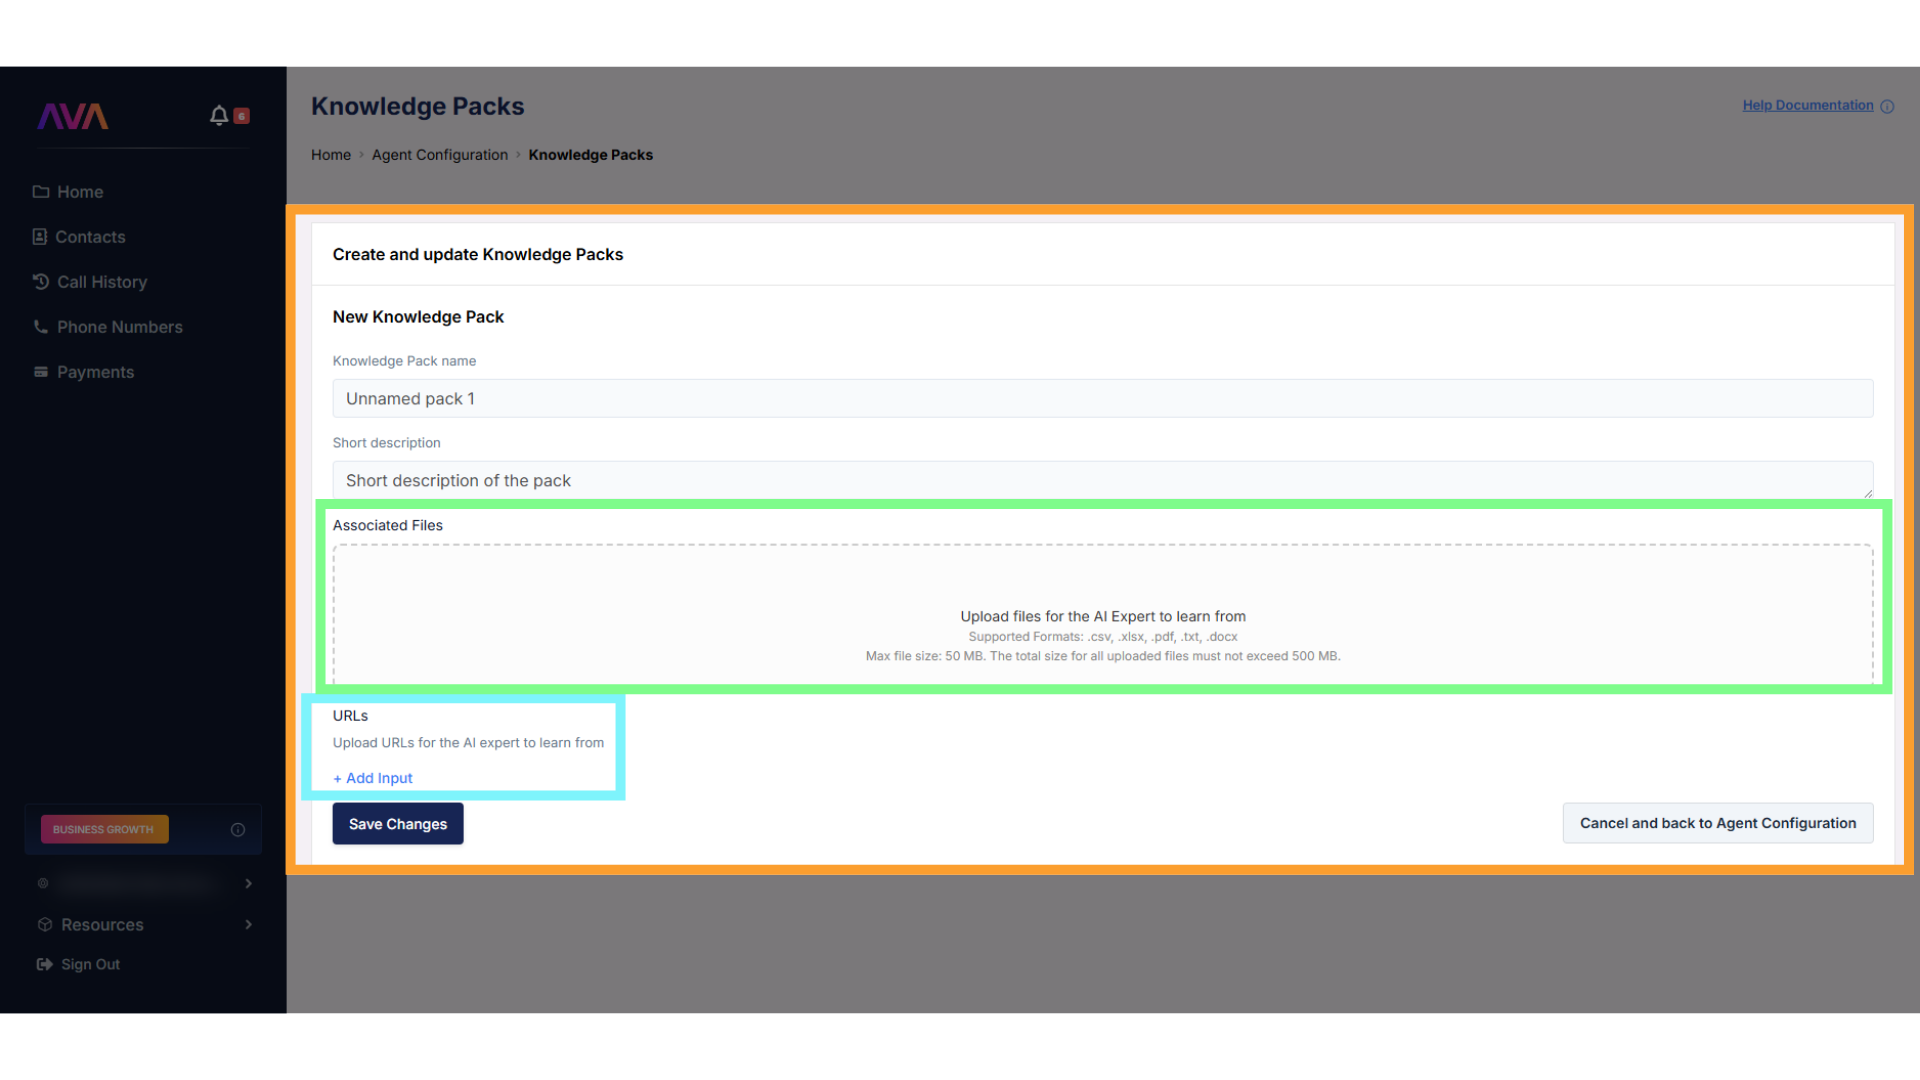
3. Choose one or both of the following sources:
* **Upload files** in .csv, .xlsx, .pdf, .txt, or .docx format
* Up to 50MB per file; total upload limit of 500MB
* **Enter URLs** to let thinkrr scan web pages for reference content
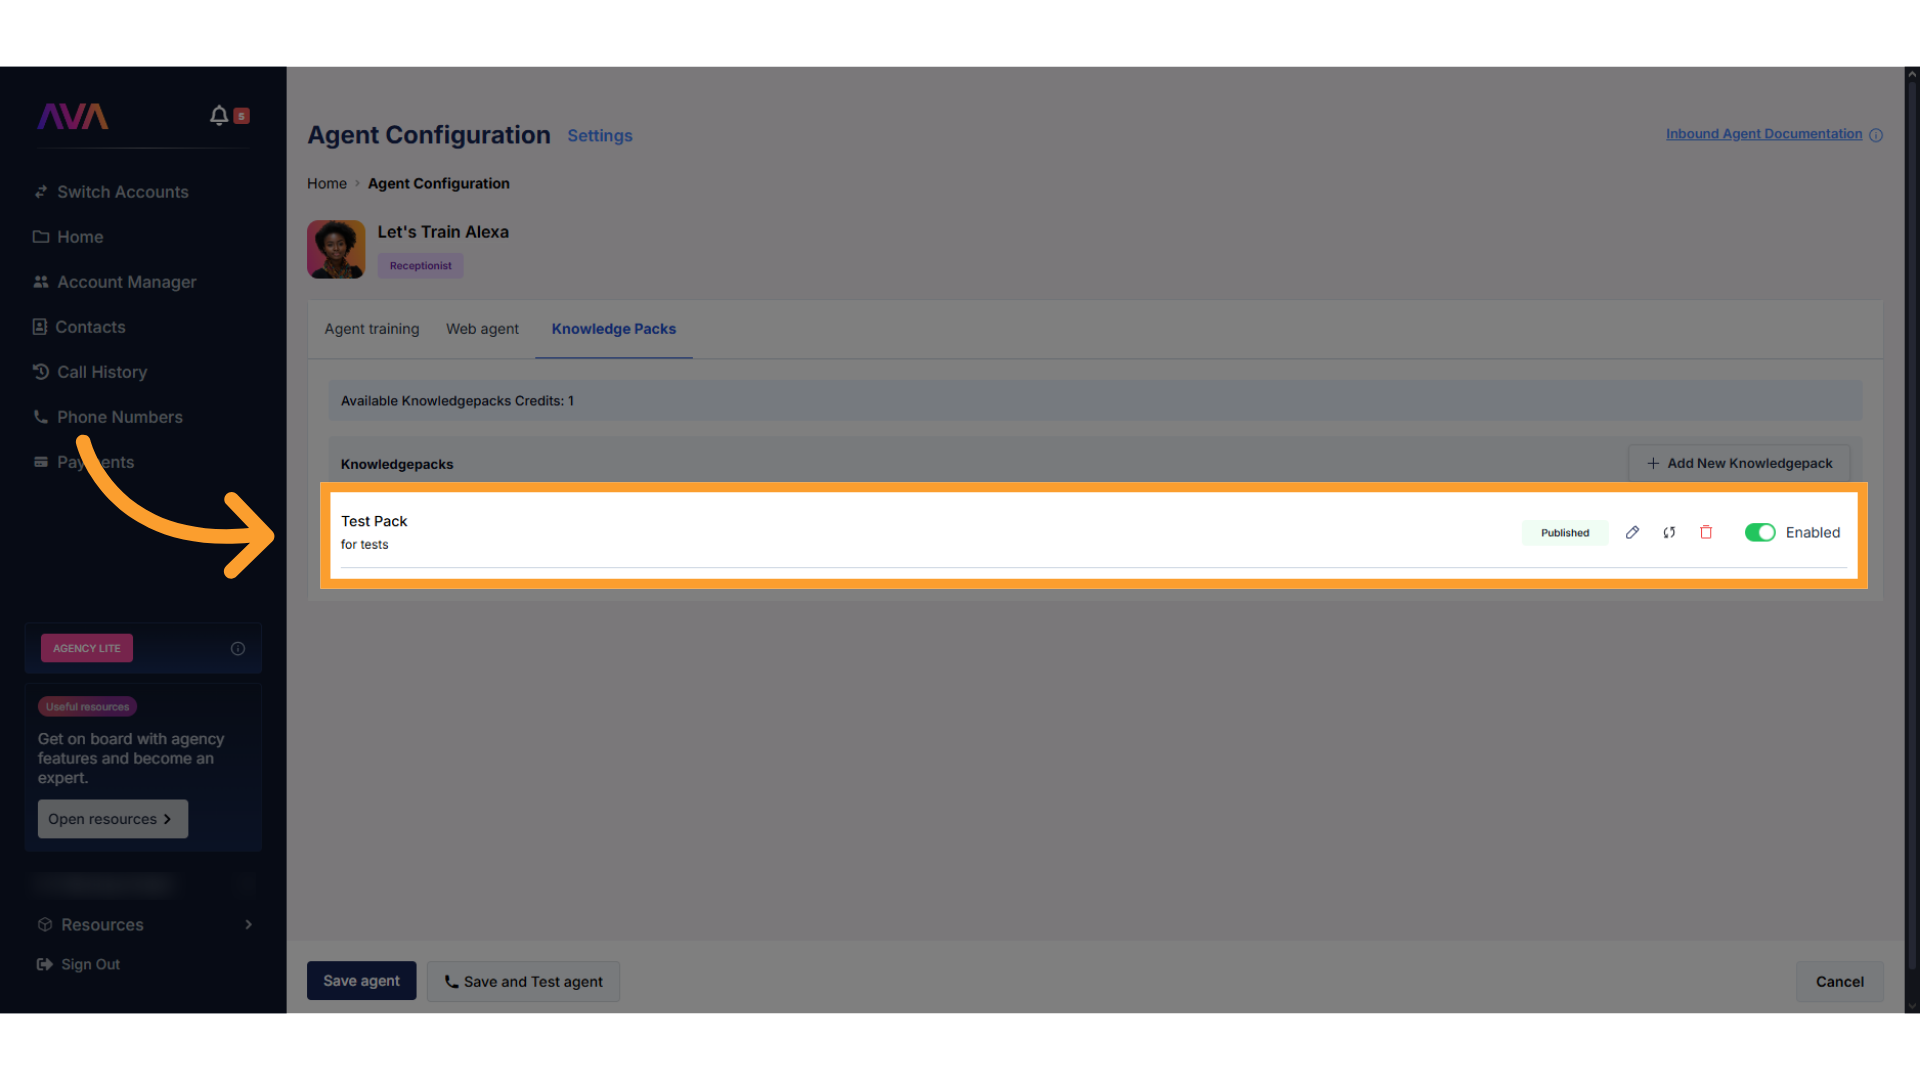
4. Once created, you can **edit**, **delete**, or **refresh** your pack from the right-hand menu.
* To disable access temporarily, simply **turn off** the pack instead of deleting it.
* You can re-enable the same pack at any time without losing the content.
🚫 **Note:** Sub-accounts cannot access Knowledge Packs created by an agency’s main account.
### 3. Assigning Actions to the Receptionist AI
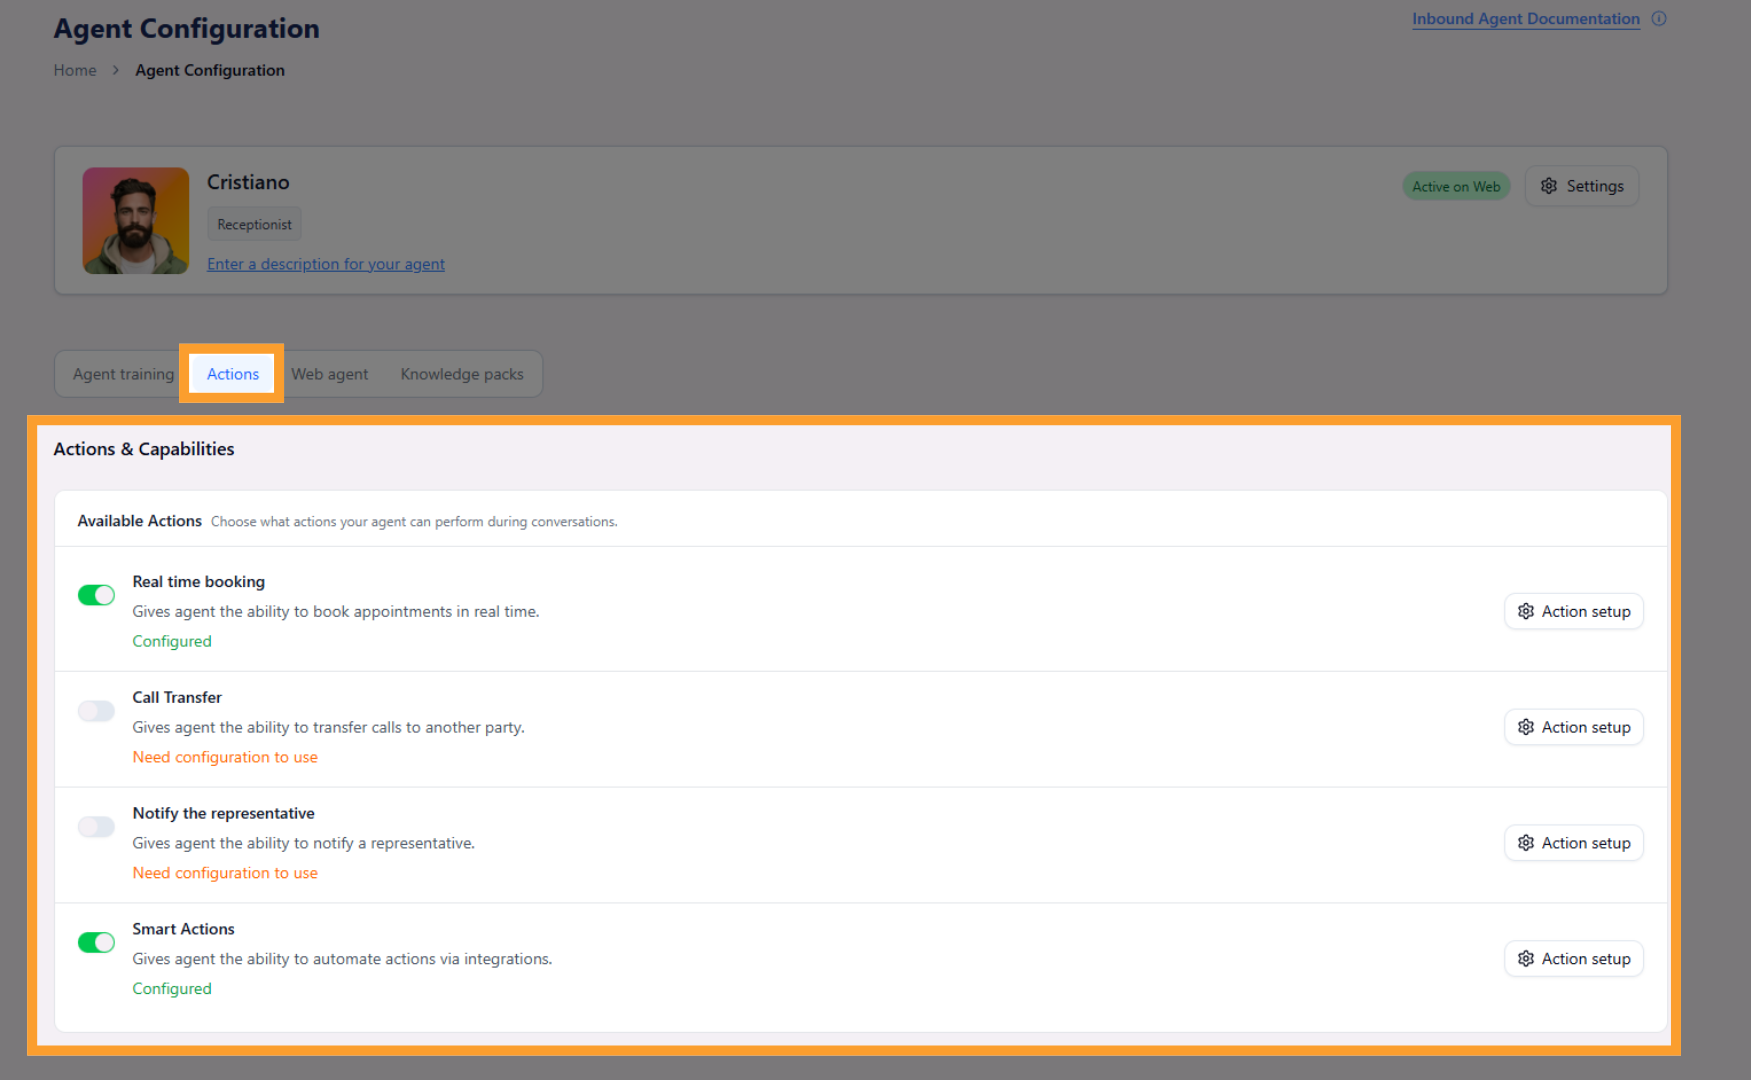
Once your agent’s behavior and optional modules are configured, let's move to the **Actions** tab.
Each action appears as a **toggle switch**:
* Turning a toggle **on** opens a configuration sidebar.
* Once configured, the setup will be **retained**, even if later turned off.
* Re-enabling the toggle restores the saved configuration instantly.
- Lets the agent book meetings into connected calendars.
- You must select a **GHL calendar**.
- Optional: Add **conditional logic** for when booking should occur.
- Works only in **phone-based** and **web-based** agents (not test calls).
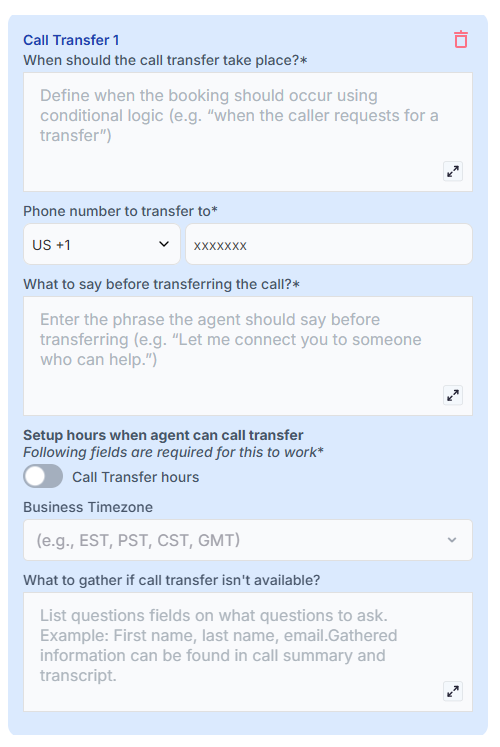
* Enter the **phone number** to transfer to.
* Define **when** the transfer should occur.
* Add a **message** to be spoken before the transfer (e.g., “Let me connect you to someone…”).
* Multiple call transfers can be set up with unique hours and conditions. If two conditions are true at once, the system prioritizes the first configuration in the list.
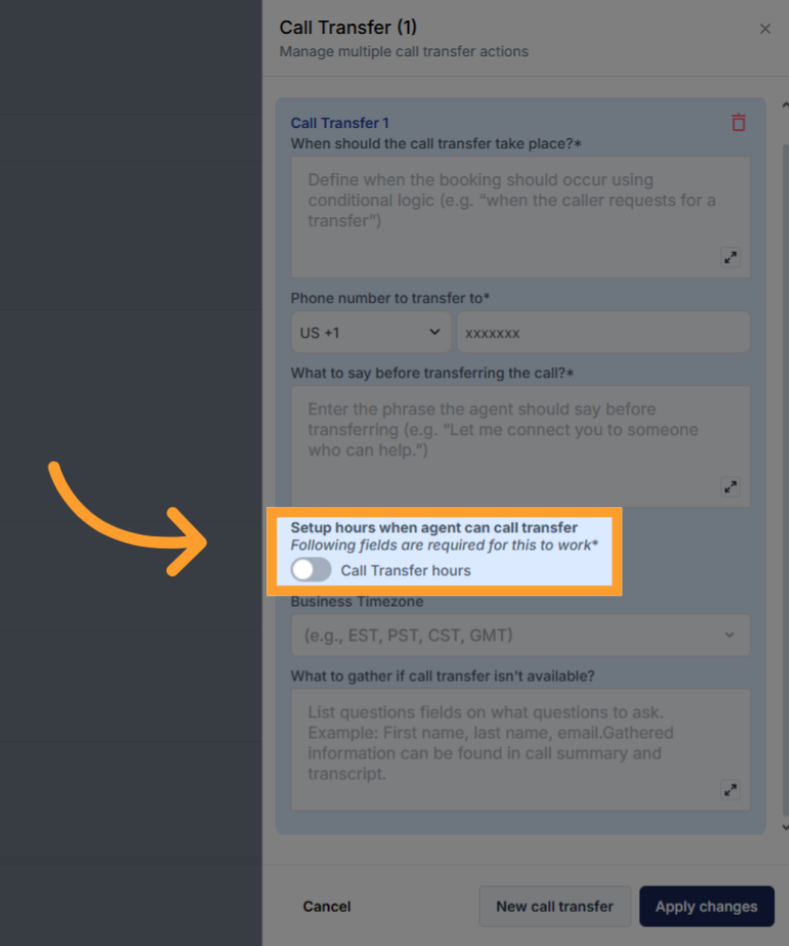
* You can configure **business/availability hours** to prevent disruptive off-hour transfers (e.g., 3 AM). Outside configured hours, the agent will offer alternatives such as taking a message or sending an email.
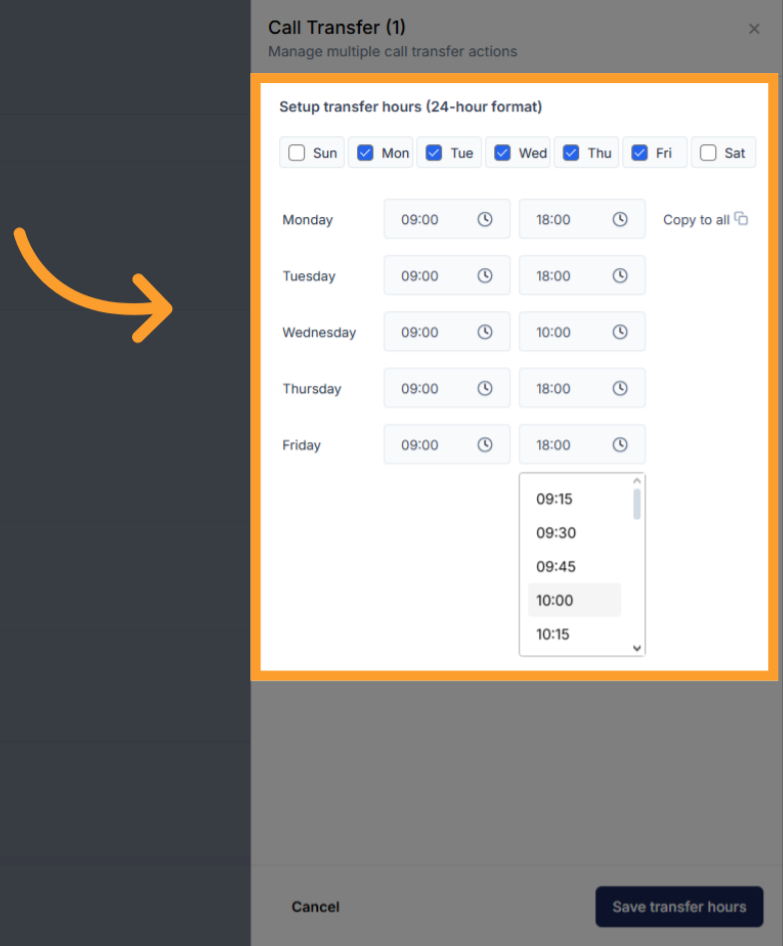
* Select the days of the week and customize the hours for each day. After customizing one day, use **Copy All** to apply the same hours across all days, if you wish.
* Transfers only work in **phone-based agents**.
* Enter up to **10 email addresses**.
* Each email includes:
* Caller details
* Summary + transcript
* Call sentiment
* Recording link (unless the call was transferred)
* These are **internal-only notifications**.
* Allows your agent to automate CRM follow-up actions after completing a call.
* Smart Actions require an active GoHighLevel CRM connection before they can be enabled.
* Once turned on, you can choose which actions should run when the agent finishes a conversation.
* **Actions to trigger**
* **Add Tags**
* Automatically apply one or more CRM tags to any contact who interacts with this inbound agent.
* Tags must already exist inside GoHighLevel before they can be selected.
* **Trigger Workflow**
* Automatically start one or more published GoHighLevel workflows after the call ends.
* Workflows must be configured and published inside GoHighLevel before they appear in the selection list.
> ⚠️ **Important**
>
> If you trigger workflows using Smart Actions, do not use **Inbound Agent Call** or **AI Voice Studio Smart Trigger** as the workflow trigger in GoHighLevel.
>
> Otherwise, the workflow may run twice.
***
## FAQs & Troubleshooting
### General Questions
Yes, you can create multiple agents for different departments or use cases.
Yes, you can train the AI using the **Key Information** section to ensure it knows relevant business details.
Yes, you can deploy the same AI for **phone calls and website interactions**.
Yes, inbound agents are designed to handle multiple concurrent calls without any issue.
No. If you don’t paste a URL during agent creation, you can add one later at any time. Open the agent configuration screen, click **Settings** at the top, and paste your website URL there to retrain and overwrite the existing training fields.
### Configuration
The Web Widget is configured under the **Web Agent** tab in the agent setup. You can customize colors, size, placement, and domain targeting.
Scroll to the **Knowledge Packs** section in the agent configuration. You can upload files or paste URLs, then toggle the pack on for the agent.
Yes. You can use dynamic placeholders in fields like greeting or key information to personalize responses.
### Usage and Results
Yes. Use the **Save & Test** feature to run simulations. Note: actions like bookings and transfers require live phone or web calls.
No. Call Transfers only work for **phone-based agents**.
Yes, if you've set up your custom email domain in the **White Label > Email** settings. Otherwise, emails will default to @thinkrr.ai.
***
For additional questions or guidance, try using our [**Virtual Support Agent**](/Thinkrr-Support-Agent)! Available 24/7 to help resolve most issues quickly at [thinkrr.ai/support](https://thinkrr.ai/support).
If you still need assistance, visit our support site at [help.thinkrr.ai](http://help.thinkrr.ai) or contact our team directly at [hello@thinkrr.ai](mailto:hello@thinkrr.ai).
.jpg?fit=max&auto=format&n=RODsmrLust0zzcIM&q=85&s=893e00abd8389666b181fbbd0ec0ca69) Otherwise, navigate to the **Home** screen in thinkrr.
* Click **"Add New Agent"** in the **Active Agents** section.
Otherwise, navigate to the **Home** screen in thinkrr.
* Click **"Add New Agent"** in the **Active Agents** section.
 * Choose whether the agent should be:
* Tied to a **phone number**
* Deployed to the **web**
* Both
* Choose whether the agent should be:
* Tied to a **phone number**
* Deployed to the **web**
* Both
 When creating a new inbound agent, configuration is organized into three tabs: **Agent Settings**, **Call Settings**, and **Voice Settings**.
* **Agent Settings**
* **Agent Role** – Select **Receptionist** to determine the agent's function and tone.
* **Agent Name** – Customize how the agent refers to itself during calls. If left blank, it will use its default name.
* **Train Agent from Website** – Paste a public company URL and thinkrr will use your website content to pre-configure the training fields in the next step.
* **Phone Number** – Assign an available number (**Inbound Agents cannot share phone numbers**).
* **Language** – Agents can only speak their specifically assigned language. The selected language determines which voices are available.
* **Ethnicity** – Optional voice style filter to help narrow down accent and delivery options.
* **Agent Voice** – Use the **Listen** button to preview and select a voice.
When creating a new inbound agent, configuration is organized into three tabs: **Agent Settings**, **Call Settings**, and **Voice Settings**.
* **Agent Settings**
* **Agent Role** – Select **Receptionist** to determine the agent's function and tone.
* **Agent Name** – Customize how the agent refers to itself during calls. If left blank, it will use its default name.
* **Train Agent from Website** – Paste a public company URL and thinkrr will use your website content to pre-configure the training fields in the next step.
* **Phone Number** – Assign an available number (**Inbound Agents cannot share phone numbers**).
* **Language** – Agents can only speak their specifically assigned language. The selected language determines which voices are available.
* **Ethnicity** – Optional voice style filter to help narrow down accent and delivery options.
* **Agent Voice** – Use the **Listen** button to preview and select a voice.
 * **Call Settings**
* **Include History** – Option to let the agent remember past conversations (phone agent only).
* **Noise Isolation Mode** – Filters out background voices.
* **Maximum Call Duration** – Caps call time (set in minutes).
* **End Call After Silence** – Ends calls automatically after a set period of silence.
* **Background Sound** – Add ambient noise (e.g., Coffee Shop).
* **Background Volume Slider** – Appears if background sound is enabled.
* **Call Settings**
* **Include History** – Option to let the agent remember past conversations (phone agent only).
* **Noise Isolation Mode** – Filters out background voices.
* **Maximum Call Duration** – Caps call time (set in minutes).
* **End Call After Silence** – Ends calls automatically after a set period of silence.
* **Background Sound** – Add ambient noise (e.g., Coffee Shop).
* **Background Volume Slider** – Appears if background sound is enabled.
 * **Voice Settings**
* **Loudness Level (volume)** – Adjust how loud or soft your agent talks.
* **Responsiveness** – Decide how quickly your agent replies.
* Less responsive: Gives users more time to think or speak without interruption.
* More responsive: Makes for fast-paced chats or real-time assistance.
* **Interruption Sensitivity** – Controls how easily you can cut off the agent mid-sentence.
* High sensitivity: Easy to interrupt at any time.
* Low sensitivity: Agent will usually finish speaking before listening again.
* **Voice Settings**
* **Loudness Level (volume)** – Adjust how loud or soft your agent talks.
* **Responsiveness** – Decide how quickly your agent replies.
* Less responsive: Gives users more time to think or speak without interruption.
* More responsive: Makes for fast-paced chats or real-time assistance.
* **Interruption Sensitivity** – Controls how easily you can cut off the agent mid-sentence.
* High sensitivity: Easy to interrupt at any time.
* Low sensitivity: Agent will usually finish speaking before listening again.
 ### 2. Defining the Receptionist’s Behavior
Once the **Receptionist** role is selected and your initial settings are configured, you will need to train the Inbound Agent to properly represent your business.
If you need to revisit or update these settings later, click the **Settings** button at the top of the agent’s page. This reopens the same three tabs—**Agent Settings**, **Call Settings**, and **Voice Settings**—allowing you to make adjustments at any time.
The following input fields determine how the agent will interact with callers:
* **How will the agent greet callers?** – How the **Receptionist** answers calls or starts interactions (e.g., “Hello! Thanks for calling \[Company Name]”).
* **Introduction text (optional)** – Optional text where the Agent introduces itself and its function.
* **Representative name** – Name of the business representative the AI is assisting.
* **Representative title** – Job title of the representative.
* **Company name** – The company the Agent is working on behalf of.
* **Information to gather** – What details the Agent should collect from the caller during the interaction.
* **Key information** – Business-specific data that the Agent should know.
* **Primary goal** – The main purpose of the Agent.
### 2. Defining the Receptionist’s Behavior
Once the **Receptionist** role is selected and your initial settings are configured, you will need to train the Inbound Agent to properly represent your business.
If you need to revisit or update these settings later, click the **Settings** button at the top of the agent’s page. This reopens the same three tabs—**Agent Settings**, **Call Settings**, and **Voice Settings**—allowing you to make adjustments at any time.
The following input fields determine how the agent will interact with callers:
* **How will the agent greet callers?** – How the **Receptionist** answers calls or starts interactions (e.g., “Hello! Thanks for calling \[Company Name]”).
* **Introduction text (optional)** – Optional text where the Agent introduces itself and its function.
* **Representative name** – Name of the business representative the AI is assisting.
* **Representative title** – Job title of the representative.
* **Company name** – The company the Agent is working on behalf of.
* **Information to gather** – What details the Agent should collect from the caller during the interaction.
* **Key information** – Business-specific data that the Agent should know.
* **Primary goal** – The main purpose of the Agent.
 If you need assistance filling in these training fields, you can use the built-in **AI Copilot**.
 * **Click "Perfect, let’s create the agent"** once you’re satisfied. The assistant will automatically populate the customizable fields shown above, giving you a solid starting point you can refine.
 We recommend not overthinking the instructions. Train your agent the way you would train an intern; not by defining an exact script, but by providing guidelines and considerations you want it to follow.
 2. Click **"Create New Knowledge Pack"** to launch the builder.
 3. Choose one or both of the following sources:
* **Upload files** in .csv, .xlsx, .pdf, .txt, or .docx format
* Up to 50MB per file; total upload limit of 500MB
* **Enter URLs** to let thinkrr scan web pages for reference content
3. Choose one or both of the following sources:
* **Upload files** in .csv, .xlsx, .pdf, .txt, or .docx format
* Up to 50MB per file; total upload limit of 500MB
* **Enter URLs** to let thinkrr scan web pages for reference content
 4. Once created, you can **edit**, **delete**, or **refresh** your pack from the right-hand menu.
* To disable access temporarily, simply **turn off** the pack instead of deleting it.
* You can re-enable the same pack at any time without losing the content.
4. Once created, you can **edit**, **delete**, or **refresh** your pack from the right-hand menu.
* To disable access temporarily, simply **turn off** the pack instead of deleting it.
* You can re-enable the same pack at any time without losing the content.
 🚫 **Note:** Sub-accounts cannot access Knowledge Packs created by an agency’s main account.
.png?fit=max&auto=format&n=cUxtuDUW_RkAiPup&q=85&s=e1bcb349e932708239cc41acc740402a)
 * You can configure **business/availability hours** to prevent disruptive off-hour transfers (e.g., 3 AM).
 * Select the days of the week and customize the hours for each day. After customizing one day, use **Copy All** to apply the same hours across all days, if you wish.
 * Transfers only work in **phone-based agents**.
.png?fit=max&auto=format&n=d9INt8_clMeLOZYl&q=85&s=6680c602305ea07d657b708a30d0ea96)
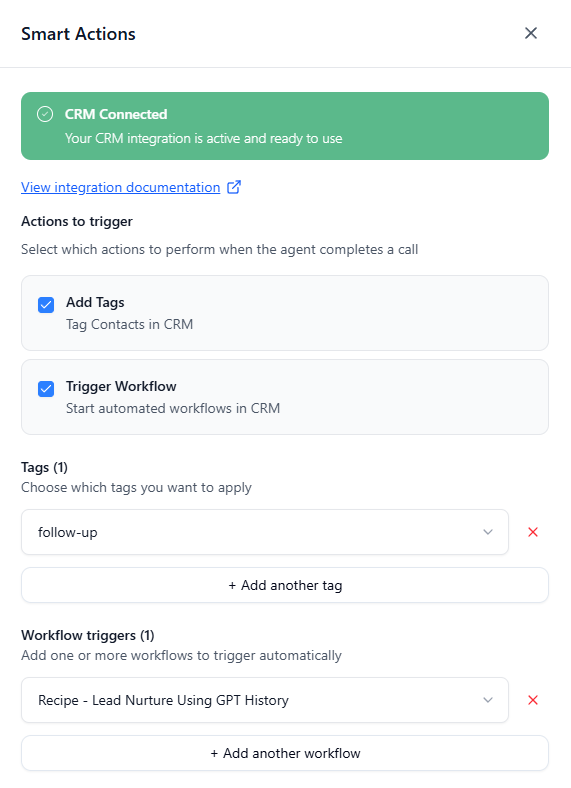 * **Actions to trigger**
* **Add Tags**
* Automatically apply one or more CRM tags to any contact who interacts with this inbound agent.
* Tags must already exist inside GoHighLevel before they can be selected.
* **Trigger Workflow**
* Automatically start one or more published GoHighLevel workflows after the call ends.
* Workflows must be configured and published inside GoHighLevel before they appear in the selection list.
> ⚠️ **Important**
>
> If you trigger workflows using Smart Actions, do not use **Inbound Agent Call** or **AI Voice Studio Smart Trigger** as the workflow trigger in GoHighLevel.
>
> Otherwise, the workflow may run twice.
* **Actions to trigger**
* **Add Tags**
* Automatically apply one or more CRM tags to any contact who interacts with this inbound agent.
* Tags must already exist inside GoHighLevel before they can be selected.
* **Trigger Workflow**
* Automatically start one or more published GoHighLevel workflows after the call ends.
* Workflows must be configured and published inside GoHighLevel before they appear in the selection list.
> ⚠️ **Important**
>
> If you trigger workflows using Smart Actions, do not use **Inbound Agent Call** or **AI Voice Studio Smart Trigger** as the workflow trigger in GoHighLevel.
>
> Otherwise, the workflow may run twice.