Overview
By setting up Auto-Recharge, users can automate credit top-ups when their account balance falls below a specified Threshold, preventing service disruptions and ensuring smooth call operations. This guide walks you through how to configure Auto-Recharge and manage your Threshold Settings to optimize credit usage. It also highlights key considerations, especially under thinkrr’s credit-based billing model, where your USD credit converts into minutes dynamically based on your current pricing rate.What Is Auto-Recharge?
Auto-Recharge is a feature that allows users to automatically purchase additional credit when their wallet balance falls below a predefined Threshold amount. This ensures uninterrupted service without requiring manual top-ups each time your credit runs low. For example:- Threshold Amount: $10
- Auto-Recharge Amount: $50
💡 Since thinkrr uses dynamic per-minute pricing, the number of minutes your $50 will generate will depend on your selection: $0.16/min for Premium minutes or $0.09/min for Basic minutes.
How to Set Up Auto-Recharge & Threshold Settings
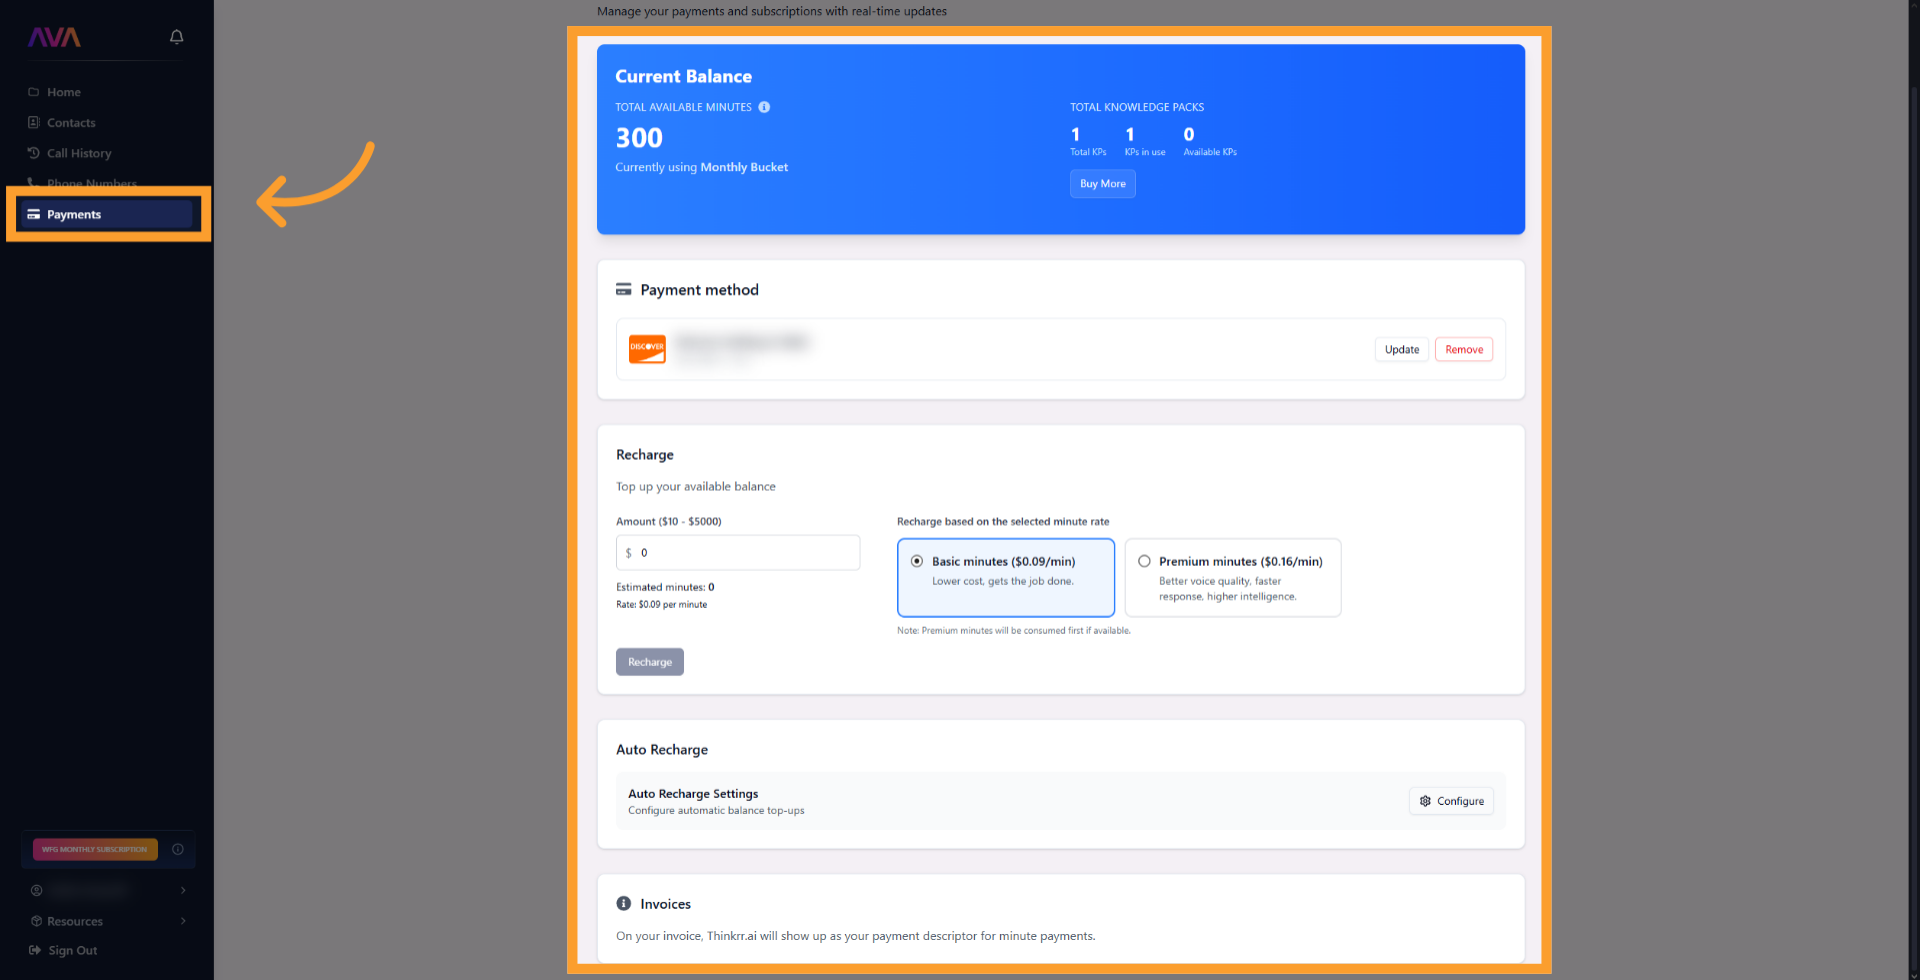
Navigate to the Payments Section
- In the thinkrr Voice AI platform, click on Payments from the main side panel to access your wallet.
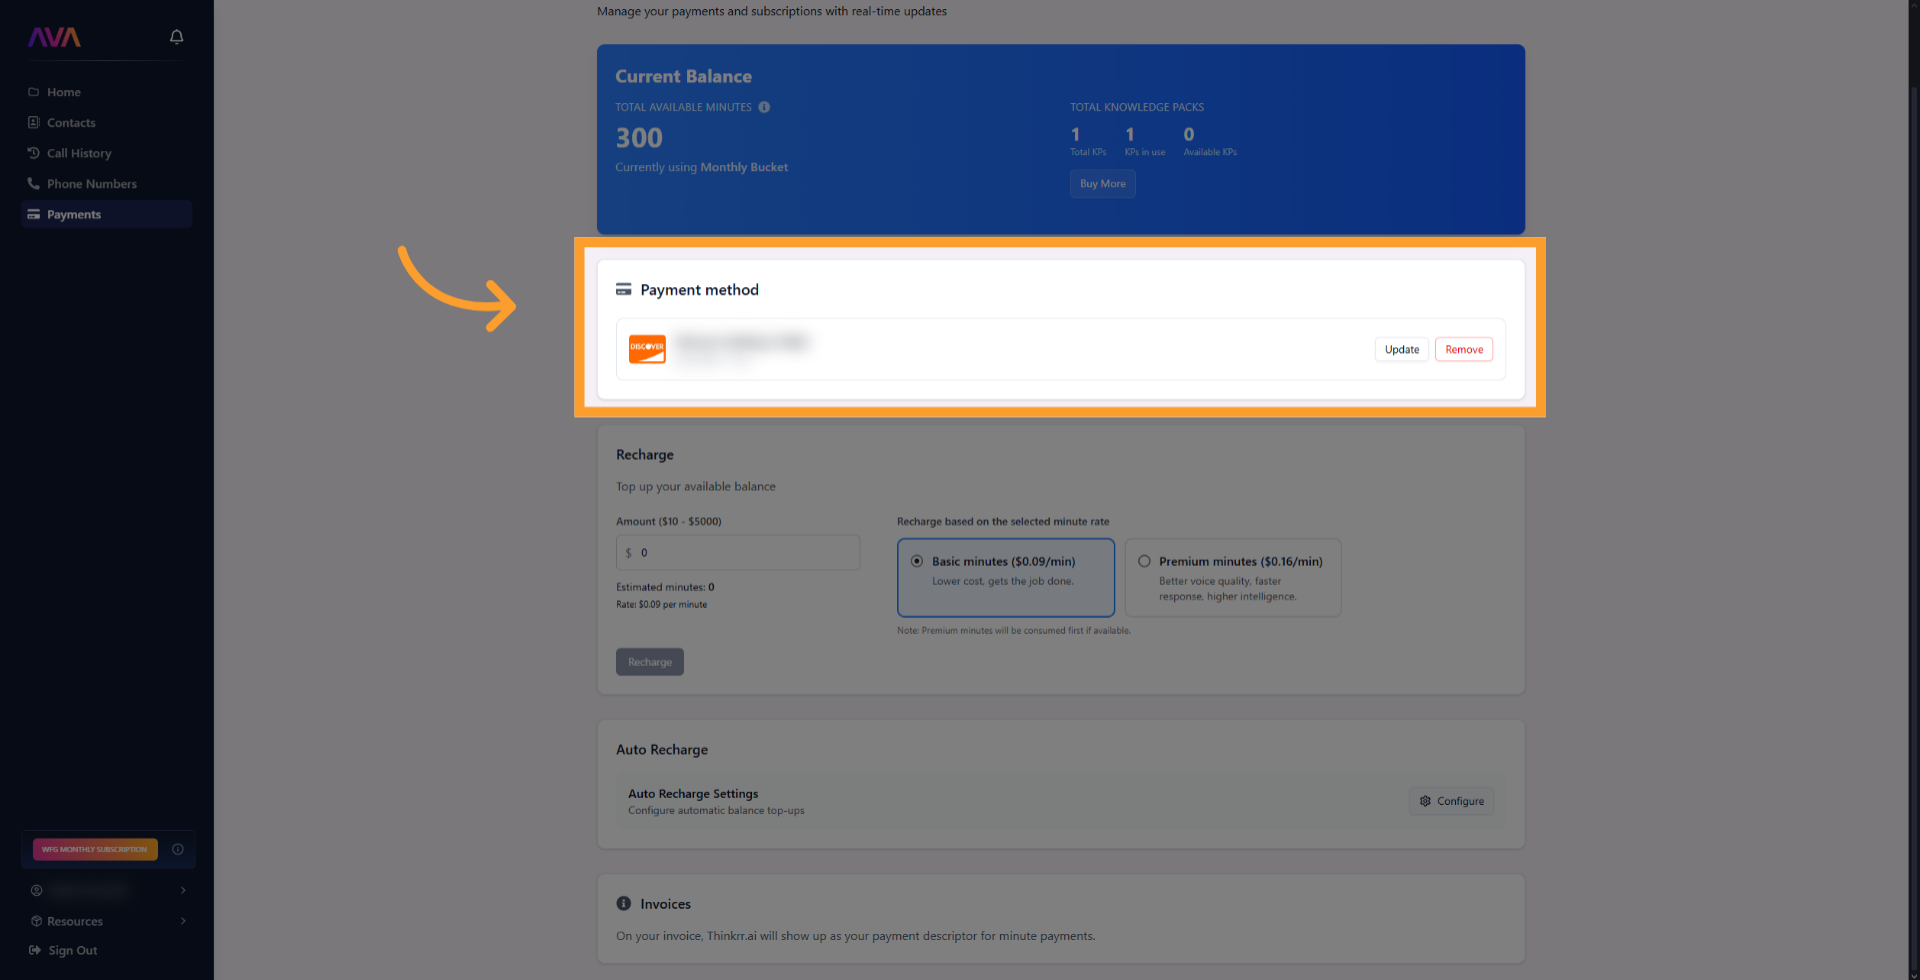
Add a Payment Method (if not already done)
- Ensure you have a valid credit or debit card added to your account.
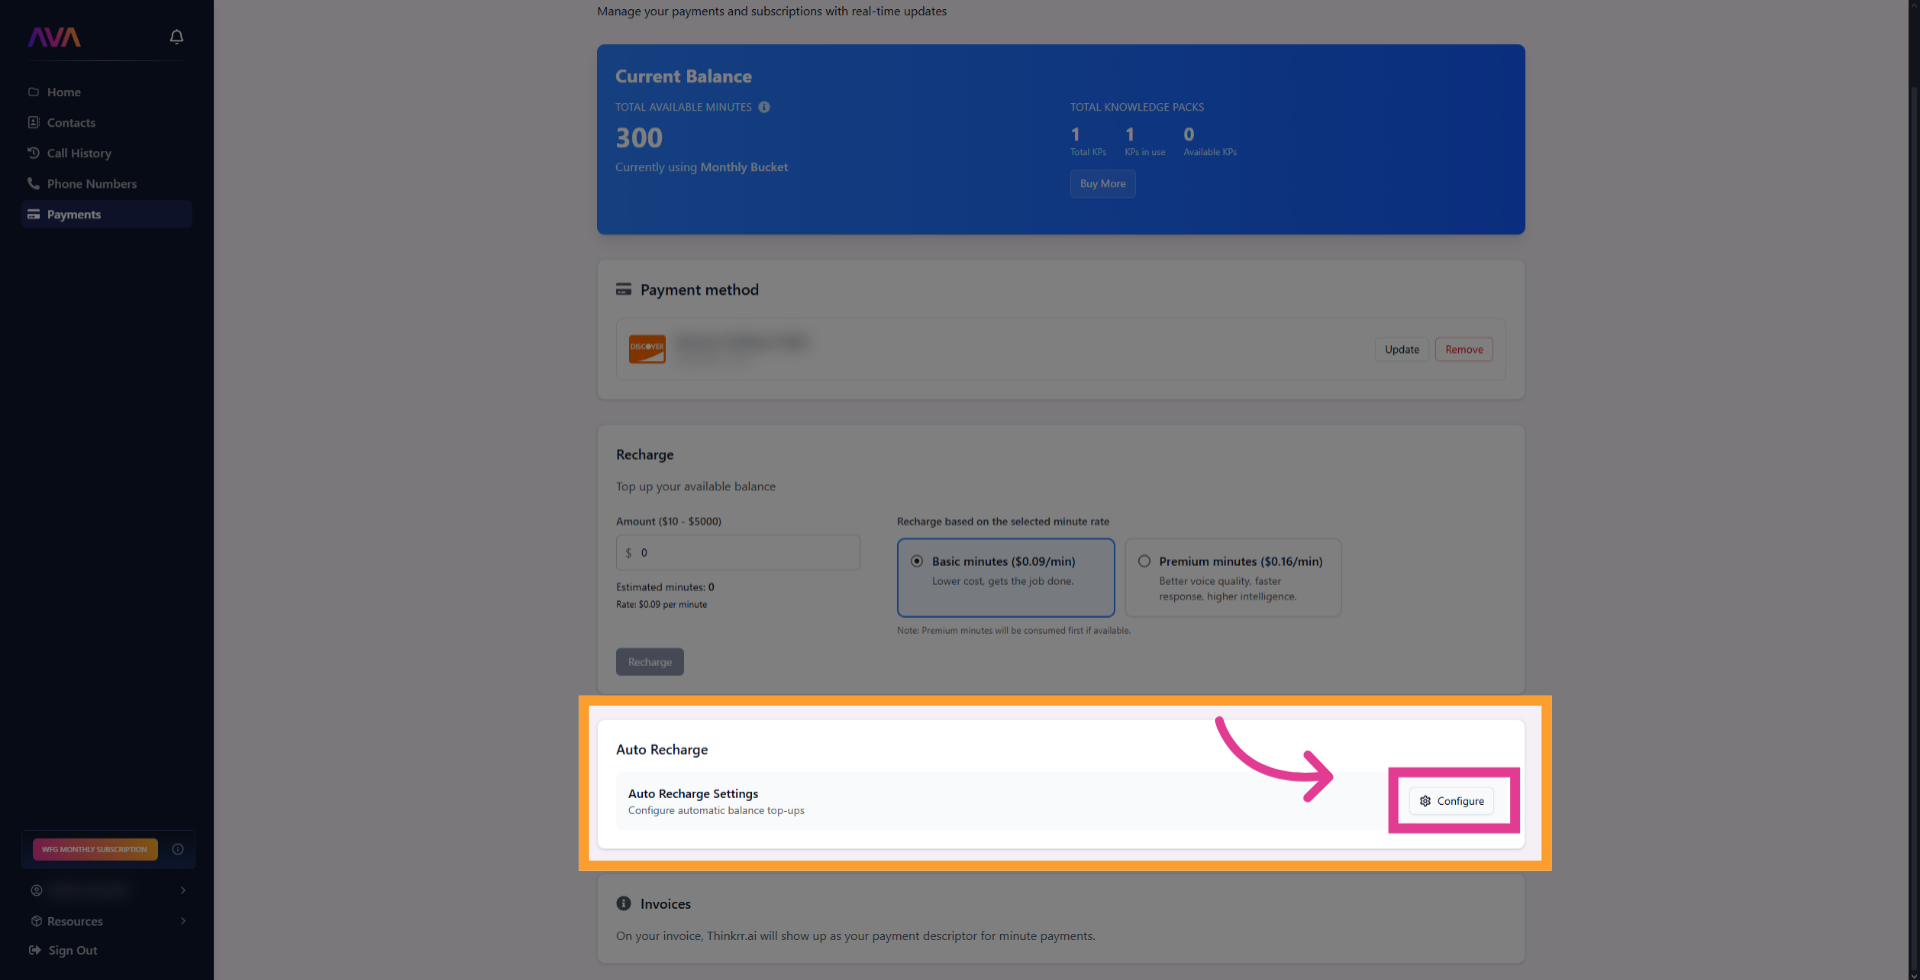
Set Your Threshold & Auto-Recharge Amount
- Click the ‘Configure’ button to open the recharge conditions interface
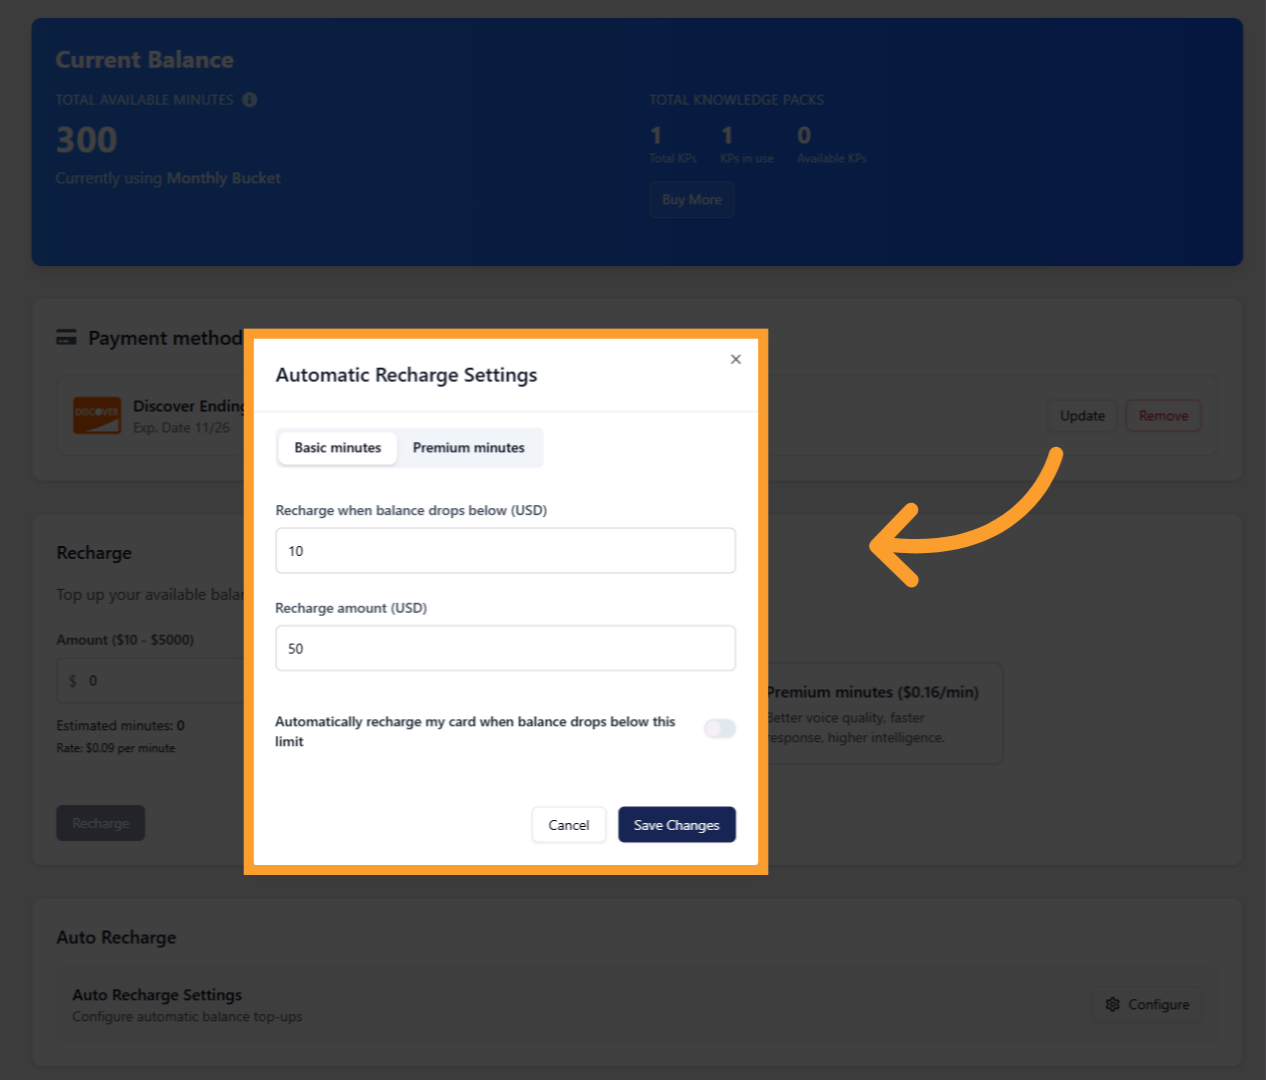
Save Settings
- In the new interface, set the following values:
- Minimum Threshold: The wallet balance that triggers an Auto-Recharge.
- Auto-Recharge Amount: The amount of credit purchased when your balance drops below the threshold.
- Toggle the slide on for the recharge to be done automatically when you current balance drops below the set amount.
Sub-Account Minute Auto Allocation
Monthly Sub-Account Auto Allocation lets agencies purchase and assign Basic and Premium minutes to a specific sub-account on a recurring monthly basis. This is configured from Account Manager, not the Payments tab.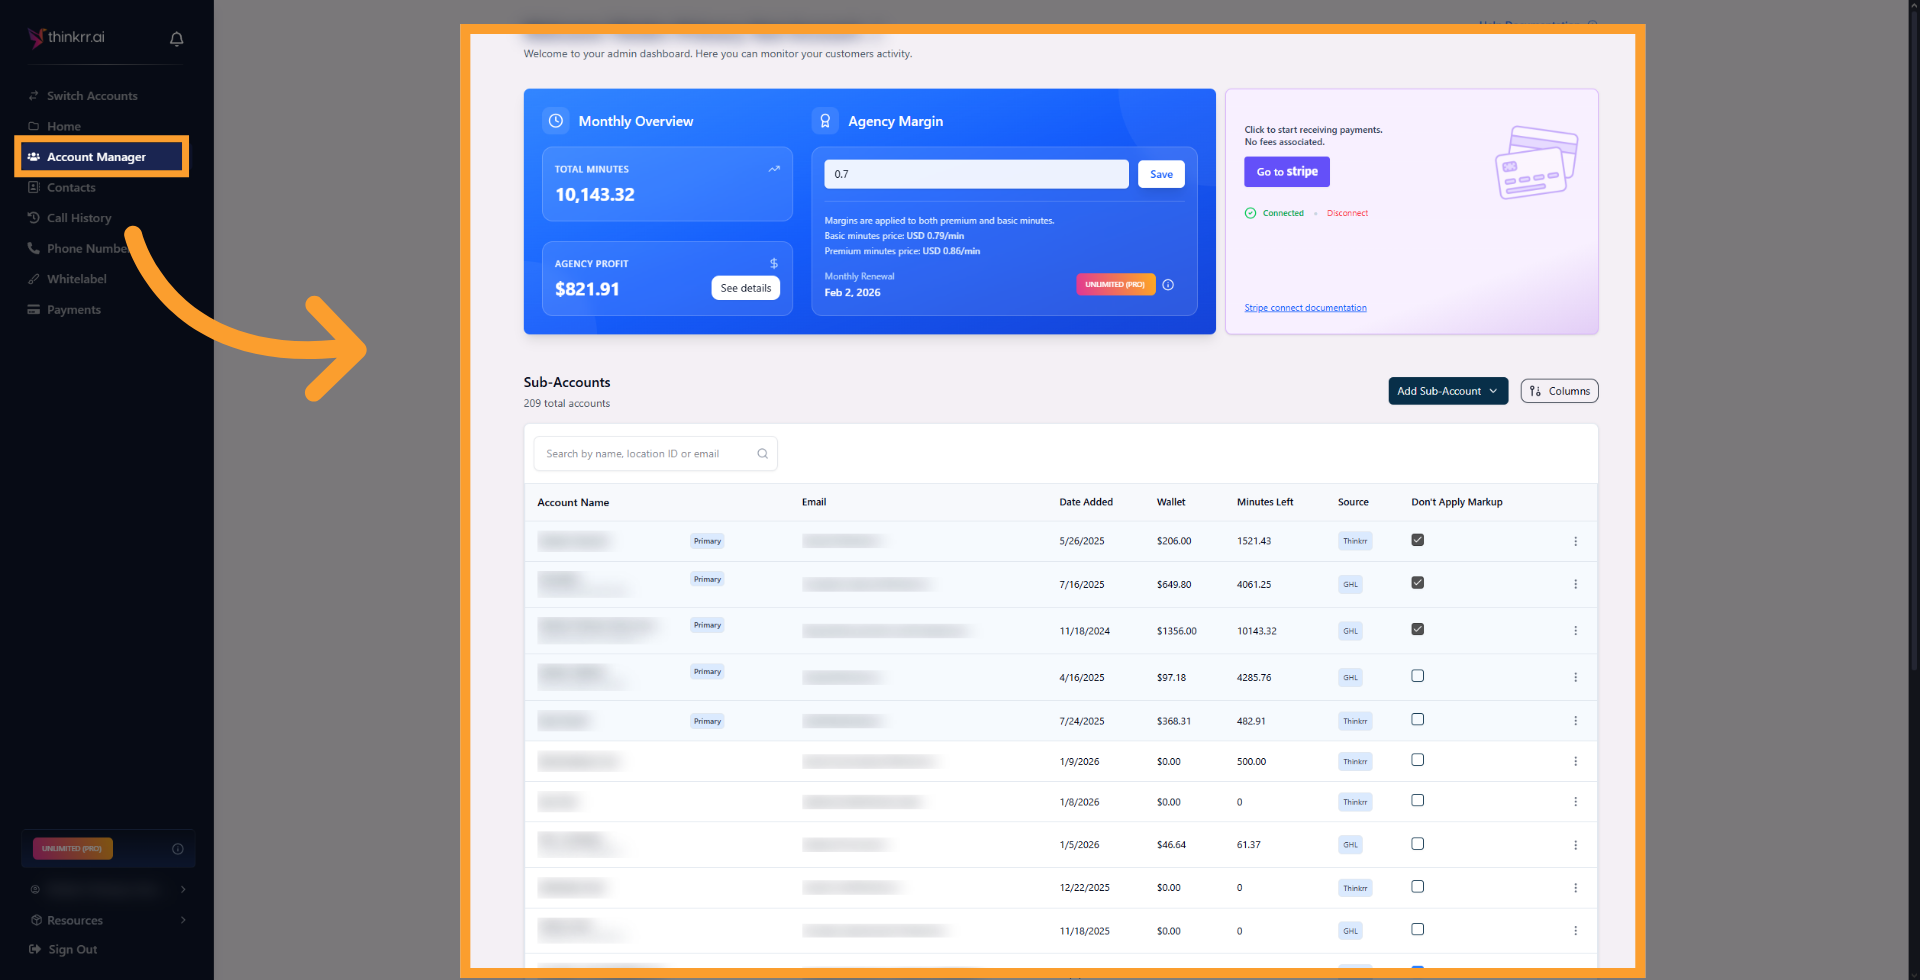
Select the Sub-Account
- Find the sub-account you want to manage in the list.
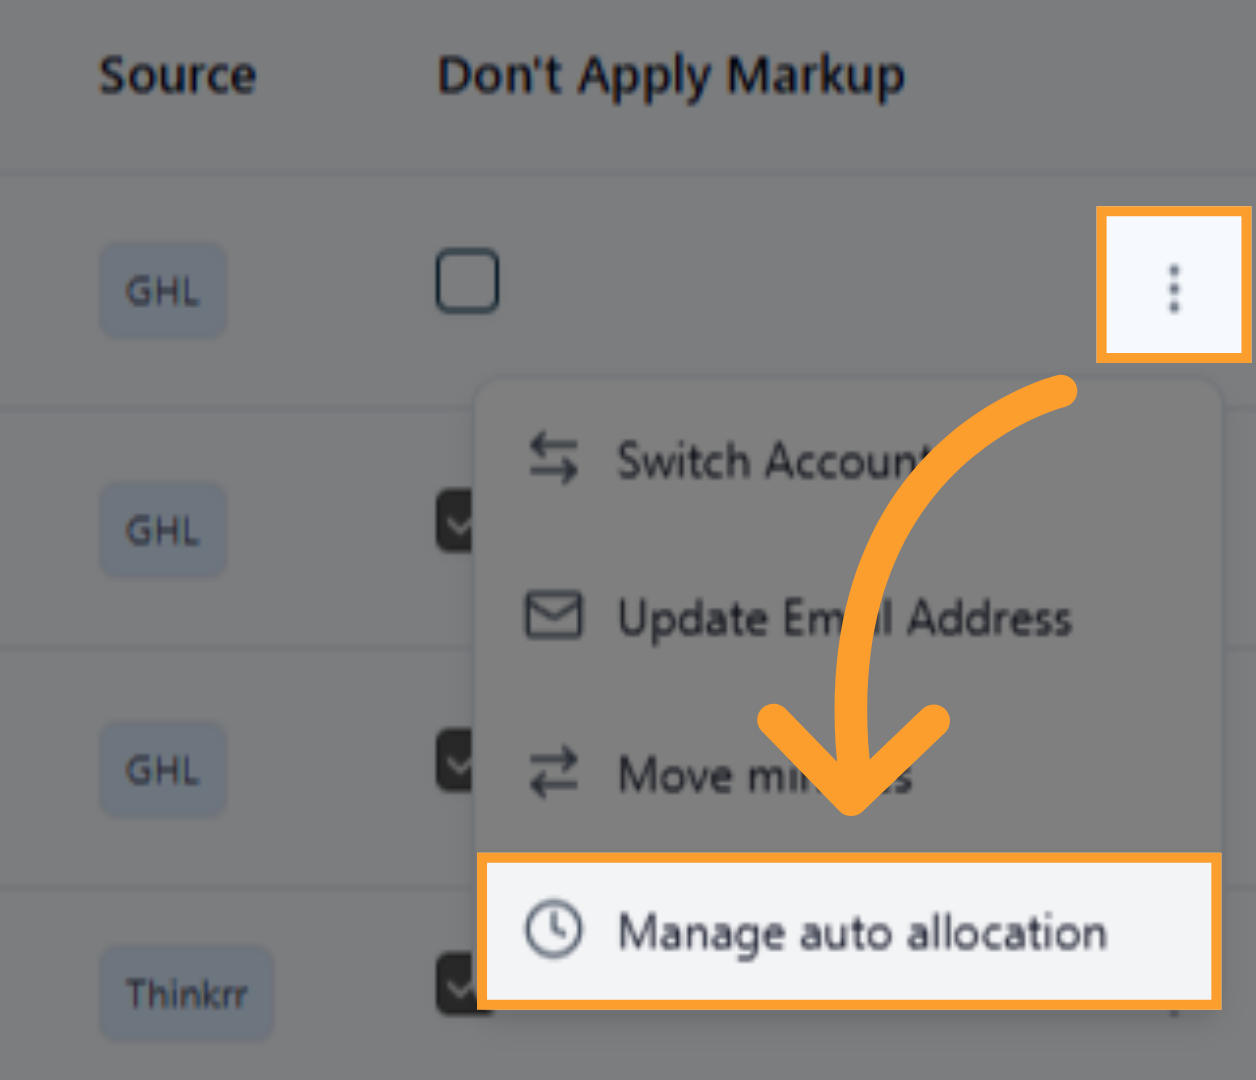
- Click the three-dot menu next to that sub-account.
-
Select Manage auto allocation.
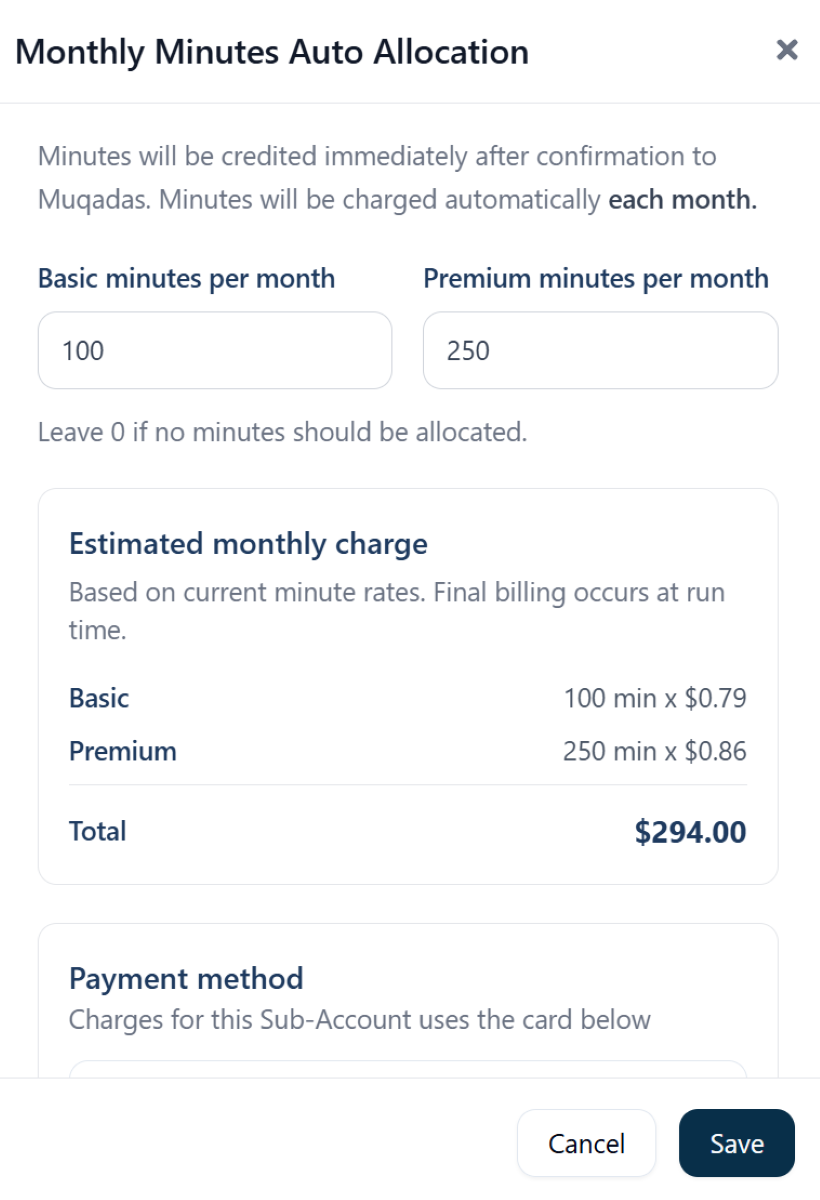
Set Monthly Minutes
- Enter how many Basic minutes should be allocated each month.
- Enter how many Premium minutes should be allocated each month.
- Leave a value as 0 if you do not want to allocate that minute type.
-
Review the Estimated monthly charge shown in the panel.
- This estimate is based on current minute rates.
- Final billing occurs at runtime.
Important Considerations
- Dynamic Pricing Impact: Credit does not equate to a fixed number of minutes. The amount of minutes your credit buys depends on your current per-minute rate.
- Minute Type Affects Value: Premium minutes are billed at $0.16/min and Basic minutes at $0.09/min. Your credit balance converts to minutes dynamically based on which rate applies to your current usage.
- Threshold Sync: If your balance is below the threshold when you set it, the system will immediately trigger a recharge.
You set a threshold of 15 → the system recharges your wallet immediately to push your balance above the threshold.
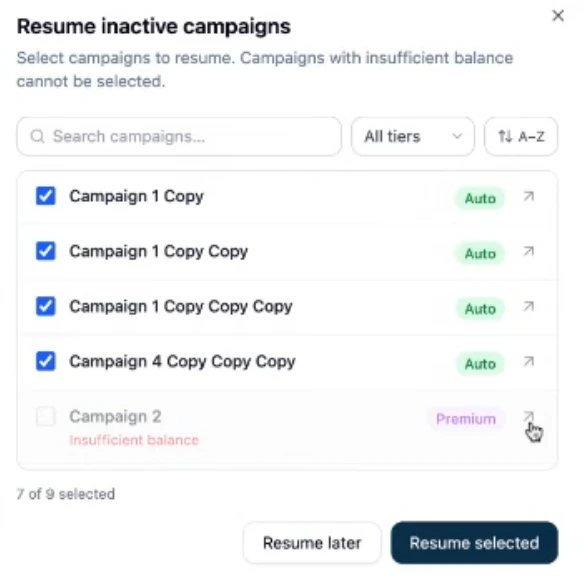
Campaign Autopause
If your balance drops below the minimum required to continue calling, affected campaigns are paused automatically.See the low-balance warning
- A warning banner appears across the app when one or more campaigns become inactive due to low balance.
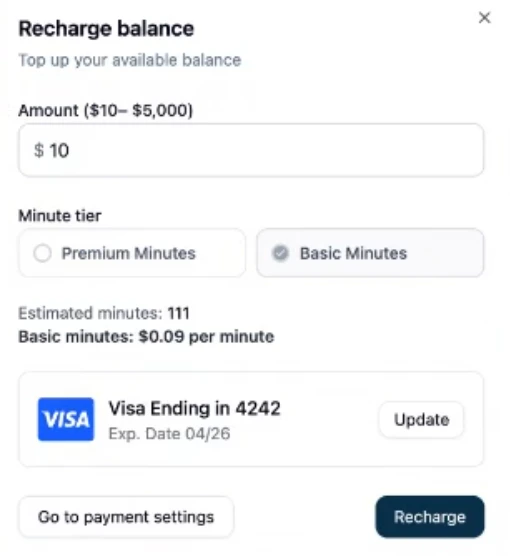
- Click Recharge to add more minutes and continue calling.

Choose the recharge amount and minute tier
- Enter the amount you want to add to your balance.
- Select whether you want to purchase:
- Premium Minutes
- Basic Minutes
FAQs & Troubleshooting
General Questions
What is Auto-Recharge?
What is Auto-Recharge?
Auto-Recharge automatically purchases more credit when your wallet balance falls below a set threshold, preventing interruptions in service.
Why should I use Auto-Recharge?
Why should I use Auto-Recharge?
It ensures you never run out of credit, avoiding disruptions to your AI Agent’s call flow or campaign delivery.
How do I automatically allocate minutes to a sub-account?
How do I automatically allocate minutes to a sub-account?
Go to Account Manager, open the three-dot menu next to the sub-account, select Manage, then choose Manage Auto Allocation.From there, set the number of Basic and/or Premium minutes you want to allocate each month and save your settings. The selected minutes will be purchased monthly and credited to that sub-account.Monthly Sub-Account Auto Allocation allows you to purchase additional Basic or Premium minutes on a recurring monthly basis for a selected sub-account. It does not transfer or redistribute the Premium minutes included with your primary plan. Included monthly minutes remain reserved for the primary account and cannot be automatically allocated to sub-accounts.
Configuration
How do I set up Auto-Recharge?
How do I set up Auto-Recharge?
Go to the Payments section, add a payment method, then define your Threshold and Auto-Recharge Amount. Click Save to activate.
What if my wallet balance is already below the threshold?
What if my wallet balance is already below the threshold?
The system will immediately trigger a recharge to bring your balance above the threshold using your saved payment method.
Can I change my Auto-Recharge settings later?
Can I change my Auto-Recharge settings later?
Yes, you can adjust or disable Auto-Recharge at any time from the Payments tab.
Usage and Results
How does dynamic pricing affect Auto-Recharge?
How does dynamic pricing affect Auto-Recharge?
Auto-Recharge purchases USD credit, not minutes. The number of minutes that credit translates to depends on your current pricing rate, which is 0.09 for Basic minutes.
What happens if my payment method fails during an Auto-Recharge?
What happens if my payment method fails during an Auto-Recharge?
You’ll receive an error notification and your account may be paused until the issue is resolved. Make sure your payment details are always up to date.
Is Auto-Recharge available for all users?
Is Auto-Recharge available for all users?
Yes. Agencies, subaccounts, and regular users can all use Auto-Recharge to automate credit purchases.
Can agencies manage Auto-Recharge for subaccounts?
Can agencies manage Auto-Recharge for subaccounts?
No. Subaccounts must configure Auto-Recharge themselves. Agencies can monitor usage but cannot enforce recharge settings directly.
For additional questions or guidance, try using our Virtual Support Agent! Available 24/7 to help resolve most issues quickly at thinkrr.ai/support. If you still need assistance, visit our support site at help.thinkrr.ai and submit a Ticket or contact our team directly at hello@thinkrr.ai.