Overview
The Inbound Agent Call trigger activates whenever your thinkrr-powered receptionist receives and completes a call.
Once the call ends, this trigger can run a workflow in GoHighLevel (GHL) or thinkrr CRM to check if the caller already exists, update their contact information, or create a new contact record entirely. This trigger is essential for teams using thinkrr to handle inbound calls for sales, scheduling, or support. It lets you automatically log every call, map important details (like transcript, sentiment, and summary), and trigger follow-ups instantly.
Trigger Setup
Start by navigating to the Workflow Builder in GHL or thinkrr CRM.Create a new workflow and choose the Inbound Agent Call trigger from the thinkrr Voice AI category. Once added, you can specify which inbound agent(s) this trigger should listen to:
- Select a specific agent if you want the workflow to fire only for that agent.
- Leave the field blank if you want the trigger to apply to all inbound agents.
Filtering by Call Status
You can add filters so your workflow only continues for certain call outcomes. Example:- Meeting Booked
- Call Completed
Inbound Agent Call data.Enter the exact status value (these are case-sensitive).
⚠️ Be sure to match the value exactly — e.g., “Meeting Booked,” not “meeting booked” or “MeetingBooked.”
Finding the Contact
Next, determine whether the caller already exists in your CRM.- Add a Find Contact step.
- Click the tag icon next to the phone number input.
- Go to
thinkrr Voice AI → Inbound Agent Call (beta). - Select the thinkrr Phone Number field.
If the Contact Is Found
If a match is found, you can now update their existing record with new details from the call.To update the contact:
- Click the plus icon (+) to add a new action.
- Choose Update Contact Field.
- Inside the action, click Add Field.
- Select the field you want to update — for example:
NamePhoneEmailTime ZoneTranscriptRecording URLCall SummaryCall Sentiment
- Click the tag icon → navigate to
thinkrr Voice AI → Inbound Agent Call (beta)→ and select the corresponding variable.
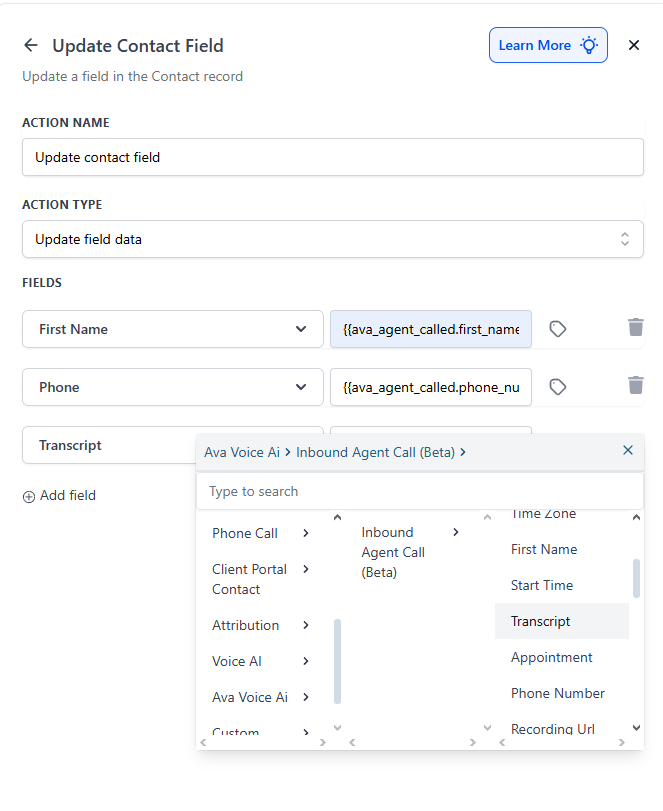
💡 Tip: You can also add a Create Note step if you want the transcript or call summary to appear in the activity log in addition to or outside the contact fields.

If the Contact Is Not Found
If no existing contact is found, thinkrr provides two possible phone number fields — only one will contain data:- thinkrr Phone Number
- New Contact Phone Number
⚠️ thinkrr returns one or the other depending on the call. You’ll need to check which one contains a value before continuing.
Recommended logic:
- Add an If/Else Conditional step.
- If thinkrr Phone Number has a value:
- Use it to search for a contact again.
- If still no match, continue to Create Contact.
- If thinkrr Phone Number is empty:
- Use New Contact Phone Number instead.
- If still no match, continue to Create Contact.
Creating a New Contact
If no match is found after your conditionals, you can create a new contact and map all inbound call data directly into its fields.- Add a Create Contact action.
- Inside the action, click Add Field.
- For each field you want to capture:
- Click Add Field
- Select the desired field (e.g.,
First Name,Email,Time Zone, etc.) - Click the tag icon, go to
thinkrr Voice AI → Inbound Agent Call (beta), and select the matching variable.
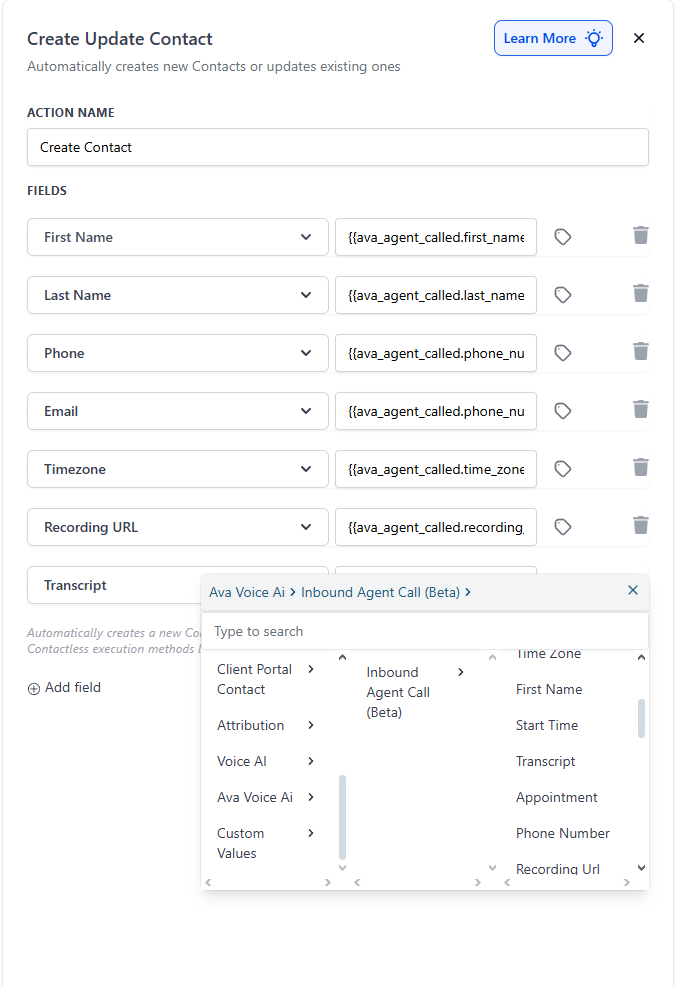
Commonly mapped fields:
- First Name
- Last Name
- Phone
- Time Zone
- Transcript
- Recording URL
- Call Summary
- Call Sentiment
💡 The mapping process is identical to “Update Contact Field.” The only difference is the action you add — “Create Contact” instead of “Update Contact Field.”
FAQs & Troubleshooting
General Questions
When does this trigger activate?
When does this trigger activate?
The Inbound Agent Call trigger activates after the inbound call ends. It does not run while the call is still in progress.
Do I need to specify a particular agent?
Do I need to specify a particular agent?
No. You can leave the agent field blank to trigger for all inbound agents. But if you want different workflows for different agents, you can select specific ones.
Can I use call status filters?
Can I use call status filters?
Yes. Add an If/Else Conditional using the Call Status field. This lets you define logic for different call outcomes, like “Meeting Booked” vs “Voicemail.”
Configuration
Which phone field should I use to find the contact?
Which phone field should I use to find the contact?
Start with thinkrr Phone Number. If it’s empty, fall back to New Contact Phone Number — only one will contain data per call.
How do I map transcript, summary, or recording data?
How do I map transcript, summary, or recording data?
Use either Update Contact Field or Create Contact, depending on the case. Inside the action, click Add Field, select the field you want to update, then click the tag icon and choose the corresponding value from
thinkrr Voice AI → Inbound Agent Call (beta).What if the contact doesn’t exist?
What if the contact doesn’t exist?
Add logic to create a new contact with mapped data. Use whichever phone number field has data, then include values like name, email, transcript, and sentiment so the new record is complete.
Usage and Results
Can I use this trigger to route leads?
Can I use this trigger to route leads?
Yes. You can assign leads based on who they spoke with, call type, or call sentiment. Combine with tags or conditional logic to automate routing.
What’s the best way to handle voicemail or missed calls?
What’s the best way to handle voicemail or missed calls?
Use call status filtering. If a call ends as “Voicemail” or “Incomplete,” you can tag the contact or route it to a follow-up sequence automatically.
Is mapping the time zone field necessary?
Is mapping the time zone field necessary?
It’s optional but strongly recommended. Mapping the time zone helps ensure all future automations (like outbound calls or meeting invites) happen at the right time for the lead.
For additional questions or support, use the Virtual Support Agent at thinkrr.ai/support — available 24/7.
If you still need help, visit help.thinkrr.ai or contact us at hello@thinkrr.ai.